How do I set up linting, unit, snapshot and visual regression testing?
How do I set up linting, unit, snapshot and visual regression testing?
By Dave Bitter
7 min read
How to build a component library Part 3: Setting up linting, unit, snapshot and visual regression testing.

- Authors

- Name
- Dave Bitter
Part of series
Before adding new components to your component library, you might want to set up some linting and testing tools. This ensures that no unexpected mistakes, inconsistencies and manual labour are required. Let’s have a look at a few tools I think you should always add to your component library. This will not just consist of the the actual tools to run the testing and linting, but surrounding tools to help automate the chores even more and take work off your hands.
How do I set up linting?
Generally, there are a few must-have linting tools for me in any (front-end) project. Let’s have a look at a few of my favourite ones:
ESLint
Front-end projects are JavaScript-heavy nowadays. Usually, a better part of the codebase is written in JavaScript (or TypeScript). By far, the most popular tool to lint JavaScript is ESLint. Setting up ESLint is usually pretty straightforward. Head over to the docs to run the setup provided.
We do however want to add a few things. As we are using TypeScript in this project, we want to update the generated eslintrc.js to handle this:
module.exports = {
  env: {
    browser: true,
    es2021: true,
  },
  extends: ['airbnb-base', 'airbnb-typescript/base', 'prettier'],
  parser: '@typescript-eslint/parser',
  parserOptions: {
    ecmaVersion: 12,
    sourceType: 'module',
    project: './tsconfig.json',
  },
  plugins: ['prettier'],
  rules: {
    'prettier/prettier': 'error',
  },
  root: true,
}
As you can see, I added the airbnb-typescipt/base to the extends array. This will give us some basic linting rules for our project. Next to that, I added the @typescript-eslint/parser as the parser value. Finally, in the parser options, I pointed the project to the tsconfig.json file. This tsconfig.json file looks like this:
{
  "compilerOptions": {
    "target": "ES2022",
    "module": "ES2022",
    "lib": ["ES2022", "dom", "dom.iterable"],
    "outDir": "build",
    "sourceMap": true,
    "strict": true,
    "noUnusedLocals": true,
    "noUnusedParameters": true,
    "noImplicitReturns": true,
    "noFallthroughCasesInSwitch": true,
    "moduleResolution": "node",
    "forceConsistentCasingInFileNames": true,
    "esModuleInterop": true
  },
  "exclude": [],
  "overrides": [
    {
      "files": ["*.ts", "*.tsx"],
      "extends": [
        "plugin:@typescript-eslint/recommended",
        "plugin:@typescript-eslint/recommended-requiring-type-checking"
      ],

      "parserOptions": {
        "project": ["./tsconfig.json"] // Specify it only for TypeScript files
      }
    }
  ]
}
This is a fairly basic tsconfig.json. Do note that in the overrides array, I added an entry that points to two plugins for ESLint from the @typescript-eslint package. For now, this is the main configuration I added to start linting the TypeScript files. I’ve added the following NPM script to the root package.json:
"lint:ts": "eslint --fix packages/**/*.ts",
Stylelint
Naturally, as this project is a component library, we’ll write quite some styling. As you have ESLint for JavaScript, you have Stylelint for CSS/LESS/SASS/Styled Components/[insert framework here]. In our demo repository, we use CSS for now, but the setup is pretty similar across the different frameworks. I’ve added a .stylelintrc.json file in the root with the following contents after following the setup docs:
{
  "extends": "stylelint-config-standard",
  "rules": {
    "selector-class-pattern": null
  }
}
This config is fine for now. I’ve added the following NPM script to the root package.json:
"lint:css": "stylelint --fix 'packages/**/*.css'"
Prettier
Now, we have this linting that will warn us in our IDE. As you may have noticed, I passed for both the lint:ts and lint:css NPM script the --fix parameter. This will try to fix any rules that are breaking. So why not do this and more when you save the file? Luckily, we can use Prettier for just that. Prettier can take your existing ESLint and Stylelint configuration to format your code for you. Next to that, you can use Prettier to configure additional automated formatting chores for you. Installing Prettier is pretty straightforward as well. Head over to the docs to get you started. For the autoformatting on saving, you might need to configure your IDE. For VScode for instance, you can go here to see how.
I’ve added the following NPM script to the root package.json:
"format:check": "prettier --write \"**/*.{css,ts,js}\"",
"format:fix": "prettier --write \"**/*.{css,ts,js}\""
Import sorts
Another neat automation I like to add to projects is sorting and grouping imports at the top of files. You can use @trivago/prettier-plugin-sort-imports to do this for you. Simply install the package and update the .prettierrc with your desired configuration:
{
	"useTabs": true,
	"singleQuote": true,
	"trailingComma": "es5",
	"proseWrap": "preserve",
	"printWidth": 100,
	"importOrder": [
		"^lit/?(.*)$",
		"<THIRD_PARTY_MODULES>",
		"^@davebitter/(.*)$",
		"^../(.*)$",
		"^./(?!styles/(.*)$)",
		"^\\./styles/(.*)$"
	],
	"importOrderSeparation": true,
	"importOrderSortSpecifiers": true
}
As you can see, for the demo repository, I want to have all imports related to Lit be at the top, then have a group with all other third-party modules. After that, I want all the private node_modules under the @davebitter scope grouped. Next, I want to have all relative imports in a group. Finally, all imports regarding styling should be grouped. After adding this configuration, you never have to worry about your imports again.
Manypkg
When building a component library as a monorepo, you need to keep internal and external dependencies up-to-date between packages. You could do this manually once in a while, but there is a better way. You can use Manypkg to help you out. In its essence, Manypkg is a linter for package.json files in Yarn, Bolt or pnpm mono-repos. You can use it to automate these chores. Simply run yarn add @manypkg/cli and you can run the following commands in your pre-commit hooks and pipelines:
manypkg check to check whether all package.json files are alphabetically sorted, there are internal and external mismatches between packages, there are invalid dev and peer dependency relationships, invalid package names and more. You can have a look at the checks here.
manypkg fix will run the check and try to automatically resolve the issues it finds. Usually, it’s a wise idea to run this command in your pre-commit hook. That way, your pipeline won’t fail mid-way because of a minor issue.
I’ve added the following NPM scripts to the root package.json:
"manypkg:check": "manypkg check",
"manypkg:fix": "manypkg fix"
How do I set up unit tests?
This section can be an article on its own. Setting up testing in your project can get quite complex. Let’s go over a few basic things I set up for the demo repository.
Jest
Firstly, we need a test runner. By far, one of the most popular ones for JavaScript-based projects is Jest. Head over to their docs to get started. I did however add some custom configuration. Firstly, I updated the jest.config.js to
- support our TypeScript-based project
- use jsdom
- ignore Lit packages as I had some issues
- setup another configuration file for
@testing-libraryfor jsdom - stub our CSS imports.
You can have a look at the configuration file here:
module.exports = {
  preset: 'ts-jest/presets/js-with-babel',
  testEnvironment: 'jsdom',
  transformIgnorePatterns: [
    'node_modules/(?!(testing-library__dom|@open-wc|lit-html|@lit|lit|lit-element|pure-lit|lit-element-state-decoupler)/)',
  ],
  setupFilesAfterEnv: ['<rootDir>/config/tests/testSetup.ts'],
  moduleNameMapper: {
    '^.+\\.(css|less)$': '<rootDir>/config/tests/cssImportStub.ts',
  },
}
Head over to the demo repository to see the contents of the referenced files.
I then added the following NPM scripts to the root package.json:
"test": "jest ./packages",
"test:watch": "yarn test --watch"
Support for Web Components
Great, I can run basic tests which are useful for my utility packages, but now we need to add support for the Web Components. Even though Open Web Components has a specific test runner for this, I want to be able to test my components in Jest using Testing Library. Luckily, Open Web Components offers testing helpers to test your Web Components as well. Simply add the @open-wc/testing-helpers package and test your component:
import { fixture } from '@open-wc/testing-helpers'
import { screen } from 'testing-library__dom'

import Button from '../Button'

describe('Button', () => {
  beforeEach(async () => {
    await fixture(Button({ label: 'test', testId: 'test-button' }))
  })

  it('renders passed label in as text in button', () => {
    expect(screen.getByTestId('test-button')).toHaveTextContent('test')
  })
})
How do I set up snapshot and visual regression testing?
As components in a component library often use other components from the same library, you might change something in one component and have it affect multiple other components. It is wise to set up tests to ensure that all changes are spotted and intended. You can do this with snapshot and visual regression testing. Luckily, as we are using Storybook and already documenting many different combinations and configurations of components, we can make use of two great tools for just this.
Storyshots
Firstly, we can make snapshots of the DOM for every story using Storyshots. With this Storybook addon, we can create a test file called, for example, storyshots.spec.ts which looks like this:
import initStoryshots, { multiSnapshotWithOptions } from '@storybook/addon-storyshots'
import path from 'path'

initStoryshots({
  suite: 'Storyshots',
  framework: 'web-components',
  test: (story) => {
    const fileName = path.resolve(__dirname, story.story.id)
    return multiSnapshotWithOptions()({
      ...story,
      context: { ...story.context, fileName },
    })
  },
})
When running this test, it will go over all Storybook stories and create a snapshot of the DOM. If something changes, the test will fail. If you pass the flag -u when running this test, it will update the locally checked-in snapshots and pass. You can then review these changes (in a merge request). I’ve added the following NPM script to the root package.json:
"test:regression": "jest /.storybook/storyshots.spec.ts"
Storyshots
Its visual counterpart is called Storyshots. Like before, I’ve created a test tile called imageshots.spec.ts with the following content:
import initStoryshots from '@storybook/addon-storyshots'
import { imageSnapshot } from '@storybook/addon-storyshots-puppeteer'
import path from 'path'

initStoryshots({
  suite: 'Imageshots',
  framework: 'web-components',
  test: imageSnapshot({
    storybookUrl: `file://${path.resolve(__dirname, '../storybook-static')}`,
  }),
})
This will do the same as the code snapshots, but using images. This way, you can make sure that any visual changes are correct. I added the following NPM script to the root package.json:
"test:visual-regression": "jest ./.storybook/imageshots.spec.ts"
How do I automate the linting and testing?
Even though you can manually run all these linting and testing scripts, you want to automate this part to help out developers on the project and ensure that the code standard is met. In the next article, we are going to have a look at how to do this in a pipeline, but you don’t want to wait on a pipeline to inform the developer that there is something that needs to be looked at. Much rather, you run your linting and testing before a commit is made. We can do this in a pre-commit hook. To make this easier and smarter, we’ll use Husky.
After installing husky, we update .hsuky/pre-commit to run the lint-staged command:
#!/usr/bin/env sh
. "$(dirname -- "$0")/_/husky.sh"

npx lint-staged
lint-staged
Naturally, we only want to lint needed files and not the entire repository if that’s not needed. Using lint-staged in combination with Husky allows you to, for instance, just lint TypeScript files if there are any TypeScript files staged. After installing lint-staged, I updated the .lintstagedrc file to the following content:
{
	"packages/**/*.{js,ts}": [
		"eslint --cache",
		"jest ./packages"
	],
	"packages/**/*.css}": "stylelint --fix",
	"packages/**/*.{js,ts,css,json,md}": "prettier --write",
	"**/package.json": "manypkg check"
}
Now, when we commit, the linting and testing scripts will run.
How do I set a convention for commit messages?
While we are on the topic of committing, let’s have a quick look at setting a convention for commit messages. Not every developer writes the same way and standards of commit messages.
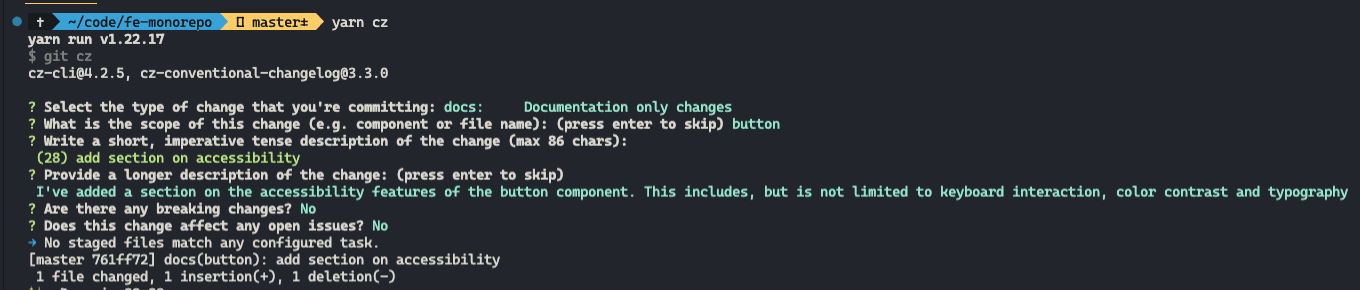
Commitizen
You can help developers with this process using Commitizen. In it’s essence, before committing, it will help you construct a commit message with the Karma commit style. After installing, I’ve added the following NPM script to the root package.json:
"cz": "git cz"
This will then guide you through an interactive CLI:
Looking back
You've set up quite a bit of tooling for the component library. Linting and testing are done automatically and more automations are added.
Next steps
That’s already starting to look like a proper setup for the component library repository. In the next article, we’re going to have a look at how we can automate some linting, testing and publishing tasks in a pipeline.