Getting started with tRPC v10 by building a todo app - Frontend
Getting started with tRPC v10 by building a todo app - Frontend
By Zjerlondy Ferero
11 min read
There's nothing quite like the feeling of finally getting your front-end and back-end types to match up. After hours of slacking, emailing, and going through documentation, you finally have it! But that feeling doesn't last long, because you realize the back-end had some type changes, which broke your front-end again! Well, here is where tRPC comes into play.

- Authors

- Name
- Zjerlondy Ferero
In the previous part of this two-part series, we built the backend of our fullstack Todo mobile application using ExpressJS and tRPC. We looked at several tRPC concepts, such as query procedures, mutation procedures, and request body validation. If you haven't read the previous part yet, I suggest you do so.
In this part of the series, we will showcase the power of tRPC by creating our UI using React Native and connecting it to our backend.
The code for this series can be found on Github.
Getting started
If you have followed the first part of this series, you will already have a project folder containing a client and server folder set up. If not, you can head over to Github and clone the project, and follow along using the part2-starter folder.
Let's take a look inside the client folder of our project. As you can see, the client folder contains a basic React Native project that was generated using the React Native CLI.
Installing our dependencies
Let's get started by using the terminal to navigate to the client directory in our project directory, and install the following dependencies:
cd client && npm install @trpc/client@next @trpc/server@next @trpc/react@next @tanstack/react-query
You might be wondering why we install @trpc/server in the client-side code of our project. This is due to @trpc/server being a peer dependency of @trpc/client, and is therefore required to be installed. Another package we install is @tanstack/react-query. @trpc/react provides a thin wrapper over @tanstack/react-query, therefore it is required as a peer dependency.
React query
If you have never heard (or used) React Query, I'd recommend you take a look at their docs, but in simple terms, React Query is a library that helps you fetch and manage data in your React applications. It makes it easy to fetch data from an API, store it in a local state, and then update your UI when the data changes. Since @trpc/client is a thin wrapper over React Query, we will be utilizing the concepts of React Query quite a lot.
Setting up our tRPC utility
Now that we have installed our dependencies, we can finally start programming! Let's start by creating a tRPC utility which helps us share types between server and client. Head over to the client/src directory, and create a new directory called utils. Within that folder, create a new file called trpc.ts, and add the following code:
import { createTRPCReact } from '@trpc/react'
import type { AppRouter } from '../../../server/src/routers'

export const trpc = createTRPCReact<AppRouter>()
All this file will do, is import our AppRouter type we have defined in our server code, and create a set of strongly-typed React Query hooks. This step is important because this 'ties' the backend to the frontend, making it possible to have end-to-end typing.
Setting up our tRPC providers
Let's head over to the App.tsx file and set it up to match the following code:
// Import React
import React from 'react'
import { Text } from 'react-native'

// Import tRPC dependencies
import { httpLink } from '@trpc/client'
import { QueryClient, QueryClientProvider } from '@tanstack/react-query'

// Import our tRPC utility
import { trpc } from './utils/trpc'

// Define our URL
const API_URL = 'http://localhost:3000/trpc'

const App: React.FC = () => {
  // initialize queryClient & trpcClient
  const [queryClient] = React.useState(() => new QueryClient())
  const [trpcClient] = React.useState(() =>
    trpc.createClient({
      links: [
        httpLink({
          url: API_URL,
        }),
      ],
    })
  )

  // Wrap our main component with providers and pass along the appropriate clients.
  return (
    <trpc.Provider client={trpcClient} queryClient={queryClient}>
      <QueryClientProvider client={queryClient}>
        <Text>Temp</Text>
      </QueryClientProvider>
    </trpc.Provider>
  )
}

export default App
In the code snippet above, we declare an API_URL variable which defines the URL of our endpoint. After that, we initialize React Query's queryClient which is needed for tRPC to run properly. We also define a new trpcClient instance using our trpc utility and pass it our API_URL.
You might be wondering why createClient takes an array of links. This is due to links (in tRPC) being a way to customize the data flow between a tRPC client and server. A link should do one thing, which can be either a self-contained change to a tRPC operation (query, mutation, or subscription) or a side-effect based on the operation (such as logging).
When making a request using the tRPC client, the tRPC client will execute all the links in the order they are added in the links array. In our case, we only pass a httpLink. All that will do is pass our tRPC operation to a tRPC procedure in our backend using HTTP. If you wanted to add logging to gain a better overview of what operations are queries, mutations, or subscriptions, all you would have to do is add tRPC's loggerLink to our links array.
More on links can be found in the tRPC docs.
Lastly, we wrap a temporarily Text component with the trpc.Provider and QueryClientProvider and pass along the corresponding clients.
Creating our first component
Now that we have finished setting up tRPC, we can finally start creating components. Let's start by making a Todo component, which will containerize and tie together all our todo components, such as the form and list.
Head over to the client/src folder and create a new folder components. In that folder, we'll create a new component todo.tsx. The Todo component will, for now, only consist of a title, subtitle, hr, and some basic styling.
import React from 'react'
import { StyleSheet, View, Text, SafeAreaView } from 'react-native'

const Todo: React.FC = () => {
  return (
    <SafeAreaView style={$.flex}>
      <View style={$.container}>
        <Text style={$.title}>My Todos</Text>
        <Text style={$.subTitle}>0 out of 5 todos completed</Text>
        <View style={$.hr} />
      </View>
    </SafeAreaView>
  )
}

const $ = StyleSheet.create({
  container: {
    paddingHorizontal: 35,
    paddingTop: 50,
    flex: 1,
  },
  flex: {
    flex: 1,
  },
  title: {
    fontSize: 40,
    fontWeight: 'bold',
  },
  subTitle: {
    marginTop: 8,
    fontWeight: '500',
    fontSize: 12,
    color: '#a3a3a3',
  },
  hr: {
    height: 3,
    backgroundColor: '#e8e8e8',
    marginVertical: 30,
  },
})

export default Todo
Now, let's jump back to our App.tsx file, and import our newly created Todo component, and also swap our temporarily Text component with the new Todo component.
// client/App.tsx
return (
  <trpc.Provider client={trpcClient} queryClient={queryClient}>
    <QueryClientProvider client={queryClient}>
      // Old (removed)
      <Text>Temp</Text>
      // New
      <Todo />
    </QueryClientProvider>
  </trpc.Provider>
)
Llet's test if everything is working correctly by opening the terminal, and running npx react-native run-ios in our client folder. If all went well, you should have an app that looks something like this:
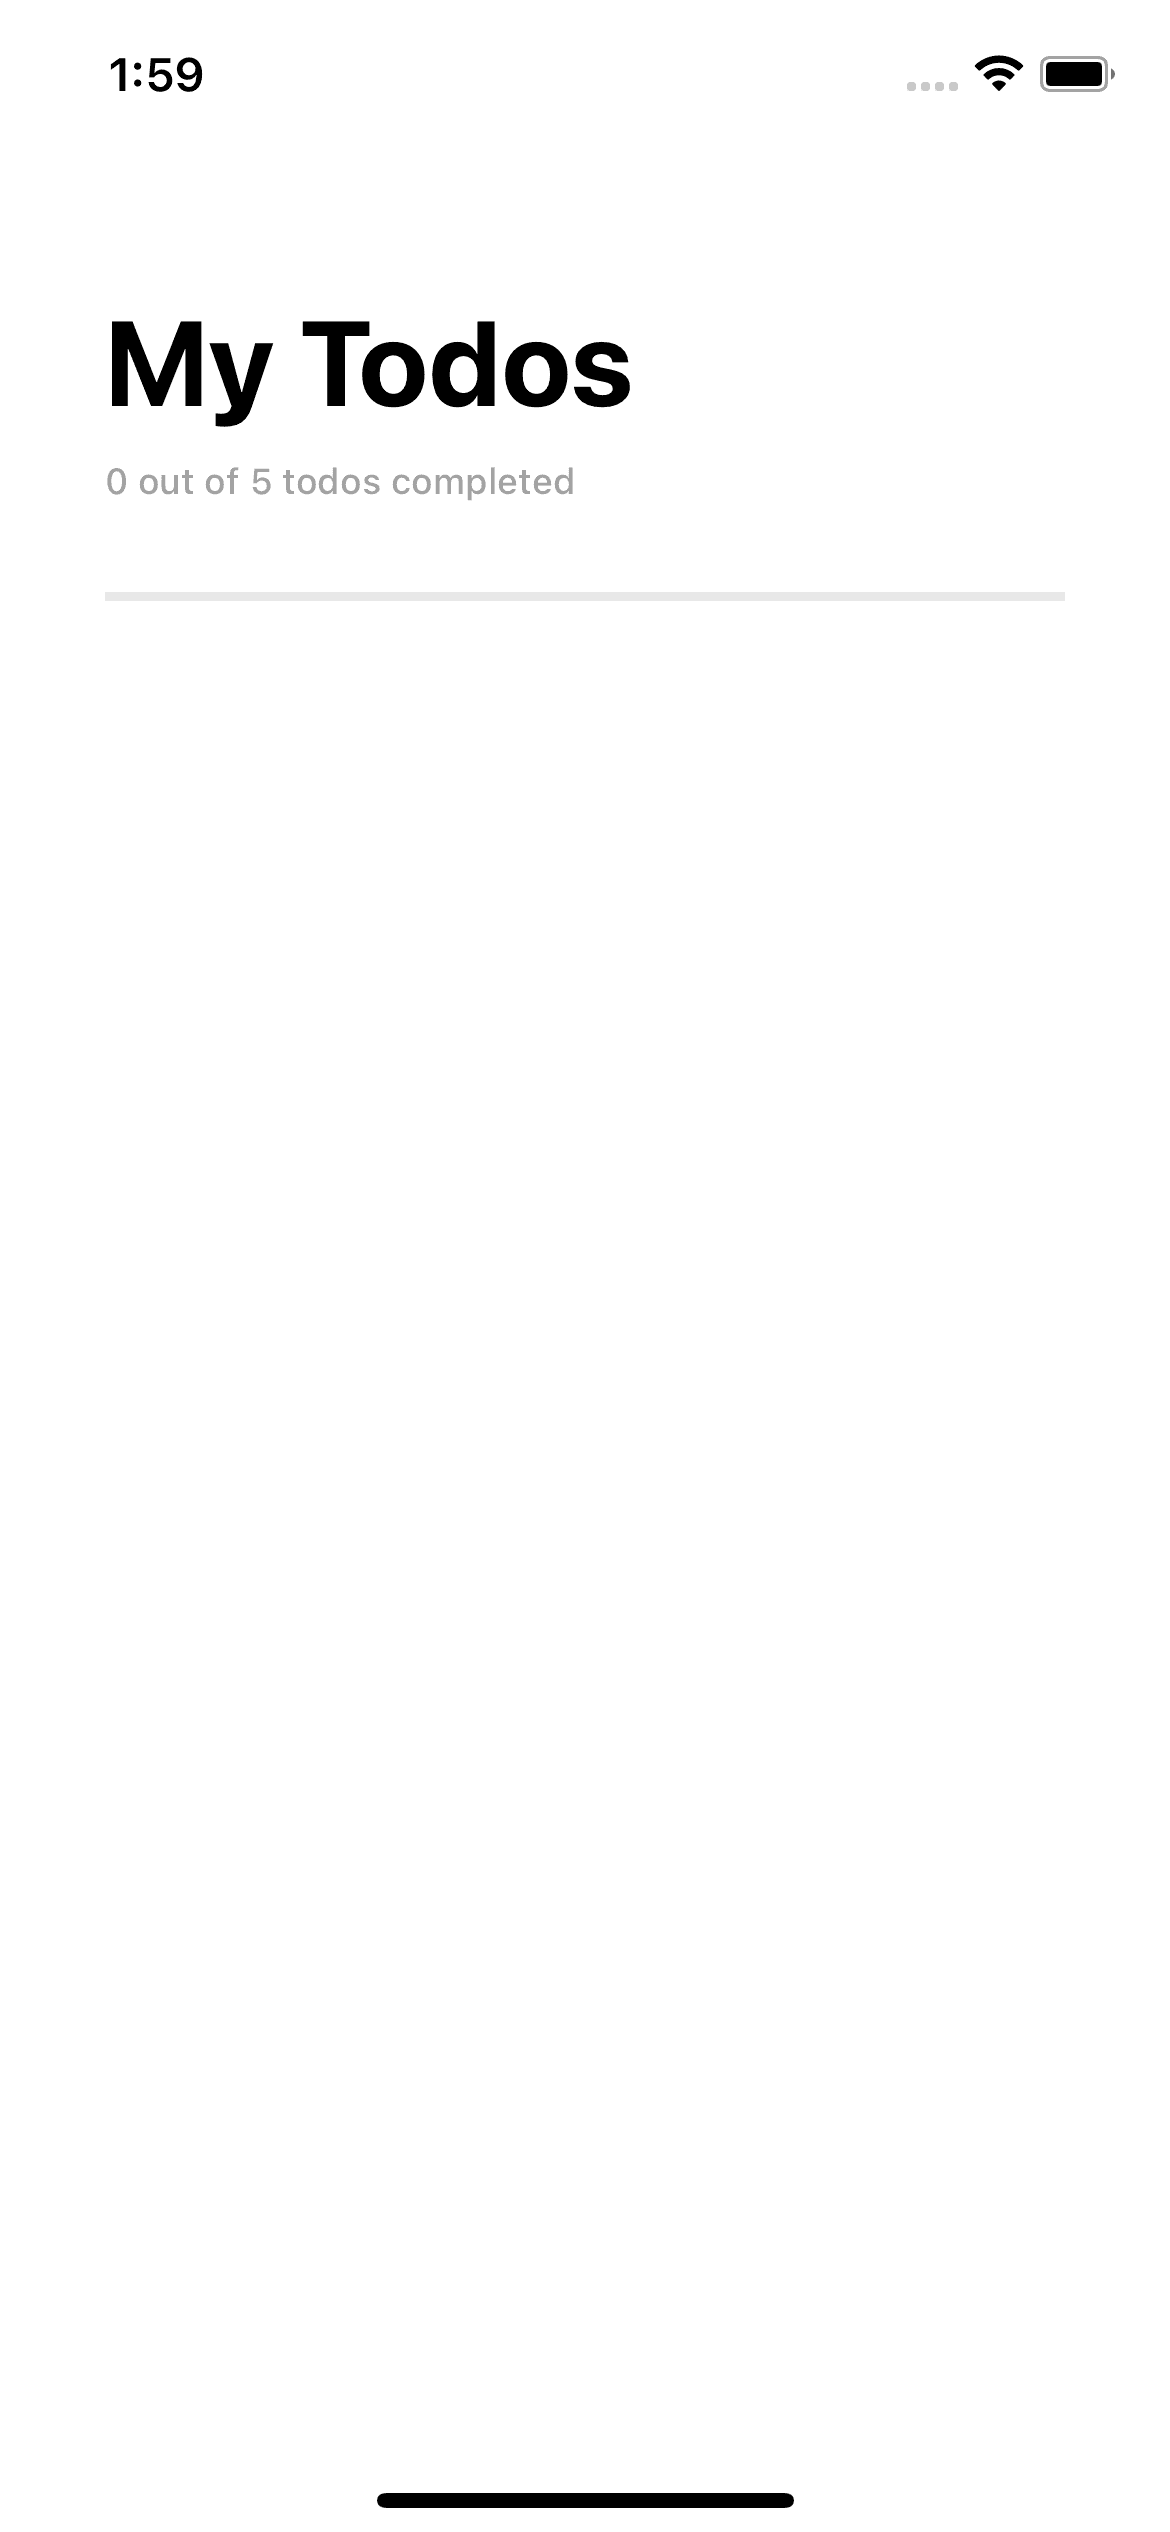
Creating our useTodosQuery hook
To keep our API logic seperated from our components we will be creating seperate hooks responsible for making the API calls. Let's start by creating a useTodosQuery hook which will be responsible for fetching all todos. Start by creating a new folder hooks in the client/src of our project. Within that folder create a new file use-todos-query.ts.
import { trpc } from '../utils/trpc'

const useTodosQuery = () => {
  return trpc.todo.all.useQuery()
}

export default useTodosQuery
I would recommend you type the above-mentioned code out yourself to really see the magic of tRPC. I'll include a small demonstration of the power of tRPC in case you're too lazy (which I know most of you are 😋) to type it out yourself.
The autocomplete and linting is great, isn't it?
You can breakdown the line trpc.todo.all.useQuery(); as followed:
trpc: is our trpc utilitytodo: is the namespace we used on the server when we defined our routerall: is the name of our procedureuseQuery: is React Query'suseQuerybecause we defined theallprocedure in the backend to be a query procedure.
Using the useTodosQuery hook
Let's utilize our newly created useTodosQuery hook. Head over to our Todo component and change the code to match the following code:
import React from 'react'
import { StyleSheet, View, Text, SafeAreaView } from 'react-native'

import useTodosQuery from '../hooks/use-todos-query'

const Todo: React.FC = () => {
  const { data } = useTodosQuery()

  return (
    <SafeAreaView style={$.flex}>
      <View style={$.container}>
        <Text style={$.title}>My Todos</Text>
        <Text style={$.subTitle}>0 out of 5 todos completed</Text>
        <View style={$.hr} />
      </View>
    </SafeAreaView>
  )
}

const $ = StyleSheet.create({
  container: {
    paddingHorizontal: 35,
    paddingTop: 50,
    flex: 1,
  },
  flex: {
    flex: 1,
  },
  title: {
    fontSize: 40,
    fontWeight: 'bold',
  },
  subTitle: {
    marginTop: 8,
    fontWeight: '500',
    fontSize: 12,
    color: '#a3a3a3',
  },
  hr: {
    height: 3,
    backgroundColor: '#e8e8e8',
    marginTop: 30,
  },
})

export default Todo
As you can see, we are simply importing and calling our useTodosQuery hook. We can check if the hook is working properly by logging data. Since we haven't added any todos yet, our data will be an empty array. Considering we are yet to implement the functionality to add todos, we will just use mock data. Head over to our todo router in our server code, and modify the following lines of code:
// old
let todos: Todo[] = []

// new
let todos: Todo[] = [
  {
    id: 1,
    title: 'First todo',
    completed: false,
  },
  {
    id: 2,
    title: 'Second todo',
    completed: false,
  },
  {
    id: 3,
    title: 'third todo',
    completed: false,
  },
]
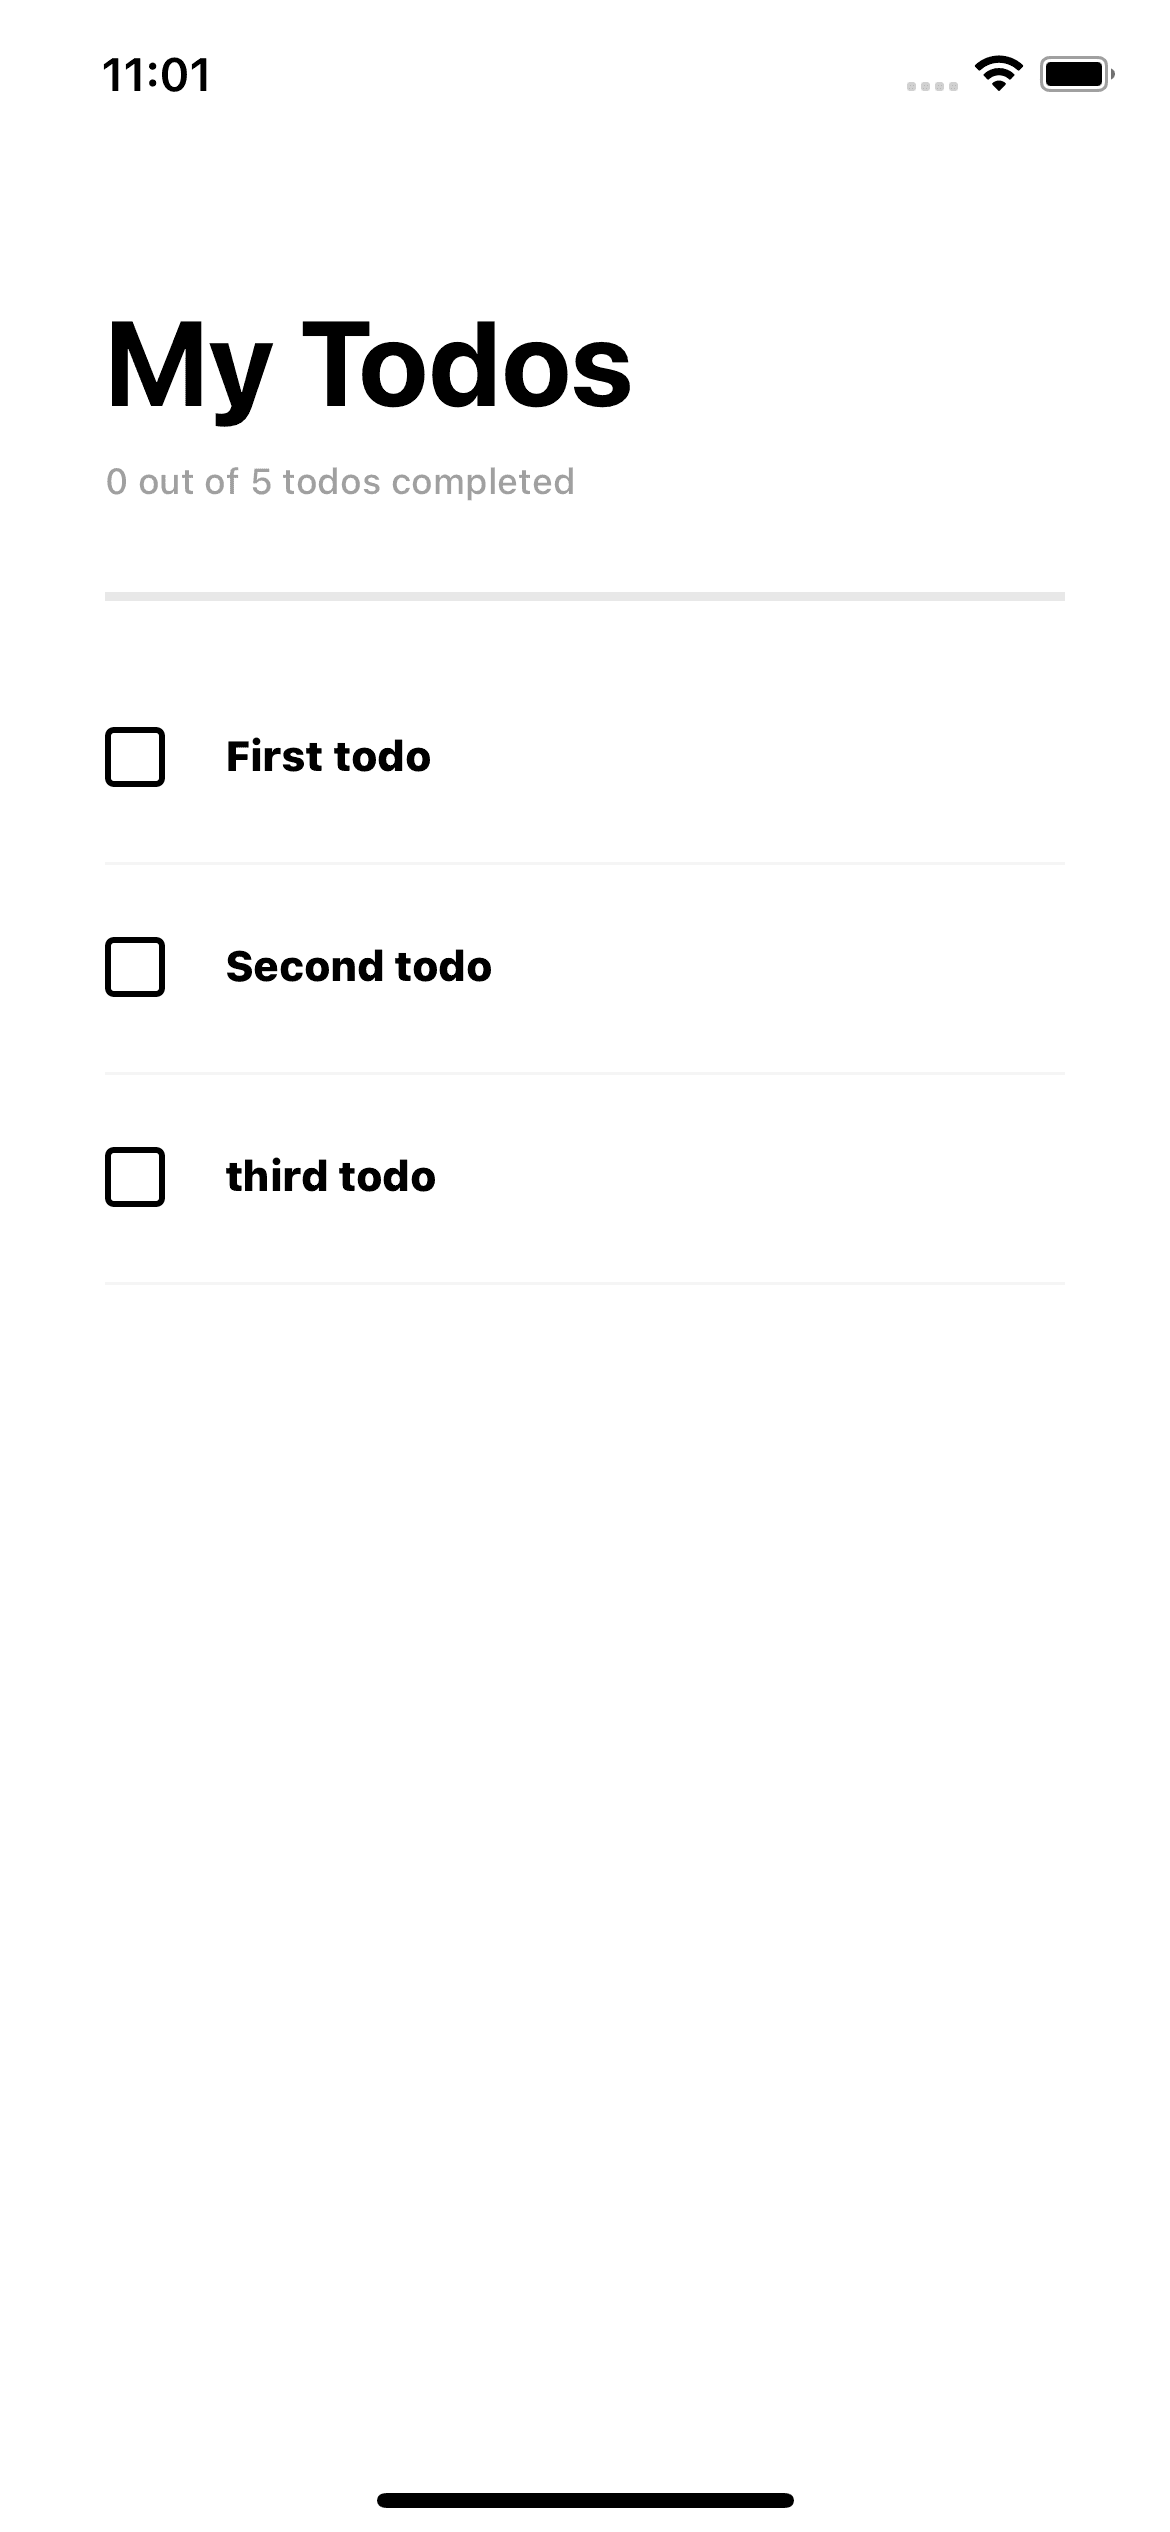
Now if we go back and log our data object, we should receive an array with todos.
Creating our List component
The list component will be responsible for taking in an array of todos as prop, and displaying those todos using a FlatList. Create a new file list.tsx in the src/components/ directory and add the following code:
import React from 'react'
import { FlatList, ListRenderItem, Text, StyleSheet } from 'react-native'

import { Todo } from '../../../server/src/models/todo'

type Props = {
  todos?: Todo[]
}

const List: React.FC<Props> = ({ todos }) => {
  const renderTodoItem: ListRenderItem<Todo> = ({ item }) => {
    return <Text>{item.title}</Text>
  }

  return (
    <FlatList
      keyExtractor={({ id }) => String(id)}
      contentContainerStyle={styles.container}
      data={todos}
      renderItem={renderTodoItem}
    />
  )
}

const styles = StyleSheet.create({
  container: {
    paddingTop: 30,
  },
})

export default List
I don't think this component requires much of an explanation, as it's pretty straightforward. You might have noticed that we import our Todo type from our server. This is done because we want to utilize the same todo schema we created on our backend on the frontend.
Creating our TodoItem component
Instead of rendering a Text component, we will be creating a new TodoItem component which will render the todos items. Let's create a new file todo-item.tsx in the src/components/ folder of our project. Add the following code:
import React from 'react'
import { View, Text, StyleSheet, Pressable } from 'react-native'

import { Todo } from '../../../server/src/models/todo'

type Props = {
  todo: Todo
}

const TodoItem: React.FC<Props> = ({ todo }) => {
  return (
    <Pressable style={({ pressed }) => [styles.container, pressed && styles.pressed]}>
      <View style={styles.innerContainer}>
        <View style={[styles.checkbox, todo.completed && styles.checkboxCompleted]}>
          <Text style={styles.icon}>✓</Text>
        </View>
        <Text style={[styles.todo, todo.completed && styles.todoCompleted]}>{todo.title}</Text>
      </View>
      <View style={styles.hr} />
    </Pressable>
  )
}

const styles = StyleSheet.create({
  checkbox: {
    borderWidth: 2,
    height: 20,
    width: 20,
    borderRadius: 3,
    marginRight: 20,
    justifyContent: 'center',
    alignItems: 'center',
  },
  checkboxCompleted: {
    backgroundColor: '#645bb4',
    borderColor: '#645bb4',
  },
  container: {
    marginVertical: 12,
  },
  hr: {
    height: 1,
    backgroundColor: '#f5f5f5',
    marginTop: 25,
  },
  icon: {
    color: 'white',
    fontSize: 10,
    fontWeight: '900',
  },
  innerContainer: {
    flexDirection: 'row',
    alignItems: 'center',
  },
  todo: {
    fontWeight: '800',
  },
  todoCompleted: {
    color: '#645bb4',
    textDecorationLine: 'line-through',
  },
  pressed: {
    opacity: 0.5,
  },
})

export default TodoItem
This component takes in a todo as a prop, and renders that todo with some styling. It also makes use of the completed property on the todo object to conditionally check the checkbox and cross out the title.
Note: we are using React Native's Pressable component without passing an onPress handler. We will do this later.
Let's jump back to our list.tsx file to swap out the Text component with the new TodoItem component.
import React from 'react'
import { FlatList, ListRenderItem, StyleSheet } from 'react-native'

import TodoItem from './todo-item'

import { Todo } from '../../../server/src/models/todo'

type Props = {
  todos?: Todo[]
}

const List: React.FC<Props> = ({ todos }) => {
  const renderTodoItem: ListRenderItem<Todo> = ({ item }) => {
    // Swap Text component to TodoItem
    return <TodoItem todo={item} />
  }

  return (
    <FlatList contentContainerStyle={styles.container} data={todos} renderItem={renderTodoItem} />
  )
}

const styles = StyleSheet.create({
  container: {
    paddingTop: 30,
  },
})

export default List
Now also jump to our todo.tsx file to update our render method to make use of our List component.
return (
  <SafeAreaView style={$.flex}>
    <View style={$.container}>
      <Text style={$.title}>My Todos</Text>
      <Text style={$.subTitle}>0 out of 5 todos completed</Text>
      <View style={$.hr} />
      // Add this
      <List todos={data} />
    </View>
  </SafeAreaView>
)
Your app should look something like this:
Creating our update and delete todo mutations hooks
Now that we can view our todos, let's add the ability to mark them as complete and/or delete them.
Creating our useDeleteTodoMutation and useUpdateTodoMutation hooks
Start by creating two new files, use-delete-todo-mutation.ts and use-update-todo-mutation.ts in our components/hooks folder. These files will be almost identical. use-update-todo-mutation.ts will have the following content:
import { trpc } from '../utils/trpc'

const useUpdateTodoMutation = () => {
  const utils = trpc.useContext()

  return trpc.todo.update.useMutation({
    onSuccess: () => {
      utils.todo.all.invalidate()
    },
  })
}

export default useUpdateTodoMutation
When used, this hook will simply execute our todo.update mutation procedure. You might have noted that we make use of query invalidation. This is a React Query feature, which makes it possible to refetch data for a given query. In our case, we tell tRPC to refetch our todo.all procedure after the todo.update procedure has been run successfully (HTTP 2xx status codes), thus making the todos re-render.
Our use-delete-todo-mutation.tsx will be similar. The only change we will be applying is that instead of hitting the todo.update procedure, we will be hitting todo.delete mutation.
import { trpc } from '../utils/trpc'

const useDeleteTodoMutation = () => {
  const utils = trpc.useContext()

  return trpc.todo.delete.useMutation({
    onSuccess() {
      utils.todo.all.invalidate()
    },
  })
}

export default useDeleteTodoMutation
Easy enough, right?
Using our update and delete mutation
Let's jump back to our Todo component and use our new hooks. Update our Todo component to match the following code:
import React from 'react'
import { StyleSheet, View, Text, SafeAreaView } from 'react-native'

import { Todo as TodoType } from '../../../server/src/models/todo'

import useDeleteTodoMutation from '../hooks/use-delete-todo-mutation'
import useUpdateTodoMutation from '../hooks/use-update-todo-mutation'
import useTodosQuery from '../hooks/use-todos-query'

import List from './list'

const Todo: React.FC = () => {
  const { data } = useTodosQuery()

  const updateMutation = useUpdateTodoMutation()
  const deleteMutation = useDeleteTodoMutation()

  const handleMarkTodo = ({ id, completed }: TodoType) => {
    updateMutation.mutate({
      id,
      completed: !completed,
    })
  }

  const handleDeleteTodo = ({ id }: TodoType) => {
    deleteMutation.mutate({ id })
  }

  return (
    <SafeAreaView style={$.flex}>
      <View style={$.container}>
        <Text style={$.title}>My Todos</Text>
        <Text style={$.subTitle}>0 out of 5 todos completed</Text>
        <View style={$.hr} />
        <List todos={data} onMarkTodo={handleMarkTodo} onDeleteTodo={handleDeleteTodo} />
      </View>
    </SafeAreaView>
  )
}

const $ = StyleSheet.create({
  container: {
    paddingHorizontal: 35,
    paddingTop: 50,
    flex: 1,
  },
  flex: {
    flex: 1,
  },
  title: {
    fontSize: 40,
    fontWeight: 'bold',
  },
  subTitle: {
    marginTop: 8,
    fontWeight: '500',
    fontSize: 12,
    color: '#a3a3a3',
  },
  hr: {
    height: 3,
    backgroundColor: '#e8e8e8',
    marginTop: 30,
  },
})

export default Todo
After we import and initialize our hooks, we create handlers that will invoke our mutations function when fired. Lastly, we pass those handlers to our List component. The parameters we pass to our mutate function have to match the input validation schema we have defined for our procedures in the backend. If they don't match, you will receive a linting error, which again showcase the power of tRPC. Awesome, right?
Now, let's alter our List component to take in those handlers and pass them down more layer to our TodoItem.
import React from 'react'
import { FlatList, ListRenderItem, StyleSheet } from 'react-native'

import TodoItem from './todo-item'

import { Todo } from '../../../server/src/models/todo'

type Props = {
  todos?: Todo[]
  /*
    Add these 2 lines
  */
  onMarkTodo: (todo: Todo) => void
  onDeleteTodo: (todo: Todo) => void
}

const List: React.FC<Props> = ({ todos, onMarkTodo, onDeleteTodo }) => {
  const renderTodoItem: ListRenderItem<Todo> = ({ item }) => {
    return (
      <TodoItem
        todo={item}
        // Pass down to TodoItem
        onMarkTodo={onMarkTodo}
        onDeleteTodo={onDeleteTodo}
      />
    )
  }

  return (
    <FlatList
      keyExtractor={({ id }) => String(id)}
      contentContainerStyle={styles.container}
      data={todos}
      renderItem={renderTodoItem}
    />
  )
}

const styles = StyleSheet.create({
  container: {
    paddingTop: 30,
  },
})

export default List
Let's also update our TodoItem to also make use of onMarkTodo and onDeleteTodo
import React from 'react'
import { View, Text, StyleSheet, Pressable } from 'react-native'

import { Todo } from '../../../server/src/models/todo'

type Props = {
  todo: Todo
  // Add these again
  onMarkTodo: (todo: Todo) => void
  onDeleteTodo: (todo: Todo) => void
}

const TodoItem: React.FC<Props> = ({ todo, onMarkTodo, onDeleteTodo }) => {
  // Create handlers
  const handlePress = () => {
    onMarkTodo(todo)
  }

  const handlelongPress = () => {
    onDeleteTodo(todo)
  }

  return (
    <Pressable
      // pass handlers to `Pressable`
      onPress={handlePress}
      onLongPress={handlelongPress}
      style={({ pressed }) => [styles.container, pressed && styles.pressed]}
    >
      <View style={styles.innerContainer}>
        <View style={[styles.checkbox, todo.completed && styles.checkboxCompleted]}>
          <Text style={styles.icon}>✓</Text>
        </View>
        <Text style={[styles.todo, todo.completed && styles.todoCompleted]}>{todo.title}</Text>
      </View>
      <View style={styles.hr} />
    </Pressable>
  )
}

const styles = StyleSheet.create({
  checkbox: {
    borderWidth: 2,
    height: 20,
    width: 20,
    borderRadius: 3,
    marginRight: 20,
    justifyContent: 'center',
    alignItems: 'center',
  },
  checkboxCompleted: {
    backgroundColor: '#645bb4',
    borderColor: '#645bb4',
  },
  container: {
    marginVertical: 12,
  },
  hr: {
    height: 1,
    backgroundColor: '#f5f5f5',
    marginTop: 25,
  },
  icon: {
    color: 'white',
    fontSize: 10,
    fontWeight: '900',
  },
  innerContainer: {
    flexDirection: 'row',
    alignItems: 'center',
  },
  todo: {
    fontWeight: '800',
  },
  todoCompleted: {
    color: '#645bb4',
    textDecorationLine: 'line-through',
  },
  pressed: {
    opacity: 0.5,
  },
})

export default TodoItem
You should now be able to mark todos as complete by pressing on them, and delete them by pressing and holding on a todo.
[Gif]
Creating our add todo mutation hook
Let's create our last mutation, the add todo mutation. Start by creating a new file, use-add-todo-mutation.tsx, in the src/hooks directory. The use-add-todo-mutation.tsx will have following content:
import { trpc } from '../utils/trpc'

const useAddTodoMutation = () => {
  const utils = trpc.useContext()

  return trpc.todo.add.useMutation({
    onSuccess() {
      utils.todo.all.invalidate()
    },
  })
}

export default useAddTodoMutation
This mutation should be pretty self-explanatory by now, since it's pretty much identical to our remove and update mutations. All it does is invoke our todo.add procedure, and when successfully run, refetch our todos using React Query's invalidate() function.
Creating our floating action button and add todo modal
Users will be able to create todos by pressing on a floating action button which opens a modal where users can enter a todo title. So let's create 3 new components:
FloatingActionButton
Our FloatingActionButton component will be a simple component that takes in an onPress function and renders a simple button in the bottom right corner of our todo app. Let's create a new file in the src/components folder of our app, and add the following code:
import React from 'react'
import { Text, StyleSheet, Pressable } from 'react-native'

type Props = {
  onPress: () => void
}

const FloatingActionButton: React.FC<Props> = ({ onPress }) => {
  return (
    <Pressable
      style={({ pressed }) => [styles.button, pressed && styles.pressed]}
      onPress={onPress}
    >
      <Text style={styles.addIcon}>+</Text>
    </Pressable>
  )
}

const styles = StyleSheet.create({
  button: {
    alignItems: 'center',
    justifyContent: 'center',
    width: 50,
    position: 'absolute',
    bottom: 10,
    right: 40,
    height: 50,
    backgroundColor: '#645bb4',
    borderRadius: 100,
    zIndex: 1,
  },
  addIcon: {
    fontWeight: 'bold',
    fontSize: 20,
    color: 'white',
  },
  pressed: {
    opacity: 0.8,
  },
})

export default CreateTodoModal
AddTodoModal
When the users presses on the FloatingActionButton we will open a modal which allows the user to enter a todo title. Let's creare that modal. Create a new file add-todo-modal.tsx with the following content:
import React from 'react'
import { View, Modal, StyleSheet, Text, TextInput } from 'react-native'

import Button from './button'

type Props = {
  onSubmit: (title: string) => void
  onCancel: () => void
  visible: boolean
}

const AddTodoModal: React.FC<Props> = ({ visible, onSubmit, onCancel }) => {
  const [value, setValue] = React.useState('')

  const handleSubmit = () => {
    onSubmit(value)
  }

  return (
    <Modal animationType="fade" visible={visible} transparent>
      <View style={styles.backdrop}>
        <View style={styles.box}>
          <Text style={styles.title}>Enter Todo</Text>
          <TextInput onChangeText={setValue} style={styles.input} />
          <View style={styles.buttonContainer}>
            <Button onPress={onCancel} secondary title="Cancel" />
            <Button onPress={handleSubmit} title="Submit" />
          </View>
        </View>
      </View>
    </Modal>
  )
}

const styles = StyleSheet.create({
  backdrop: {
    backgroundColor: '#00000095',
    width: '100%',
    height: '100%',
    justifyContent: 'center',
    alignItems: 'center',
  },
  box: {
    width: '80%',
    height: 200,
    backgroundColor: 'white',
    paddingHorizontal: 35,
    paddingTop: 40,
  },
  buttonContainer: {
    flexDirection: 'row',
    justifyContent: 'space-between',
  },
  input: {
    borderWidth: 1,
    borderColor: 'black',
    marginVertical: 20,
    paddingVertical: 12,
    paddingHorizontal: 10,
  },
  title: {
    fontWeight: '800',
  },
})

export default AddTodoModal
As you can see, we are leveraging React Native's Modal component to create our modal. In this modal, the user can either enter a new todo title and submit it or close the modal by pressing cancel.
(Modal) Button
You may have noted that the AddTodoModal makes use of a custom Button component. This Button component is agian, a simple React Native Pressable that has some styling, and takes in an onPress prop. Here is the code:
import React from 'react'
import { Pressable, StyleSheet, Text } from 'react-native'

type Props = {
  title: string
  onPress: () => void
  secondary?: boolean
}

const Button: React.FC<Props> = ({ title, onPress, secondary = false }) => {
  return (
    <Pressable style={[styles.button, secondary && styles.buttonSecondary]} onPress={onPress}>
      <Text style={[styles.buttonText, secondary && styles.buttonTextSecondary]}>{title}</Text>
    </Pressable>
  )
}

const styles = StyleSheet.create({
  button: {
    backgroundColor: '#645bb4',
    paddingHorizontal: 20,
    paddingVertical: 12,
    flex: 1,
    borderRadius: 3,
    alignItems: 'center',
    marginRight: 5,
  },
  buttonSecondary: {
    backgroundColor: 'white',
    borderColor: '#645bb4',
    borderWidth: 2,
  },
  buttonText: {
    color: 'white',
    fontWeight: 'bold',
  },
  buttonTextSecondary: {
    color: '#645bb4',
  },
})

export default Button
Now that we have created the components, let's put them to use. Go back to the todo.tsx file, and update it to make use of our newly created components.
import React from 'react'
import { StyleSheet, View, Text, SafeAreaView } from 'react-native'

import { Todo as TodoType } from '../../../server/src/models/todo'

import useDeleteTodoMutation from '../hooks/use-delete-todo-mutation'
import useUpdateTodoMutation from '../hooks/use-update-todo-mutation'
import useTodosQuery from '../hooks/use-todos-query'
import useAddTodoMutation from '../hooks/use-add-todo-mutation'

import List from './list'
import FloatingActionButton from './floating-action-button'
import AddTodoModal from './add-todo-modal'

const Todo: React.FC = () => {
  const [isAddTodoModalVisble, setIsAddTodoModalOpen] = React.useState(false)

  const { data } = useTodosQuery()

  const addTodoMutation = useAddTodoMutation()
  const updateMutation = useUpdateTodoMutation()
  const deleteMutation = useDeleteTodoMutation()

  const handleMarkTodo = ({ id, completed }: TodoType) => {
    updateMutation.mutate({
      id,
      completed: !completed,
    })
  }

  const handleDeleteTodo = ({ id }: TodoType) => {
    deleteMutation.mutate({ id })
  }

  const handleAddTodo = (title: string) => {
    addTodoMutation.mutate({ title })

    // Close our modal
    setIsAddTodoModalOpen(false)
  }

  const handleOpenAddTodoModal = () => {
    setIsAddTodoModalOpen(true)
  }

  const handleCancelAddTodo = () => {
    setIsAddTodoModalOpen(false)
  }

  return (
    <>
      <AddTodoModal
        visible={isAddTodoModalVisble}
        onSubmit={handleAddTodo}
        onCancel={handleCancelAddTodo}
      />
      <SafeAreaView style={styles.flex}>
        <View style={styles.container}>
          <FloatingActionButton onPress={handleOpenAddTodoModal} />
          <Text style={styles.title}>My Todos</Text>
          <Text style={styles.subTitle}>0 out of 5 todos completed</Text>
          <View style={styles.hr} />
          <List todos={data} onMarkTodo={handleMarkTodo} onDeleteTodo={handleDeleteTodo} />
        </View>
      </SafeAreaView>
    </>
  )
}

const styles = StyleSheet.create({
  container: {
    paddingHorizontal: 35,
    paddingTop: 50,
    flex: 1,
  },
  flex: {
    flex: 1,
  },
  title: {
    fontSize: 40,
    fontWeight: 'bold',
  },
  subTitle: {
    marginTop: 8,
    fontWeight: '500',
    fontSize: 12,
    color: '#a3a3a3',
  },
  hr: {
    height: 3,
    backgroundColor: '#e8e8e8',
    marginTop: 30,
  },
})

export default Todo
As you can see from the provided code snippet, we have added a new isAddTodoModalVisble state to keep track of whether the AddTodoModal should be visible or not. After that, we initialize our useAddTodoMutation hook and create a handleAddTodo handler which will pass the entered title and fire our mutation when a submit has been triggered in the AddTodoModal.
Finishing touches
By now, you should almost have a fully functional Todo Application. Only thing that's left is making our subtitle (x out of x todos completed) dynamic. Let's head back to our todo.tsx and add two new variables:
const todosCompletedCount = data?.filter(x => x.completed).length;const todosCount = data?.length;.
And update our Text subtitle to make use of those variables.
<Text style={styles.subTitle}>
  {todosCompletedCount} out of {todosCount} todos completed
</Text>
Testing our App
Now that we have implemented all our features, it's time to run through the app and test!
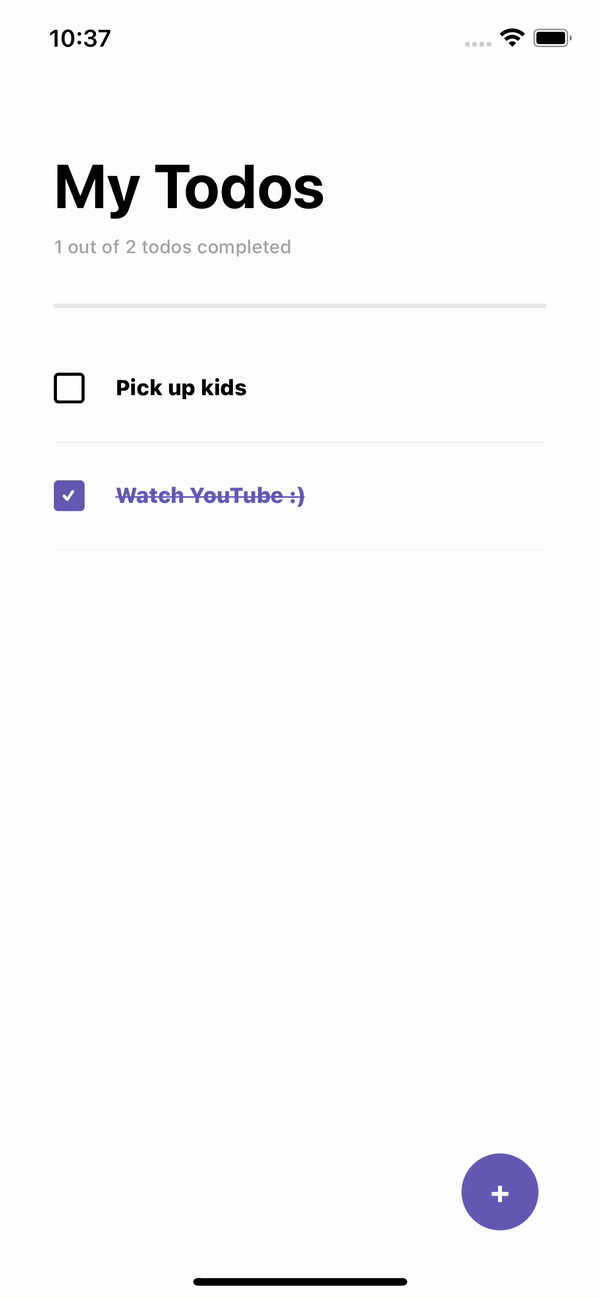
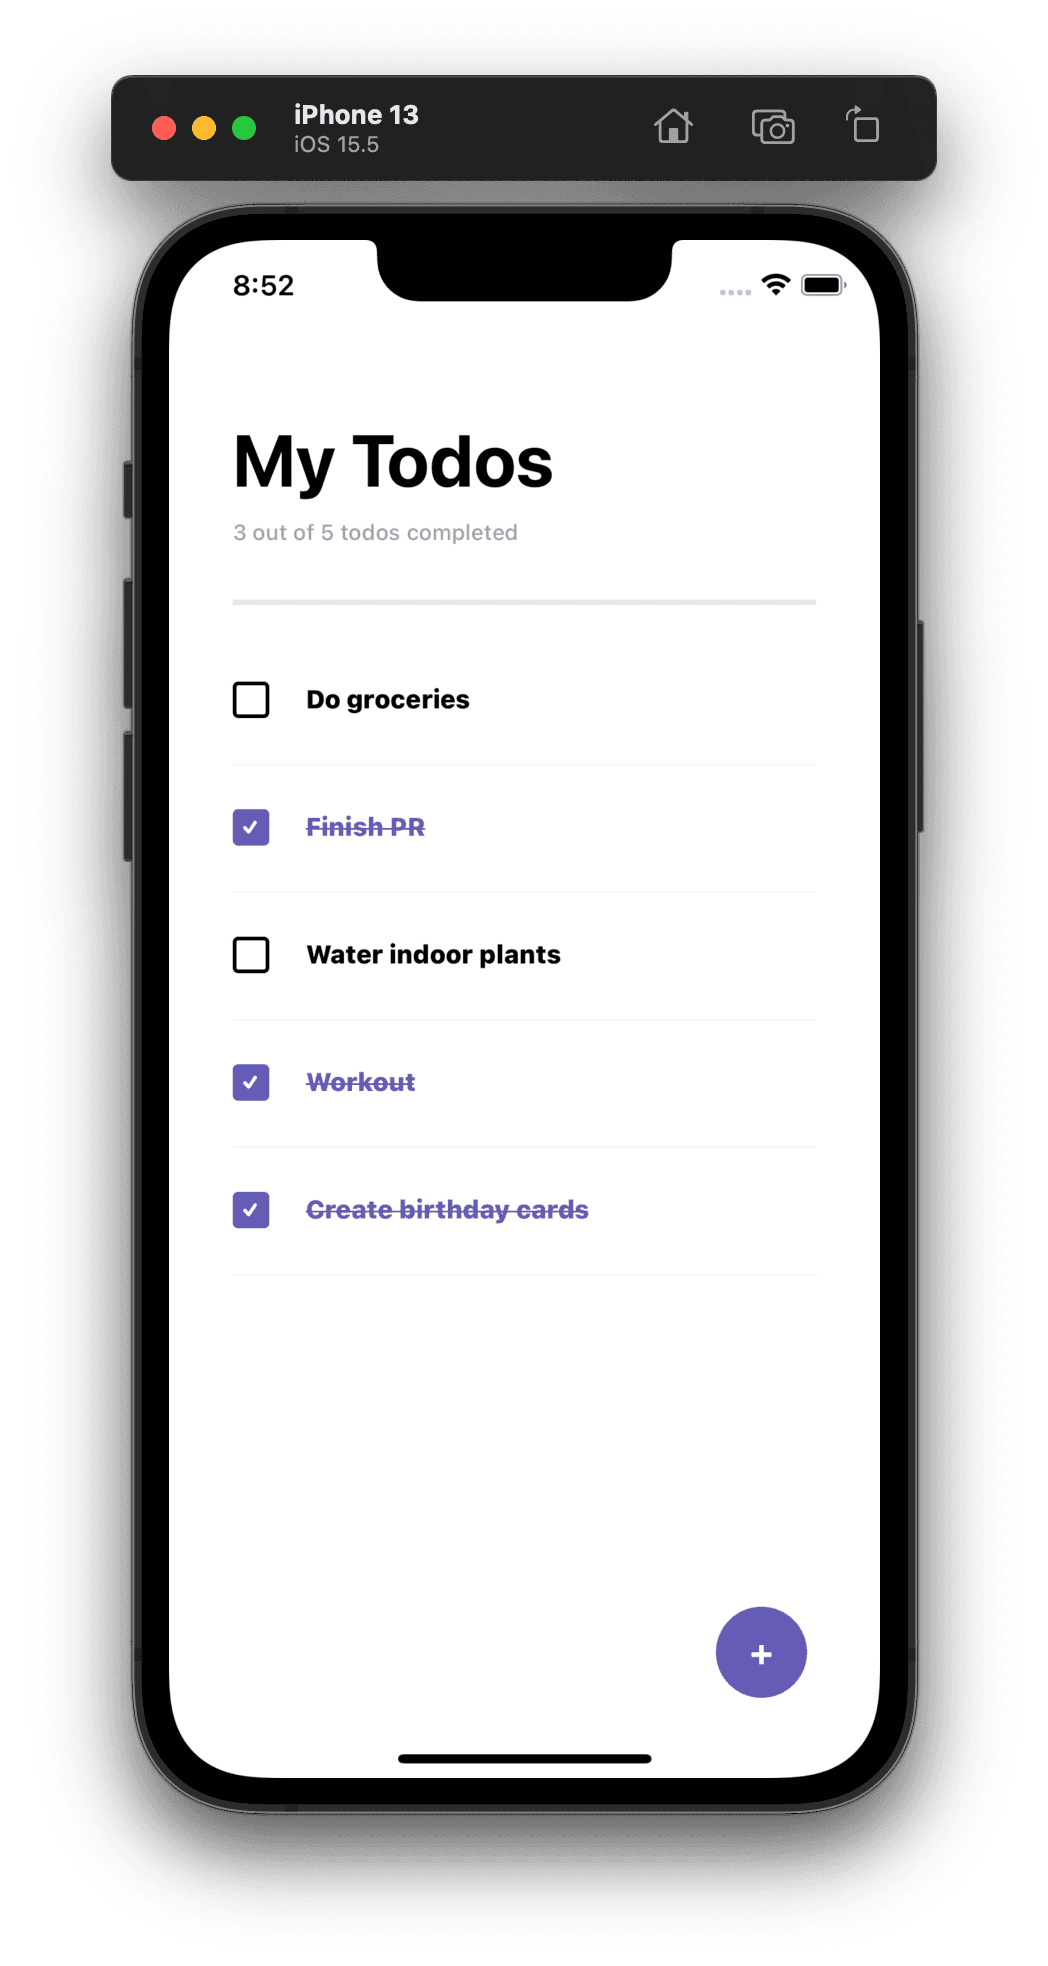
There ya go! An fully functional full stack todo app 🥳
Conclusion
In this two-part series, we looked at what tRPC is by building a full-stack Todo application. tRPC is a library that allows you to set up end-to-end typing, which leads to fewer bugs and a better development experience! tRPC can be used in conjunction with many front-end frameworks such as React, React Native, Vue, and even Svelte! For more information, take a look at the tRPC docs. The code used in this series can be found in this Github repo.
Thank you for reading!