Getting started with tRPC v10 by building a todo app - Backend
Getting started with tRPC v10 by building a todo app - Backend
By Zjerlondy Ferero
10 min read
There's nothing quite like the feeling of finally getting your front-end and back-end types to match up. After hours of slacking, emailing, and going through documentation, you finally have it! But that feeling doesn't last long, because you realize the back-end had some type changes, which broke your front-end again! Well, here is where tRPC comes into play.
- Authors

- Name
- Zjerlondy Ferero
tRPC is a lightweight library that allows you to create fully typesafe APIs without schemas or code generation. It provides end-to-end typing, which means that types can be shared between the server and client(s). This results in fewer bugs and less boilerplate code.
In this two-part series, we'll be building a todo app using tRPC. In the first part, we'll start by creating a backend API using tRPC, and then in the second part, we'll create a (React Native) frontend UI that consumes the API. By the end of this series, you'll have a fully functioning todo app!
Note: at the time this article was written, tRPC v10 was still in beta; therefore, some of the provided code examples might not work anymore.
Prerequisites
- (Minimum) Node v8 installed
- React (Native) development environment
- Basic React (Native) / Typescript knowledge
We won't be focusing on installing and setting up Typescript in this article; therefore, I've created a Github repo with some basic Typescript boilerplate to get us started right away!
Setting up our Express/tRPC backend
We will use tRPC in conjunction with ExpressJS in this article. tRPC is frequently used in conjunction with Next.js, but for this article, I chose ExpressJS to demonstrate tRPC's power in conjunction with ExpressJS. tRPC has a nice ExpressJS adapter that handles some of the tRPC magic for us, thus making setting up our tRPC backend very easy. Even though we use ExpressJS, tRPC can be used in combination with any (Node) backend that supports Typescript.
Installing dependencies
Let's start by using the terminal to navigate to the server directory in our project directory, and install the following dependencies:
cd server && npm install @trpc/server@next zod
As you can see, we install the @trpc/server package, but also a package named Zod. Zod is a library that makes input validation very simple by using schema-based validation. With Zod, tRPC can validate incoming requests against a predefined schema, keeping our handler function clean and free of any unnecessary validation checks. tRPC has out-of-the-box support for different schema validation tools such as Yup and Superstruct.
Initializing tRPC and creating our first router
Let's start by creating a new file called trpc.ts in the server/src/ of our project folder. In the file, add the following code:
import { initTRPC } from '@trpc/server'

export const t = initTRPC.create()
All this file is responsible for is initializing and exporting a tRPC instance.
Now, let's start by creating, arguably, the most important piece of our back-end, the router. Begin by creating a new file called todo.ts in the server/src/routers/ folder of our project folder. In the todo.ts add the following code:
// Import our tRPC instance
import { t } from '../trpc'

// Initalize an empty array where we will be storing our todo's.
// For now, we will use the type `any[]`, but this will be changed later on.
let todos: any[] = []

// Create our todo router, and add a query procedure (equivalent of a REST Get request) called `all`,
// which will be responsible for returning all the stored todo's
export const todoRouter = t.router({
  all: t.procedure.query(() => {
    return todos
  }),
})
We create a tRPC router by calling the router() method and passing an object containing the different endpoints and their procedures as an argument. tRPC knows two procedures:
- Query: Equivalent to a REST
Getcall - Mutation: Used for creating, updating, and deleting data. Equivalent to the REST
POST,PATCH,PUT, andDELETEcalls.
In the code snippet above, we are first importing our tRPC instance, and after, that we are creating a todos array which will be used to store our todos. After creating our todo's array, we create our todoRouter which currently has one query procedure called all, which will return all our stored todo's.
Now, let's create a new file, index.ts in the same server/src/routers/ folder of our project, and add the following code:
// Import our tRPC instance
import { t } from '../trpc'

// Import our todo Router
import { todoRouter } from './todo'

// Create an appRouter which will be used to tie together all our different routers
// In our case, we will only have one router, our todo router. This todo router will be exported under the namespace `todo`.
export const appRouter = t.router({
  todo: todoRouter,
})

// Export only the **type** of a router to avoid importing server code on the client
export type AppRouter = typeof appRouter
As you can see, we start again by importing our tRPC instance, followed by importing our todoRouter. After that, we create a new appRouter which will be used to tie together all our different routers. In our case, this will only be our todoRouter, which is exported under the namespace todo.
Namespaces are used to organize our routes. To consume our API in the front-end, you will make use of the namespaces to identify the correct router. For instance, if you wanted to query the todo router, you would write: todo. followed by the procedure name, in our case: todo.all.
Lastly, we export the type AppRouter, so that we can use it later on in the front-end.
Creating our server
Now that we have created our router, we would want to have a way to make calls to that router, so let's start by creating a Express server. In the server/src folder of our project, we will be creating a new file called index.ts which contains the following code:
// Import the tRPC Express Adatper
import * as trpcExpress from '@trpc/server/adapters/express'

// Import Express
import express from 'express'

// Import our App Router
import appRouter from './routers'

// Initialize Express
const app = express()

// Tell Express to parse incoming requests using JSON
app.use(express.json())

// Tell Express to let the tRPC adapter handle all incoming requests to `/trpc`
app.use(
  '/trpc',
  trpcExpress.createExpressMiddleware({
    router: appRouter,
  })
)

// Start the server under the port 3000
app.listen(3000)
If you are familiar with Express, the code above is pretty self-explanatory. First, we start by importing the tRPC Express Adapter, Express and finally our appRouter. After that, we initialize Express, and tell Express to use the express.json() middleware to parse incoming requests to JSON. After that, we instruct Express to route all incoming calls to /trpc through a middleware exported from the trpcExpress.createExpressMiddleware() method. This method takes an option object as an argument. In our case, we only pass our appRouter as an option. So, all incoming requests to /trpc will be handled by our appRouter.
Testing our first endpoint
Now that we have created our server and a simple route, it's time to test! We can do this by simply starting our server, hitting the API, and checking the response.
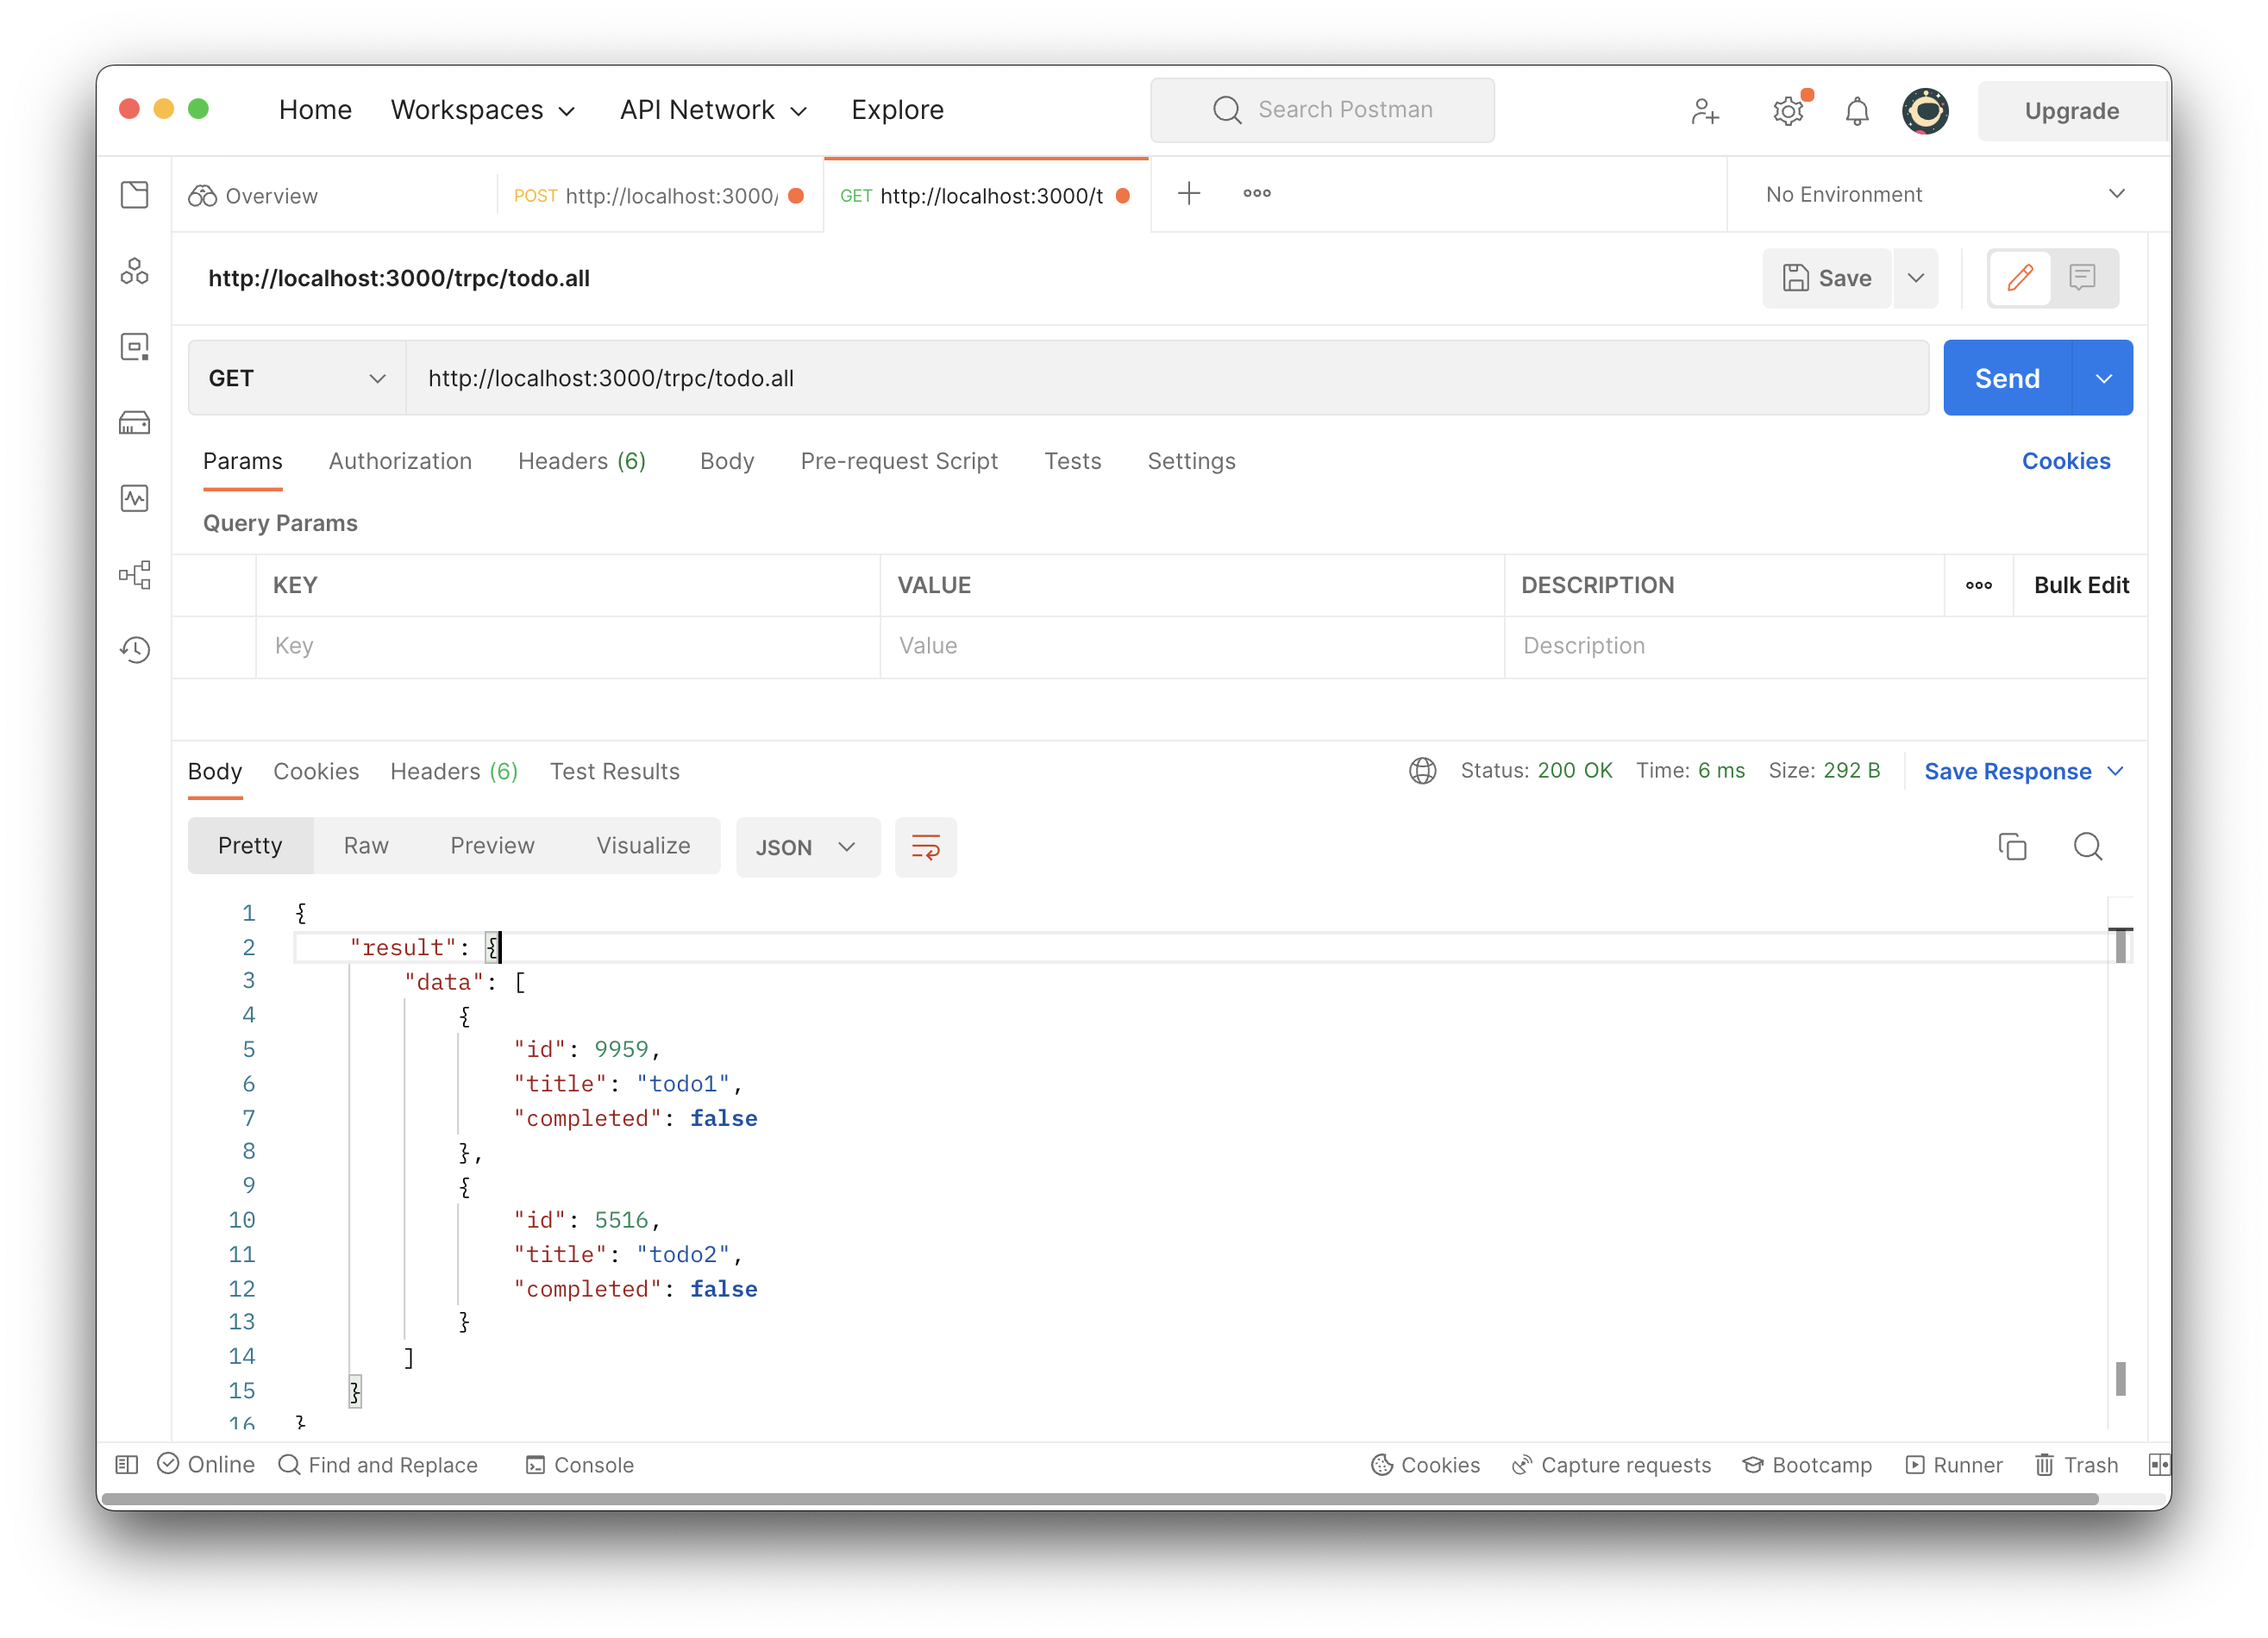
Start by navigating to the project folder in the terminal and running npm run dev. This will start the server on port 3000. Now, open a browser and navigate to http://localhost:3000/trpc/todo.all, which will result in the following JSON response:
{
  "result": {
    "data": []
  }
}
As you can see, we are getting result from the server, but the issue is, the data array is empty. Let's fix that! Let's jump back to our todo.ts file in the server/src/routers directory. If you look at the following line const todos: any[] = [];, you will see that we are initializing todos as an empty array. Let's change that by adding some data: const todos: any[] = ["todo1", "todo2", "todo3"];. Now, go back to your browser and refresh the page. If everything went well, you would see the following response:
{
  "result": {
    "data": ["todo1", "todo2", "todo3"]
  }
}
We have concluded that everything is working fine, but manually altering the todos array is not the way to go, so let's make an API that allows us to create todos!
Creating our first mutation
As mentioned previously, tRPC knows two types of procedures: a query procedure and a mutation procedure. When creating our todo.all procedure, which is responsible for getting data, we used the query procedure.
Let's start by heading back to our todo.ts file in our routers/ directory, and adding a new procedure to our todo router:
export const todoRouter = t.router({
  all: t.procedure.query(() => {
    return todos
  }),
  add: t.procedure.mutation(({ input }) => {
    todos.push(input)

    return todos
  }),
})
As you can see, we added a new mutation procedure called add, and all it's responsible for, is pushing the received input to the todos array and after that, returning the new altered todos array.
Testing our first mutation
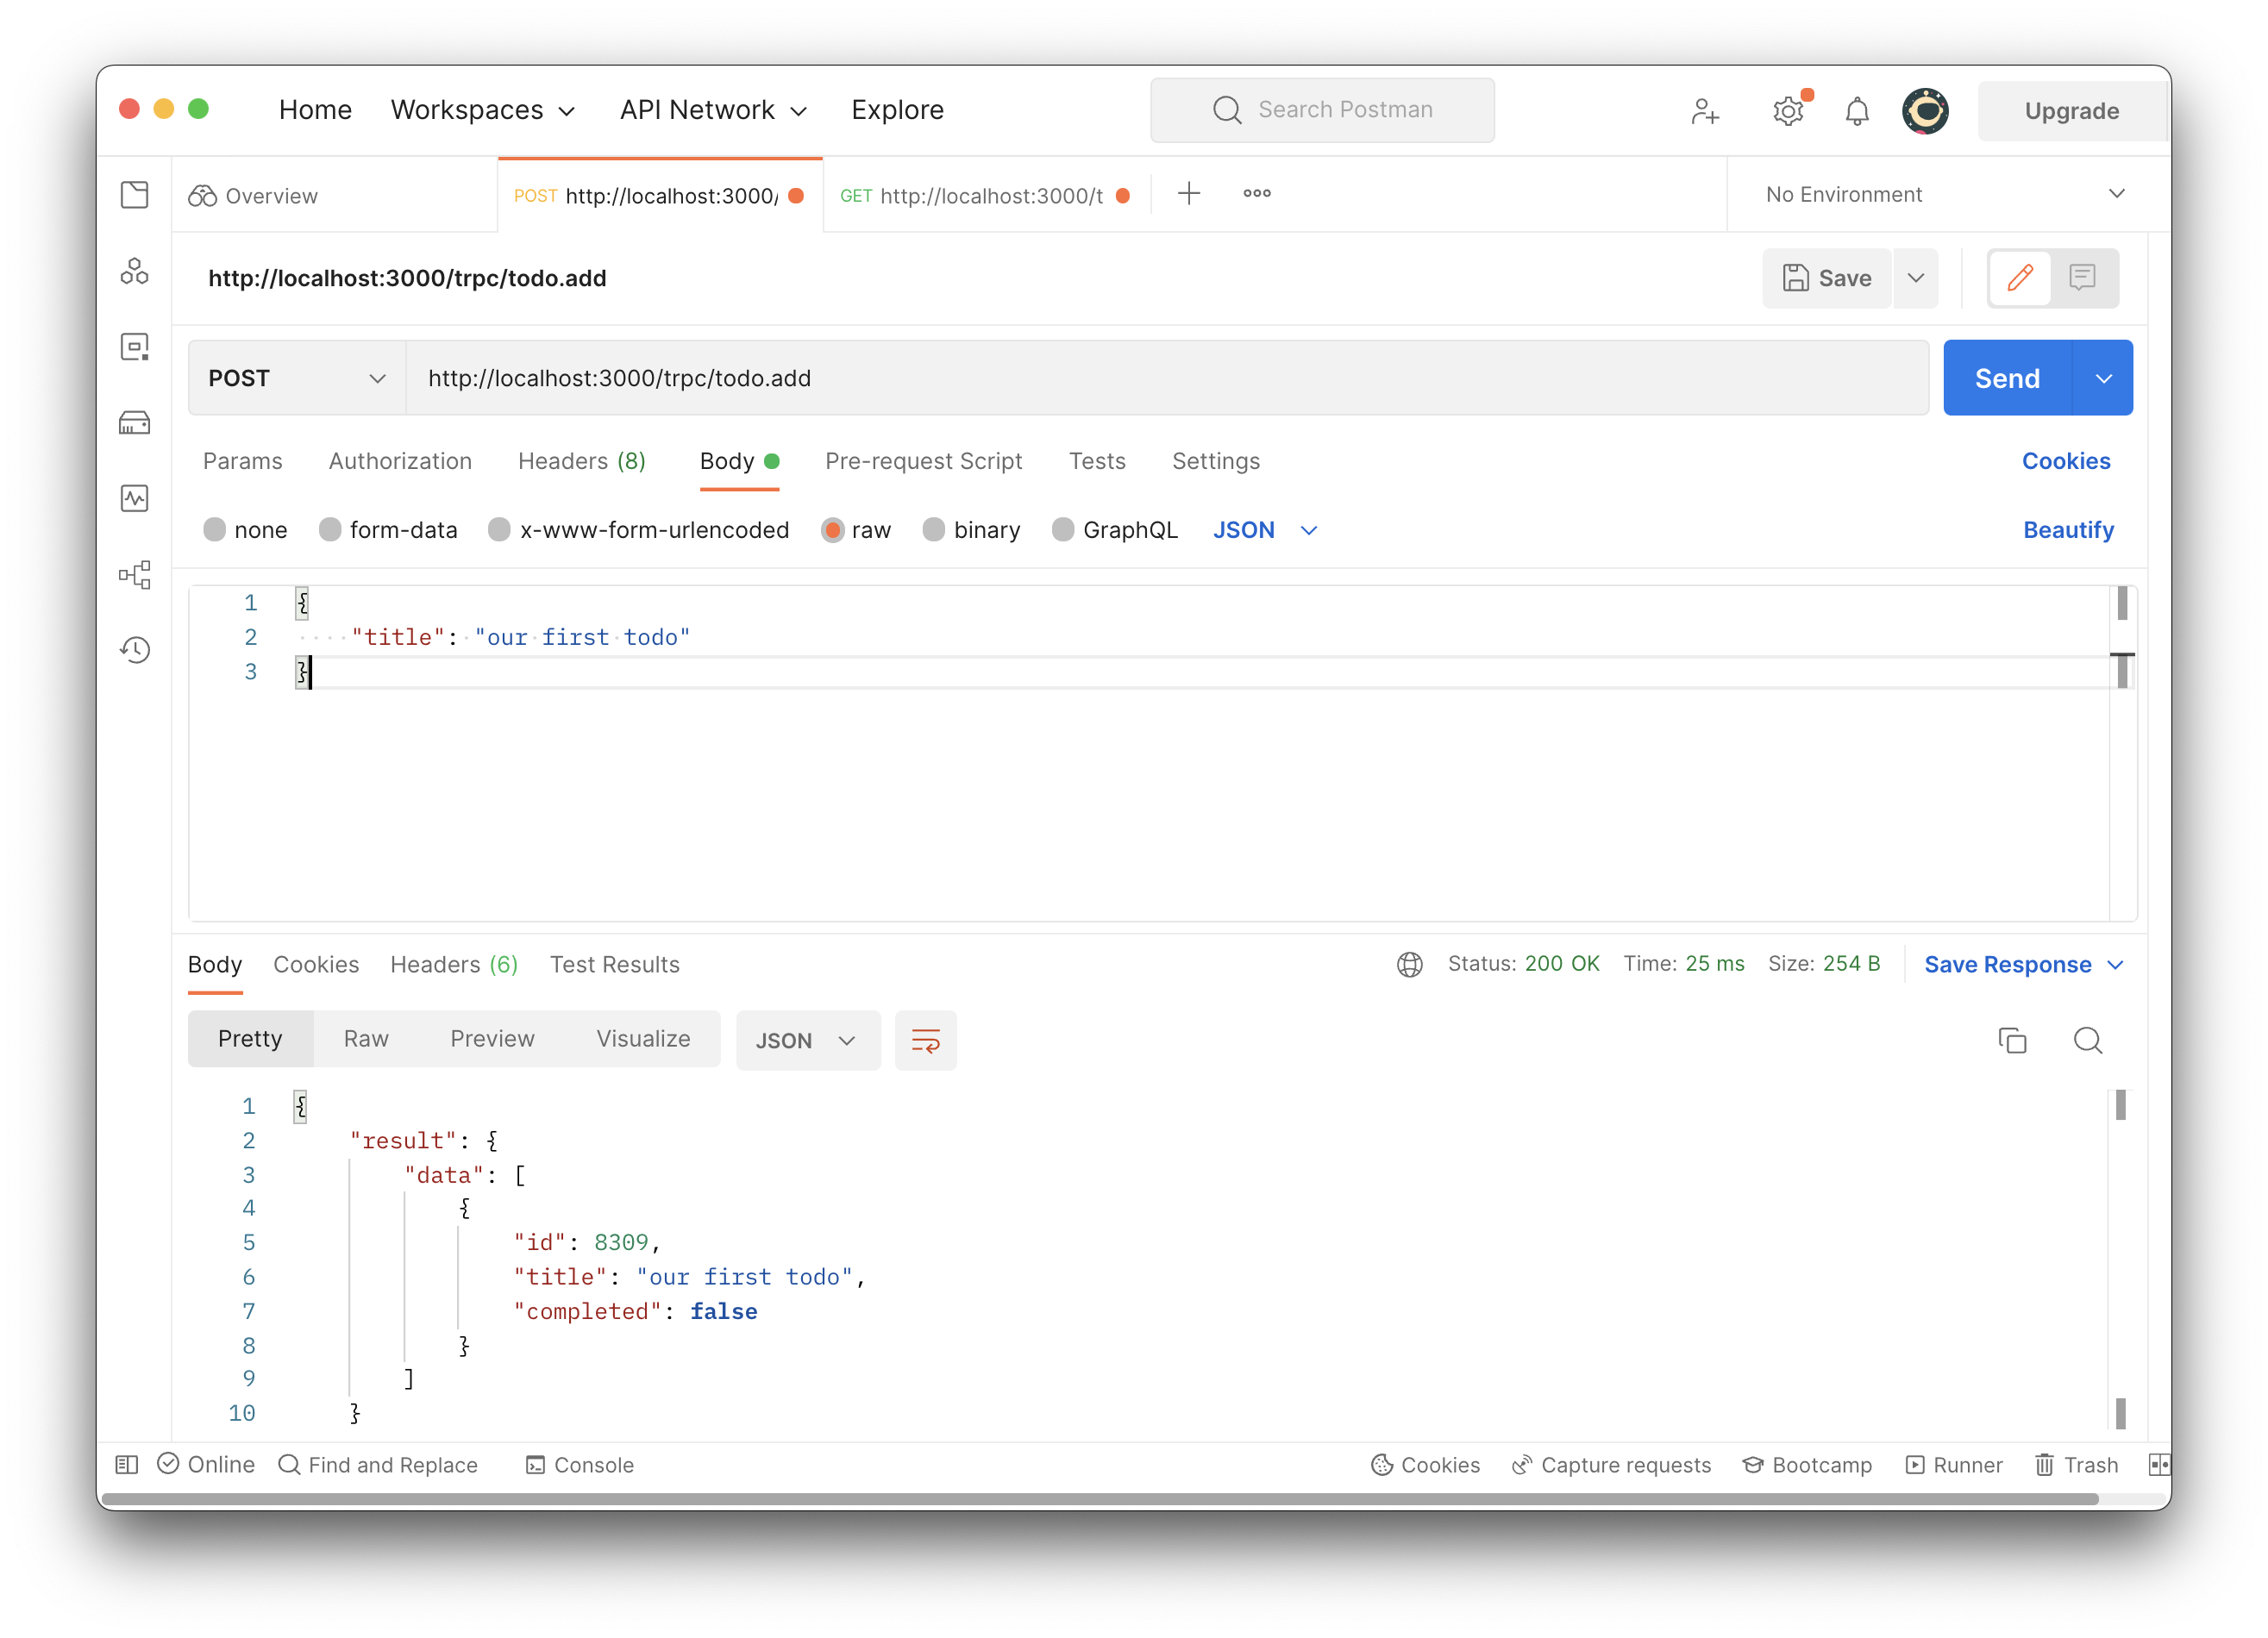
To test if this is working, let's open Postman (or any other API testing tool), and simply hit our new todo.add using the following URL: http://localhost:3000/trpc/todo.add. The request body can simply be:
{
  "title": "our first todo"
}
After hitting our new todo.add endpoint, you should've gotten the following response;
{
  "result": {
    "data": [null]
  }
}
As you can see, it's adding null to our data array. This is happening due to us not specifying to tRPC what the body of our incoming request will look like, and therefore tRPC fails to parse the incoming request into usable data. There are several ways we can fix this, but we will fix this by simply declaring a specific input format for our todo.add procedure. Let's jump back to our todo router file, and modify our code to match the following code:
// Import our input validation tool
import { z } from 'zod'

// Import our tRPC instance
import { t } from '../trpc'

// Initalize an empty array where we will be storing our todo's.
// For now, we will use the type 'any[]', but this will be changed later on.
let todos: any[] = []

// Create our todo router, and add a query (equivalent of a REST Get request) procedure with the name `all`
// Which be responsible for returning all the stored todos
export const todoRouter = t.router({
  all: t.procedure.query(() => {
    return todos
  }),
  add: t.procedure
    .input(
      z.object({
        title: z.string(),
      })
    )
    .mutation(({ input }) => {
      todos.push(input)

      return todos
    }),
})
If you look closely at the add procedure, you will notice we added a new method called input(). This input() method takes an input validation schema that defines what our incoming request body should look like. tRPC supports a handful of input validators, but we have decided to use Zod. If you look closely, you can see that all we are doing is telling tRPC that our request body should exist of an object containing a title that is a string. Let's jump back to Postman and hit our todo.add API again to test this out.
As you can see, the data array is now correctly populated:
{
  "result": {
    "data": [
      {
        "title": "our first todo"
      }
    ]
  }
}
Now let's extend our request body object by adding the extra fields: id and completed. The id field will be used to uniquely identify a todo, and the completed field will be used to mark a todo as completed. To keep our todoRouter function clean and simple, I will be moving the add todo request body validation schema to a separate file. Let's create a new folder, models, in our server's src/ directory. This folder will contain one file called todo.ts. This is where we will define our add todo validation schema.
/* server/src/models/todo.ts */

import { z } from "zod";

// Helper function to generate random id's for our todo's
const generateRandomId = () => {
  return Math.floor(Math.random() * 10000 + 1);
};

// Our todo Schema
export const todoSchema = z.object({
  id: z.number().default(generateRandomId),
  title: z.string()
  completed: z.boolean().default(false),
});

// Create a new Todo type using our todo schema
export type Todo = z.infer<typeof todoSchema>;
In the code snippet above, we are leveraging Zod to create a todoSchema. To get a detailed explanation of Zod, I recommend you look at their documentation.
Take note that we are using Zod's z.infer function to create a new Todo type from our todoSchema. z.infer is a really powerful tool you can use to extract Typescript types from Zod schemas.
Now, jump back to our todo router and modify our input() method to use the newly created todoSchema
/* server/src/routers/todo.ts */

// Import our tRPC instance
import { t } from '../trpc'

// Import our todo Schema
import { todoSchema, Todo } from '../models/todo'

// Initalize an empty array where we will be storing our todo's.
let todos: Todo[] = []

// Create our todo router, and add a query (equivalent of a REST Get request) procedure with the name `all`
// Which be responsible for returning all the stored todos
export const todoRouter = t.router({
  all: t.procedure.query(() => {
    return todos
  }),
  add: t.procedure.input(todoSchema).mutation(({ input }) => {
    todos.push(input)

    return todos
  }),
})
Let's open Postman and test our API:
Since we configured a default value when creating our todo schema with Zod, the id and completed fields will automatically be filled.
Creating our update and delete mutation
Let's continue by creating our update and delete mutations. Our delete mutation will be pretty straightforward. All it will do is take a todo's id as input and, using that id, filter out the correct todo from the todos array. Take a look at the updated todoRouter:
// Import Zod
import { z } from 'zod'

// Import our tRPC instance
import { t } from '../trpc'

// Import our todo Schema
import { todoSchema, Todo } from '../models/todo'

// Initalize an empty array where we will be storing our todo's.
let todos: Todo[] = []

// Create our todo router, and add a query (equivalent of a REST Get request) procedure with the name `all`
// Which be responsible for returning all the stored todos
export const todoRouter = t.router({
  all: t.procedure.query(() => {
    return todos
  }),
  add: t.procedure.input(todoSchema).mutation(({ input }) => {
    todos.push(input)

    return todos
  }),
  delete: t.procedure.input(z.number()).mutation(({ input }) => {
    const filteredTodos = todos.filter((todo) => todo.id !== input)

    todos = [...filteredTodos]

    return todos
  }),
})
Pretty easy, right?
Let's move on to our last mutation, the update todo mutation. First, let's look at the updated code:
// Import trpc
import * as trpc from '@trpc/server'

// Import Zod
import { z } from 'zod'

// Import our tRPC instance
import { t } from '../trpc'

// Import our todo Schema
import { todoSchema, Todo } from '../models/todo'

// Initalize an empty array where we will be storing our todo's.
let todos: Todo[] = []

// Create our todo router, and add a query (equivalent of a REST Get request) procedure with the name `all`
// Which be responsible for returning all the stored todos
export const todoRouter = t.router({
  all: t.procedure.query(() => {
    return todos
  }),
  add: t.procedure.input(todoSchema).mutation(({ input }) => {
    todos.push(input)

    return todos
  }),
  delete: t.procedure.input(z.number()).mutation(({ input }) => {
    const filteredTodos = todos.filter((todo) => todo.id !== input)

    todos = [...filteredTodos]

    return todos
  }),
  update: t.procedure.input(todoSchema.partial()).mutation(({ input }) => {
    const index = todos.findIndex((todo) => todo.id === input.id)
    const todo = todos?.[index]

    if (!todo) {
      throw new trpc.TRPCError({
        code: 'NOT_FOUND',
        message: "Given id doesn't exist",
      })
    }

    todos[index] = {
      ...todo,
      ...input,
    }

    return todos[index]
  }),
})
For the update mutation, we will have the request body be the same as the add todo procedure, but this time we will make all the fields optional using Zod's .partial() helper function. Doing this makes it easy for us to partially update todos.
Another interesting thing to look at is the following code:
if (!todo) {
  throw new trpc.TRPCError({
    code: 'NOT_FOUND',
    message: "Given id doesn't exist",
  })
}
If we can't find a todo that matches the provided id, we throw a TRPCError. The TRPCError is a subclass that makes it possible for us to represent an error that occurred inside a procedure. The code parameter will be mapped to an HTTP Error code. E.g. in our case, NOT_FOUND corresponds to HTTP status 404.
Testing our update and delete mutation
Now that we have implemented all our mutations, we can finally test them. Let's start by adding two new todo's using our API.

Now, let's list them using our todo.all API
Now, let's update one of the todo's

And finally, let's delete one of them
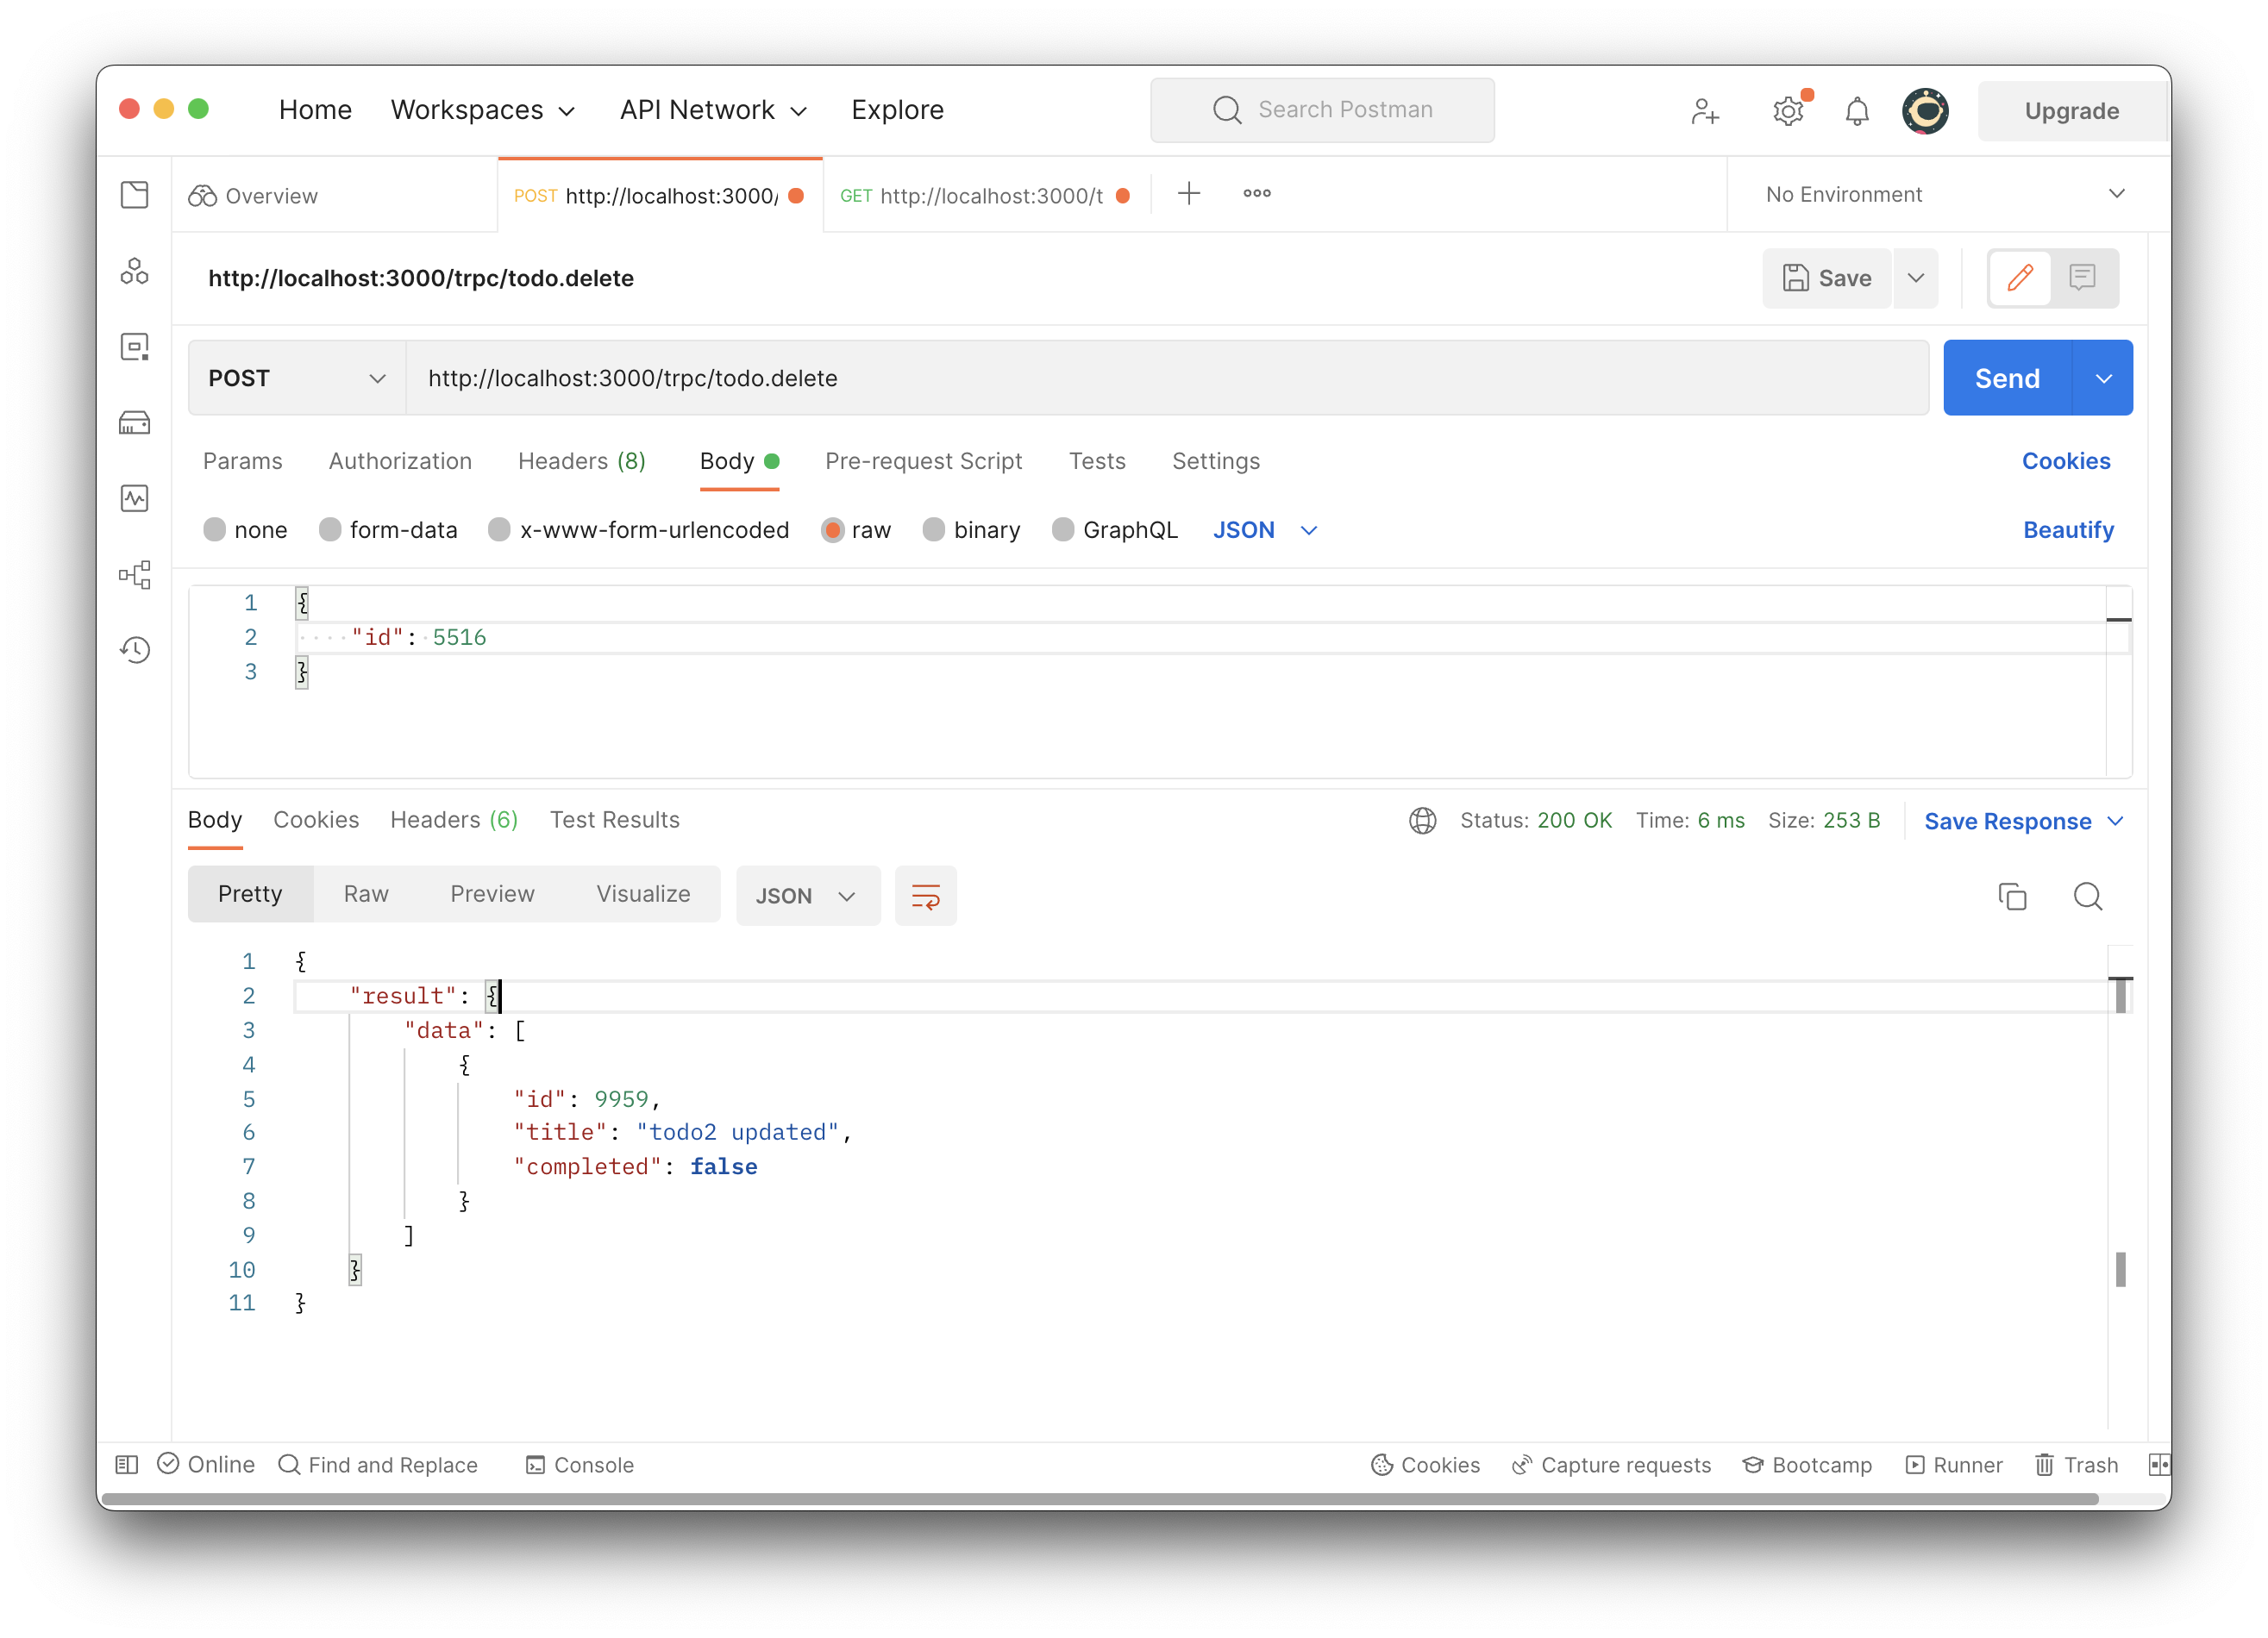
Tada 🥳! Everything is working as it should!
Conclusion
In this article, we looked at what tRPC is by building a simple todo API. tRPC is a library that allows you to set up end-to-end typing, which leads to fewer bugs and a better development experience! tRPC can be used in conjunction with many front-end frameworks such as React, React Native, Vue, and even Svelte! For more information, take a look at the tRPC docs. The code used in this article can be found in this Github repo.
In the second part of this two-part series, we will be showcasing the power of having end-to-end typing by consuming our newly created todo API in our React Native frontend!
Thank you for reading!