Take control over your CI/CD process: Use GitHub Actions to deploy to Vercel
Take control over your CI/CD process: Use GitHub Actions to deploy to Vercel
By Clarke Verdel
11 min read
How do you take full advantage of GitHub when you deploy to Vercel? Let GitHub Actions take care of your pipelines and let Vercel do the hosting.
- Authors

- Name
- Clarke Verdel
You can choose either of two options when it comes to deploying your application to Vercel:
- Go for the “zero-configuration git integration”
- Go for the custom CI/CD approach
Why would you need a custom integration?
Why resort to a custom integration over the “zero-configuration git integration”1? It makes sense if:
- you want full control over your CI/CD pipeline (e.g. linting and running tests)
- you are using GitHub Enterprise and can’t leverage Vercel’s GitHub Integration
In this article I will show you how to set up your CI/CD pipelines using GitHub Actions and deploy your application to Vercel.
Steps to take
- Disable Vercel’s “zero-configuration git integration”
- Create pipelines in GitHub Actions
- Test, lint & build (CI)
- Deployment (CD)
Intro to Vercel
Vercel is a very convenient hosting solution for modern JavaScript applications and lets you deploy your application in seconds. It is running on a managed infrastructure which means you don’t have to worry about maintaining it. Vercel offers out-of-the-box optimizations to enhance your security and performance. Their platforms supports a wide range of frameworks so there is a big chance Vercel is a very convenient way for you to host your application.
One nice thing about Vercel is that it offers Previews of your development code. With every PR you create you could push your changes to Vercel and deploy a tailored preview environment which you can use to debug, collaborate and share your current state of development. Vercel will create a unique URL and attaches it to the environment.
Intro to GitHub Actions
If your repository is already hosted on GitHub, it's a no-brainer to utilize GitHub Actions to automate our deployments to Vercel. GitHub Actions gives you the power to create CI/CD pipelines by creating YAML workflow files.
Leveraging GitHub Actions is a very easy and straight forward tool if you know a few key concepts:
- Jobs
- Runners
- Events
- Actions
If you’d like to know more about the explanation of the terminology, please visit the GitHub Actions official documentation2.
A unified CI/CD integration
With GitHub Actions you are able to create custom continuous integration workflows directly into your GitHub repository. It’s a very common practice to ensure your application is reliable and adheres to high standards. In this example we are going to add a linting and a testing step before we are going to build our application. GitHub Actions will report the status of every job in a workflow file below your PR. This gives you a unified CI/CD experience where you don’t have to switch between GitHub and Vercel to verify or debug your pipeline runs.
Create a workflow for preview deployments
First we start off by creating a workflow file in your GitHub Repository in order to deploy our application to Vercel on a preview environment.
Preview deployments are a powerful tool to deploy your application from a development branch to its own environment with its own URL. When you enable Vercel’s zero-configuration integration every commit you make will be pushed to their platform and a new environment will be spun up. Vercel will use the GitHub API to post back any status updates to your PR comments.
Because we are not utilizing the zero-configuration integration we manually have to recreate the CI/CD pipelines that were previously running on Vercel.
Create a new workflow file: .github/workflows/preview-deployment.yml
name: Feature branch integration & deployment

env:
  NODE_VERSION: 20

on:
  pull_request:
    types: [opened, synchronize]
Let me take you through the above file. First we define a name for our Workflow, which will be displayed in the GitHub Actions user interface once we run it. Then we define a workflow environment variable called NODE_VERSION which you can re-use across any job in your file.
Then we have to define a trigger for this workflow to be running. In our case we want to run whenever a pull request is being opened or synchronized: on: pull_request. You can configure this as per wish. Checkout the GitHub documentation to check which events are applicable for your workflow here.
Implement the Lint job
Now that we have the base of our workflow set up we can start adding jobs. The first job we are going to add is the linting job.
jobs:
  Lint:
    name: Lint
    runs-on: ubuntu-latest
    steps:
      - uses: actions/checkout@v4

      # Set node version
      - name: Use Node.js ${{ env.NODE_VERSION }}
        uses: actions/setup-node@v4
        with:
          node-version: ${{ env.NODE_VERSION }}
          cache: yarn

      # Install dependencies
      - name: Install dependencies
        run: yarn install --frozen-lockfile

      # Lint
      - name: Lint project
        run: yarn lint
Jobs are added by defining a line with jobs: which let you define a YAML specified list of jobs. In the above example you can see Lint on the next line, which is the ID of the first job we are going to define. Lastly you see a defined runner3: runs-on: ubuntu-latest, which in this case will run on the latest version of Ubuntu.
First we need to checkout our repository source code on our machine with actions/checkout. Then we will install a specific Node.js version on our runner, it uses the workflow environment variable we set earlier in the beginning of this file.
Matching Vercel requirements
As we are going to deploy our application to Vercel, it's recommended to have the runner4 match the Vercel build environment. In this example I am following the latest known requirements: A linux operating system that runs Node.js version 20.x.
Read more about the requirements here.
Implement the Test job
We can now do the same thing to run our tests.
jobs:
  Test:
    name: Test
    runs-on: ubuntu-latest
    steps:
      - uses: actions/checkout@v4

      # Set node version
      - name: Use Node.js ${{ env.NODE_VERSION }}
        uses: actions/setup-node@v4
        with:
          node-version: ${{ env.NODE_VERSION }}
          cache: yarn

      # Install dependencies
      - name: Install dependencies
        run: yarn install --frozen-lockfile

      # Test
      - name: Test project
        run: yarn test
This job follows the same practice as the first one, except that we run yarn lint instead of yarn test.
The power of parallelization
By default jobs in our workflow file are being executed in parallel. This means two runners are executing their own steps at the same time. This can be extremely convenient when you’d like to speed up your workflow execution time.
Implement the Build job
Now we have the take care of the actual build of our project. Remember that this was the part that Vercel actually took care off. In order to make sure our project is built in the same environment we can configure our runner to run on the latest version of Ubuntu Linux and so it uses the latest required Node.js version so it matches the environment of Vercel.
Next we configure the GitHub action to checkout our repo source code on our runner and set the default Node.js version to the version that’s stored in the workflow ENV variables.
Now that we’ve got the basic setup covered we can actually go and implement the build commands. For this we are going to use Vercel CLI which makes it easy for us to implement the build process in our pipeline.
jobs:
  Build:
    name: Build for Vercel
    runs-on: ubuntu-latest
    steps:
      - uses: actions/checkout@v4

      # Set node version
      - name: Use Node.js ${{ env.NODE_VERSION }}
        uses: actions/setup-node@v4
        with:
          node-version: ${{ env.NODE_VERSION }}
          cache: yarn

      # Install Vercel CLI
      - name: Install Vercel CLI
        run: yarn global add vercel@canary

      # Pull Vercel Environment Information
      - name: Pull Vercel Environment Information
        run: vercel pull --yes --environment=preview --token=${{ secrets.VERCEL_TOKEN }}

      # Build
      - name: Build Project Artifacts
        run: vercel build --token=${{ secrets.VERCEL_TOKEN }}

      # Upload build artifacts
      - name: Upload build artifacts
        uses: actions/upload-artifact@v4
        with:
          name: build
          path: .vercel/output
First of all we need to set up the first steps for this Job again: checkout the source code, setting a Node.js version and install the Vercel CLI. Now we can add a step to pull your Vercel project configuration and environment variables.
The next step is to actually build the project with the Vercel CLI. We set a parameter --yes which skips questions being asked by the CLI. Then we set a parameter to tell the CLI to which environment this build should be deployed: --environment=preview.
Because we are running this step in parallel with the linting and testing steps, we will store the output of the build in an artifact 5. We will later on use this artifact in the deployment job.
Connect the Vercel CLI to your project
In order to let the Vercel CLI talk to your account project account you have to provide an ACCESS_TOKEN, ORG_ID and PROJECT_ID to our runners environment. We can provide them by setting environment variables in the top of the workflow file like below:
env:
  VERCEL_ORG_ID: ${{ secrets.VERCEL_ORG_ID }}
  VERCEL_PROJECT_ID: ${{ secrets.VERCEL_PROJECT_ID }}
The only thing we have to do now is to create the repository secrets inside your GitHub Repo settings. The instructions to
- Copy your Vercel Access Token
- Install the Vercel CLI locally in your repository and run
vercel login - Then run
vercel linkto create a new Vercel project or link an existing one - The Vercel CLI now generated a
.vercelfolder, copy over theprojectIdandorgIdfrom theproject.json - Add these values as new repository secrets in GitHub:
VERCEL_TOKEN,VERCEL_ORG_ID, andVERCEL_PROJECT_IDas secrets- Navigate to your GitHub Repository Settings Tab
- In the menu navigate to “Secrets and variables” —> “Actions”
- Click on the button “New repository secret” to add a new secret
Implement the Deploy job
Now that we have everything set up we can actually deploy our built application to Vercel. In order to do so we are going to create one last job in our GitHub Actions workflow file.
We are going to call this job “Deploy” and make it dependent on the three jobs we’ve defined before: needs: [Lint, Test, Build]. This means this job will only be executed when all three of the jobs succeed.
jobs:
  Deploy:
    needs: [Lint, Test, Build]
    name: Deploy to preview environment
    runs-on: ubuntu-latest
    environment:
      name: preview
      url: ${{ steps.seturl.outputs.url }}
    steps:
      - uses: actions/checkout@v4

      # Set node version
      - name: Use Node.js ${{ env.NODE_VERSION }}
        uses: actions/setup-node@v4
        with:
          node-version: ${{ env.NODE_VERSION }}
          cache: yarn

      # Download build artifcact
      - name: Download build artifact
        uses: actions/download-artifact@v4
        with:
          name: build
          path: .vercel/output/

      # Install Vercel CLI
      - name: Install Vercel CLI
        run: yarn global add vercel@canary

      # Deploy
      - name: Deploy Project Artifacts to Vercel
        shell: bash
        run: vercel deploy --prebuilt --token=${{ secrets.VERCEL_TOKEN }} | tee deploy.log

      # Set preview url
      - id: seturl
        name: Set preview url
        run: echo "url=$(tail -1 deploy.log)">> $GITHUB_OUTPUT
In this Job we download the built artifact that we uploaded in the Build job. This avoids the runner to build the project once again. After downloading the artifact we now install the Vercel CLI and will we deploy the project build output to Vercel with vercel deploy. By passing the parameter --prebuilt we tell Vercel that we have already built the application and therefore Vercel don’t have to run any CI steps on their platform.
We store the output of the vercel deploy command in a log file where it will store the newly created Preview Environment URL. In the second last step you can see we are grabbing the preview URL and save it in a variable to the “seturl” step. At the beginning of the job we defined environment which allows us to post a link to environment to our PR updates.
environment:
  name: preview
  url: ${{ steps.seturl.outputs.url }}
Which will look like the example below.

Completed Preview Deployment workflow file
Now that we’ve added all parts of our workflow file it should look like the one below.
name: Feature branch integration & deployment

env:
  NODE_VERSION: 20
  VERCEL_ORG_ID: ${{ secrets.VERCEL_ORG_ID }}
  VERCEL_PROJECT_ID: ${{ secrets.VERCEL_PROJECT_ID }}

on:
  pull_request:
    types: [opened, synchronize]

jobs:
  Lint:
    name: Lint
    runs-on: ubuntu-latest
    steps:
      - uses: actions/checkout@v4

      # Set node version
      - name: Use Node.js ${{ env.NODE_VERSION }}
        uses: actions/setup-node@v4
        with:
          node-version: ${{ env.NODE_VERSION }}
          cache: yarn

      # Install dependencies
      - name: Install dependencies
        run: yarn install --frozen-lockfile

      # Lint
      - name: Lint project
        run: yarn lint

  Test:
    name: Test
    runs-on: ubuntu-latest
    steps:
      - uses: actions/checkout@v4

      # Set node version
      - name: Use Node.js ${{ env.NODE_VERSION }}
        uses: actions/setup-node@v4
        with:
          node-version: ${{ env.NODE_VERSION }}
          cache: yarn

      # Install dependencies
      - name: Install dependencies
        run: yarn install --frozen-lockfile

      # Test
      - name: Test project
        run: yarn test

  Build:
    name: Build for Vercel
    runs-on: ubuntu-latest
    steps:
      - uses: actions/checkout@v4

      # Set node version
      - name: Use Node.js ${{ env.NODE_VERSION }}
        uses: actions/setup-node@v4
        with:
          node-version: ${{ env.NODE_VERSION }}
          cache: yarn

      # Install Vercel CLI
      - name: Install Vercel CLI
        run: yarn global add vercel@canary

      # Pull Vercel Environment Information
      - name: Pull Vercel Environment Information
        run: vercel pull --yes --environment=preview --token=${{ secrets.VERCEL_TOKEN }}

      # Build
      - name: Build Project Artifacts
        run: vercel build --token=${{ secrets.VERCEL_TOKEN }}

      # Upload build artifacts
      - name: Upload build artifacts
        uses: actions/upload-artifact@v4
        with:
          name: build
          path: .vercel/output

  Deploy:
    needs: [Lint, Test, Build]
    name: Deploy to preview environment
    runs-on: ubuntu-latest
    environment:
      name: preview
      url: ${{ steps.seturl.outputs.url }}
    steps:
      - uses: actions/checkout@v4

      # Set node version
      - name: Use Node.js ${{ env.NODE_VERSION }}
        uses: actions/setup-node@v4
        with:
          node-version: ${{ env.NODE_VERSION }}
          cache: yarn

      # Download build artifcact
      - name: Download build artifact
        uses: actions/download-artifact@v4
        with:
          name: build
          path: .vercel/output/

      # Install Vercel CLI
      - name: Install Vercel CLI
        run: yarn global add vercel@canary

      # Deploy
      - name: Deploy Project Artifacts to Vercel
        shell: bash
        run: vercel deploy --prebuilt --token=${{ secrets.VERCEL_TOKEN }} | tee deploy.log

      # Set preview url
      - id: seturl
        name: Set preview url
        run: echo "url=$(tail -1 deploy.log)">> $GITHUB_OUTPUT

      - name: Output preview url
        run: echo "${{ steps.seturl.outputs.url }}"
Commit & Run
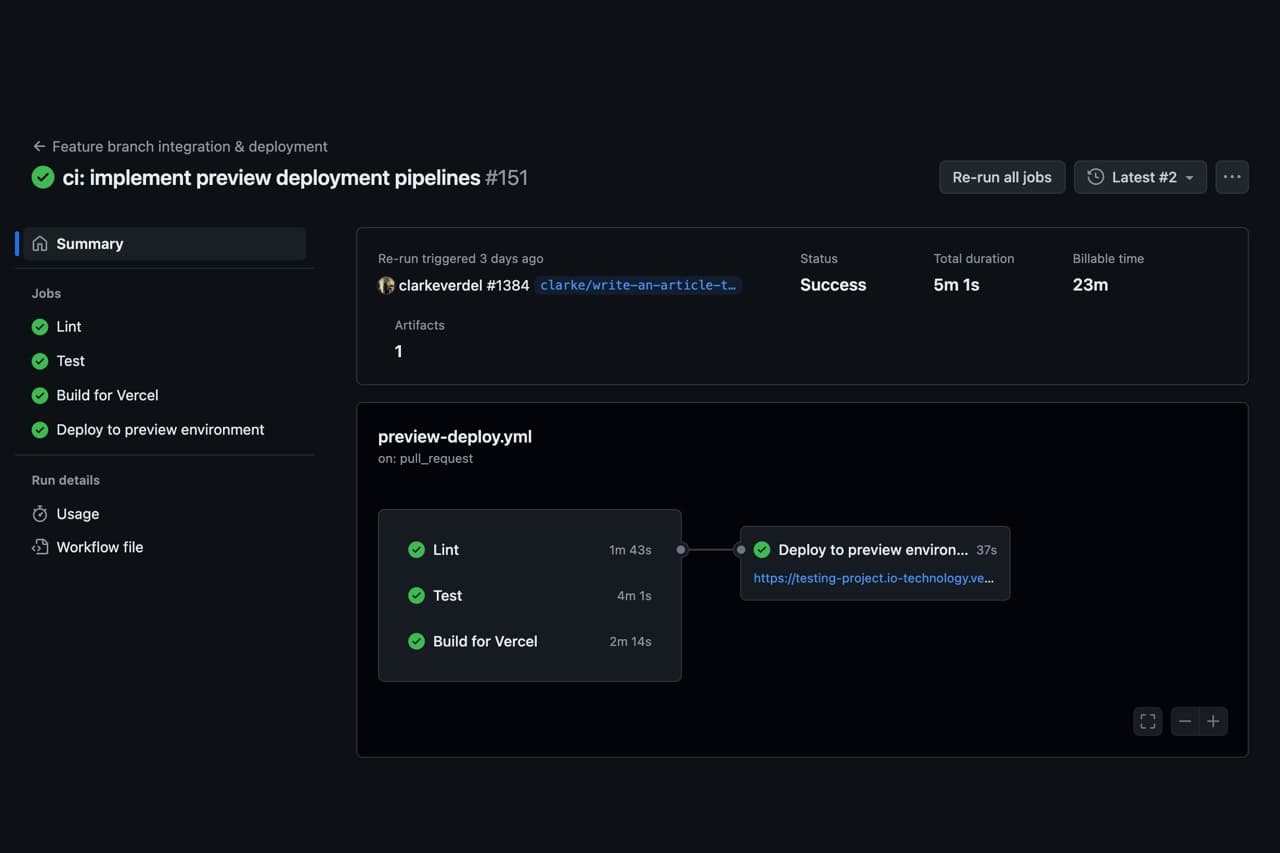
Commit your changes to the workflow file to your repository and open a PR. Once you open a PR you will notice that the pipelines will start running. This gives a great overview for developers to see what the progress is for every step it takes. Need to debug a failed step? Click on “details” and find out more.

This is an example of a workflow jobs running in GitHub Actions.
Workflow file for Production deployments
Now that the Preview Deployment step is covered a new file for Production Deployments can be created. .github/workflows/production-deployment.yml. This workflow file is very similar to the workflow that handles Preview Deployments on your PR, but there are some slight differences that I'd like to take you through:
- A different workflow trigger
- Preparing a Vercel production build
- Optional production release steps
name: Production Deployment to Vercel
env:
  VERCEL_ORG_ID: ${{ secrets.VERCEL_ORG_ID }}
  VERCEL_PROJECT_ID: ${{ secrets.VERCEL_PROJECT_ID }}
on:
  push:
    branches:
      - main
jobs:
  Build:
    runs-on: ubuntu-latest
    steps:
      - uses: actions/checkout@v3
      - name: Install Vercel CLI
        run: npm install --global vercel@canary
      - name: Pull Vercel Environment Information
        run: vercel pull --yes --environment=production --token=${{ secrets.VERCEL_TOKEN }}
      - name: Build Project Artifacts
        run: vercel build --prod --token=${{ secrets.VERCEL_TOKEN }}
      - name: Upload build artifacts
        uses: actions/upload-artifact@v4
        with:
          name: build-artifacts
          path: prod-build/
  Deploy-Vercel:
    needs: Build
    runs-on: ubuntu-latest
    steps:
      - name: Download build artifacts
        uses: actions/download-artifact@v4
        with:
          name: build-artifacts
          path: prod-build/
      - name: Deploy Project Artifacts to Vercel
        run: vercel deploy --prebuilt --prod --token=${{ secrets.VERCEL_TOKEN }}
In the provided example above you can see that this workflow file is further simplified. This workflow file is being triggered whenever you push a commit to main. In our case that's whenever a PR is succesfully merged. This also means that the checks for your PR have already succeeded and therefore we don't have to re-run the linting and testing step when we are going to deploy to production.
Build for production
The Build job builds the project with the "production" configuration from your Vercel project, this is enforced by adding the parameter --environment=production to the pull command. The same can be done for the build step by providing the parameter --prod, ensuring that the "production" environment variables and configuration is used.
Deploy to production
Lastly the Deploy step will take care off deploying your application to Vercel. In this example I already accounted for an additional job to deploy configuration to Firebase. One of the benefits of separate jobs is that the Deployment to Vercel & Firebase can now run paralell and reduces the time of mismatches between code and configuration.
Additional production deployment jobs
Below I created an example of an additional deployment job that in my case removes the need for manually firing these commands as part of the production deployment.
Deploy-Firebase:
  needs: Build
  runs-on: ubuntu-latest
  steps:
    - uses: actions/checkout@v3
    - name: Download build artifacts
      uses: actions/download-artifact@v4
      with:
        name: build-artifacts
        path: prod-build/
    - uses: actions/setup-node@v3
    - uses: w9jds/setup-firebase@main
      with:
        tools-version: 11.9.0
        firebase_token: ${{ secrets.FIREBASE_TOKEN }}
    - name: Deploy Firebase Security Rules
      run: npm firebase-deploy-rules
Wrap up
Creating your CI/CD pipelines with GitHub Actions is fairly easy and extremely convenient when you want to take more control. In this article I’ve showed you how you can lint, test and build your project on GitHub and ultimately deploy it to Vercel.
Benefits
If you ask me there are quite some benefits creating your CI/CD pipelines in GitHub Actions:
- Provide a better developer experience due to better feedback / integration, you have everything in one place: GitHub.
- Enforce code quality before merging a PR.
- Ensure reliability by requiring successfully executed test suites.
Downsides
Of course with every approach there are downsides. These are the two biggest downsides I think are important to mention:
- The "zero-configuration" integration from Vercel provides more features out of the box, you will have to integrate those manually. Such as Preview comments updates.
- There is definitely some time investment involved when setting up your own pipelines in Github Actions, for smaller hobby projects this might be too much.
Create your own plan
While for my project it seemed logical to approach it this way it could mean something different for your project. Think up front how you’d like your pipelines to run. It may depend on different factors and project size. I can give you a few tips:
- Running jobs in parallel is powerful, but doesn't always make sense.
- Debug your workflow to see if you can improve execution time and efficiency.
Thanks for reading.
Footnotes
https://docs.github.com/en/actions/learn-github-actions/understanding-github-actions ↩
https://docs.github.com/en/actions/about-github-actions/understanding-github-actions#runners ↩
https://docs.github.com/en/actions/using-github-hosted-runners/about-github-hosted-runners/about-github-hosted-runners ↩
https://docs.github.com/en/actions/writing-workflows/choosing-what-your-workflow-does/storing-workflow-data-as-artifacts ↩