Let’s explore Astro’s core features
Let’s explore Astro’s core features
By Zjerilon Ferero
9 min read
When it comes to creating websites, performance is crucial, but how do you achieve a performant website? This is why Astro was created; let's look at how it works and why it's so effective.

- Authors

- Name
- Zjerilon Ferero
Astro has been steadily increasing in popularity, but why? And what exactly is Astro? And how does it pile up against other web frameworks? Let's find out together by exploring Astro's core features.
What is Astro?
Astro is a comprehensive web framework that makes it simple to build content-rich, performance-oriented websites. Astro achieves this by delivering as minimal as possible JavaScript to the client; in contrast to popular modern web frameworks such as ReactJS, Vue, and Svelte, which are Single Page Applications (SPAs). Astro uses the Multi-Page Application (MPA) approach, and pages are therefore server side rendered. This methodology is followed by traditional server-side frameworks such as Laravel (PHP), Ruby on Rails, and so on.
How does Astro work?
Astro delivers zero JavaScript to the client by default, resulting in 100% static HTML and CSS for high-performance websites. But what if we need interactivity? This is where the concept of "Astro islands" comes into play.
What are Astro Islands?
Astro islands are UI components that are initially rendered server-side, and as developers, we choose which UI component should be hydrated. This allows us to keep the majority of the site static while adding interactive elements. The advantage of this approach in terms of performance is that we only ship JavaScript for the components that require it.
The architecture behind Astro Islands is called the Islands Architecture, whereby interactive UI components are hydrated with the partial/progressive hydration technique.ß
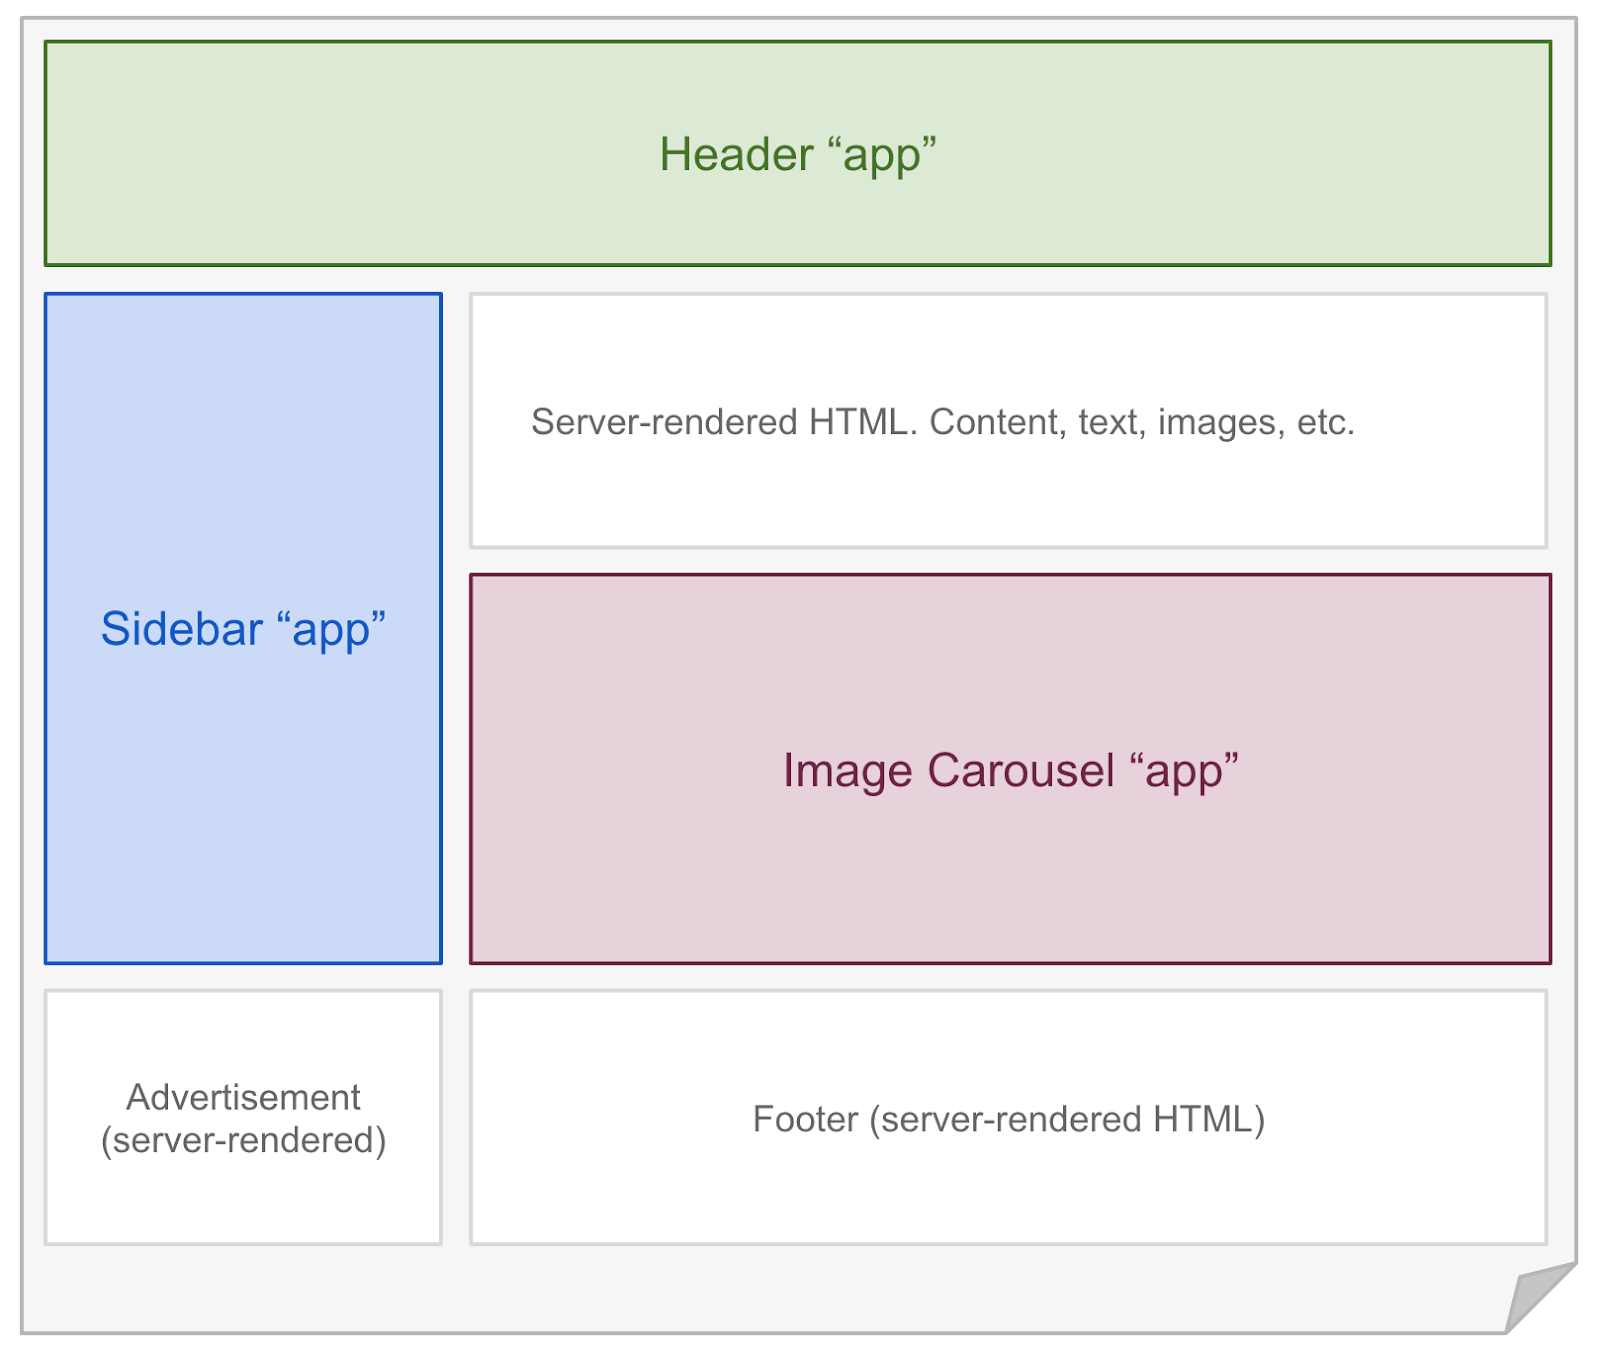
A prime example of the so-called "Astro islands" can be found in the image above; the Header, Sidebar, and Image Carousel are all "Astro islands" (interactive UI components) and are thus generated and hydrated individually.
Due to the fact that each Astro Island is separately hydrated, you could develop them using any popular UI Framework, such as ReactJS:
---
import MyReactComponent from '../components/MyReactComponent.jsx';
import AstroHeader from '../components/AstroHeader';
---
<html>
  <body>
    <AstroHeader/>
    <MyReactComponent />
  </body>
</html>
Astro has support for most popular UI Frameworks: React, Preact, Svelte, Vue, SolidJS, AlpineJS and Lit
It is even possible to combine multiple frameworks.
By default, the UI Framework component will render on the server, and thus be converted to static HTML.
If you want the component to be hydrated you have to pass a "Client Directive", Astro has different options to decide when a component should be hydrated:
// Load and hydrate the component JavaScript immediately on page load.
<MyCustomUIComponent client:load />

// Load and hydrate the component JavaScript once the page is done with its initial load
// and the requestIdleCallback event has fired.
<ShowHideButton client:idle />

//Load and hydrate the component JavaScript once the component has entered the user’s viewport.
//This uses an IntersectionObserver internally to keep track of visibility.
<HeavyImageCarousel client:visible />

// client:media={string} loads and hydrates the component JavaScript once
// a certain CSS media query is met.
<SidebarToggle client:media="(max-width: 50em)" />

//client:only={string} skips HTML server-rendering, and renders only on the client.
//It acts similar to client:load in that it loads, renders and hydrates the component immediately on page load.
<SomeReactComponent client:only="react" />
The two modes of Astro
Astro can be run in two different modes. Astro runs in “SSG” mode by default, but it is possible to switch to “SSR” mode.
Server-side rendering (SSR) is a method of rendering a website on the server before serving it to the client. This mode is great for websites that frequently updates for example a social media platform
Static site generation (SSG) is a method whereby a website is pre-generated at build time. Because of this, it’s better suited for sites that don’t require frequent updates for example a blog, because updates requires the website to be generated again.
For the sake of simplicity I wont go to deep into pro’s and cons of the two but its good to know that in both modes, render ready html is served to the client, causing it to be indexable by search engines and be more performant as opposed to the approach of modern frontend libraries, which serves minimal html to the client and then hydrates it with Javascript.
Astro vs NextJS
Astro is frequently compared to NextJS, but why would you choose Astro over the NextJS?
Flexibility
Next.js renders your website with React. Astro is more adaptable: you can create UI using any popular component library or Astro's HTML-like component syntax, as previously demonstrated.
Performance
Astro websites will typically load much faster than Next.js websites. This is due to the fact that Astro automatically removes unnecessary JavaScript from the page, hydrating only the individual components that require it (Partial Hydration).
Because NextJS does not yet support partial hydration, your website will be less performant because it will include a lot of unnecessary JavaScript.
Both NextJS and Astro are excellent website-building tools, however NextJS truly shines when it comes to applications, whereas Astro really shines when it comes to webpages with static content.
Enough talking, show some code
Astro has many amazing features, but in order to keep this blog post as interesting as possible, I'll go over the essential features required to build a website.
Astro components
The syntax of the Astro components is intended to be as straightforward as possible, and it is similar to writing plain HTML and Javascript.
---
// Import statements
import PageTitle from './PageTitle.astro';
import User from "../types.ts"

// If you are using Typescript you can define props and Astro will
// Automatically give type errors/warnings
interface Props {
    page: string;
    user?: User;
}

// Recieve props from parent component
const { page, user } = Astro.props;

const isUserLoggedIn = !!user

// Fetch data from an api.
// Since Astro Components are rendered at build time on a server
// its also possible to do a direct call to the database
// or to read from a file from the filesystem
const res = await fetch(`localhost:3000/pages/${page}`)
const contents = await res.json()

---

<main>
	<PageTitle>{Welcome to the {page} page</PageTitle>
	{isUserLoggedIn && <button>log out</button>}
	{contents.map(c => (<>{c}</>))}
<main/>
As seen on the example above Astro components exist of 2 parts:
The component script (---):
In this part you write your Javascript/Typescript that you need to render your component such as:
- importing other Astro components / UI Framework components
- fetching content from an API or database
- creating variables that you will reference in your template
---
// Import statements
import PageTitle from './PageTitle.astro';
import User from "../types.ts"

// If you are using Typescript you can define props and Astro will
// Automatically give type errors/warnings
interface Props {
    page: string;
	user?: User;
}

// Recieve props from parent component
const { page, user } = Astro.props;

const isUserLoggedIn = !!user

// Fetch data from an api.
// Since Astro Components are server side rendered
// its also possible to do a direct call to the database
// or to read from a file from the filesystem
const res = await fetch(`localhost:3000/pages/${page}`)
const contents = await res.json()

---
The component template:
This is where you write your html, in this part you can reference variables, imports etc from the the component script. If you're familiar with ReactJS, this should feel familiar to JSX.
<main>
	<>
	<PageTitle>Welcome to the {page} page</PageTitle>
	{isUserLoggedIn && <button>log out</button>}
	</>
	{contents.map(c => (<>{c}</>))}
<main/>
The most important aspect of Astro components is that they render to HTML by default during the build process. Even if you run JavaScript code within your components, it will all be executed ahead of time and removed from the final HTML that you send to your users. As a result, the site loads faster and has no JavaScript footprint by default. If you need client side JavaScript you can make use of a <script/> tag in the component’s template
Adding interactivity
In AstroJS html attributes get converted to strings, therefore passing an object or a function to a HTML element wont work:
---
function handleClick () {
    console.log("button clicked!");
}
---
<!-- ❌ This doesn't work! ❌ -->
<button onClick={handleClick}>Nothing will happen when you click me!</button>
Instead, use a client-side script to add the event handler, like you would in vanilla JavaScript:
---
---

<button id="button">Click Me</button>
<script>
  function handleClick() {
    console.log('button clicked!')
  }
  document.getElementById('button').addEventListener('click', handleClick)
</script>
Slots
The <slot /> element is a placeholder for external HTML content, allowing you to inject (or “slot”) child elements from other files into your component template.
---
import BlogPostTitle from './BlogPostTitle.astro';

const { title } = Astro.props
---
<div id="blog-post-wrapper">
  <BlogPostTitle title={title} />
  <slot name="introduction"/>  <!--  children with the `slot="introduction"` attribute will go here -->
  <hr/>
	<slot />  <!--  children without a `slot`, or with `slot="default"` attribute will go here -->
  <hr/>
  <slot name="final"/>  <!--  children with the `slot="final` attribute will go here -->
</div>
As seen in the example above, some slots have a name attribute; these are called "Named Slots" You can use Named Slots to specify which slot the content needs to be injected into.
---
import BlogPost from './BlogPost.astro';
---
<BlogPost title="Astro is awesome">
	<!-- This will get injected into the introduction slot -->
  <p slot="introduction">introduction text</p>

	<!-- this will be injected into the default slot, -->
	<!-- because we have not specified in which slot this should be injected -->
	<p>Lorem ipsum dolor sit amet, consectetur adipiscing elit. Sed eu purus ac erat facilisis laoreet.</p>

	<!--  this will get injected into the final slots -->
	<p slot="final">Thank you for reading!</p>
</BlogPost>˜
As we can see, slots are quite helpful for reducing repetition in your code, and are typically use for defining a template.
Styling in Astro
Astro was created to make styling and CSS writing as simple as possible. You can write your own CSS directly inside an Astro component, import your preferred CSS library like Tailwind, or use advanced styling languages like Sass.
Using the <style/> tag, you can begin writing styles in your Astro component.
---
import BlogPostTitle from './BlogPostTitle.astro';
const { title } = Astro.props
---
<style>
	#blog-post-wrapper {
		padding: 10px
	}
	hr {
		color: #333;
	}
</style>

<div id="blog-post-wrapper">
  <BlogPostTitle title={title} />
  <slot name="introduction"/>
	<slot />
  <slot name="final"/>
</div>
Styles defined in an Astro component are automatically scoped to this component; in other words, the styles provided for the <hr/> tag in the example above will only be applied to this component.
But what if you require global styling? Here's where the "is:global" directive comes in handy. When a style tag is tagged as global it will apply the given styles to the entire website.
<style is:global>
  /* Unscoped, delivered as-is to the browser.
     Applies to all <h1> tags on your site. */
  h1 { color: red; }
</style>
Its also possible to use a mixture of global and scoped styling:
<style>
  /* Scoped to this component, only. */
  h1 { color: red; }
  /* Mixed: Applies to child `h1` elements only. */
  article :global(h1) {
    color: blue;
  }
</style>
If you want to assign multiple classes to an HTML element, you can use the "class:list" directive.
class:list takes an array of several different possible value kinds:
string: Added to the elementclassObject: All truthy keys are added to the elementclassArray: flattenedSet: flattened
---
const { title, isCentered } = Astro.props;
---
<!-- If `isCentered` is truthy, class will be "title center". -->
<h1 class:list={['title', { center: isCentered }]}>{title}</h1>

<style>
  .title {
		font-style: italic;
	}
  .center {
		text-align: center;
	}
</style>
In this instance, the h1 is given the title class, and the center class is only applied if the isCentered property is true.
Routing in Astro
Astro uses file-based routing to generate your routes URLs based on the files in your src/pages/ directory. When a file (.astro or .md) is added to the src/pages directory of your project, it is automatically available as a route based on its filename.
Static Routes
As mentioned before every .astro or .md file in the src/pages directory becomes a page on your website:
src/pages/index.astro        -> mysite.com/
src/pages/about.astro        -> mysite.com/about
src/pages/about/me           -> mysite.com/about/me
The content returned by each of these routes will always be the same because they are static. But what if we need the content to alter depending on a route parameter? dynamic routes solves this problem for us.
Dynamic Routes
An Astro page file can specify dynamic route parameters in its filename to generate matching pages. For example, you might create a file users/[userId].astro this will create a route for every specified userId.
Astro pages are constructed at build time by default; with this in mind, you must specify a list of userIds for Astro to generate the corresponding pages.
SSG Mode (default)
Because all pages are built at build time, dynamic routes must exports a getStaticPaths() function, which returns an array of objects with the param property. So if we create a new dynamic page users/[userId].astro that exports the following function:
---
export function getStaticPaths() {
  return [
    {params: {userId: '1'}},
    {params: {userId: '2'}},
    {params: {userId: '3'}},
  ];
}

const { userId } = Astro.params;
---
<div>Hey there, {userId}!</div>
Astro will generate 3 pages: sitename.com/users/1,sitename.com/users/2 and sitename.com/users/3
Astro will also expose the userId in the route parameter and this can then be used in the component template
If we want to take a more dynamic approach we can also call an API or do a direct database call, and pass data through as props
  ---
export async function getStaticPaths() {
  const users = await userService.getAllUsers();

  return users.map((user) => {
    return {
      params: { userId: users.id },
      props: { user },
    };
  });
}

const { id } = Astro.params;
const { user } = Astro.props;
---
<h1>{user.name}</h1>
SSR Mode
In this mode, dynamic routes are also defined by making a new file in the src/pages directory, for example: /src/pages/games/[gameId]. But since they are not built ahead of time, these pages don’t have to export the getStaticPaths function, and therefore any id passed as a route parameter will work.
---
const { resource, id } = Astro.params;
const user = await userService.getUserById(id)
---
<h1>{user?.name || "user not found"}</h1>
Endpoints
Endpoints can also be created with AstroJS to serve data; Static File and SSR endpoints are defined similarly, but SSR endpoints support additional features.
Static File Endpoints (SSG Mode)
To create a custom endpoint, add a .js or .ts file to the /pages directory. The extension will be removed during the build process, so the name of the file should include the extension of the data you want to create. For example, src/pages/data.json.ts will build a /data.json endpoint.
Endpoints export a get function that will receive a context object and it should return a object with a body property:
export const get: APIRoute = async ({ params, request }) => {
  const id = params.id
  const user = userService.getUserById(id)
  return {
    body: JSON.stringify({
      user,
    }),
  }
}

export function getStaticPaths() {
  return [{ params: { id: '0' } }, { params: { id: '1' } }, { params: { id: '2' } }]
}
This get function will be called at build time and use the content of this body property to generate the file. Since these files are getting created at build time we have to also return a getStaticPaths function incase we want to make use of params
Server Endpoints (SSR Mode)
Returning a static file is also conceivable in SSR mode, although in this case the endpoint will be built upon request, opening up new functionalities like listening to requests and running code.
Server endpoints can make use of params without the getStaticPath function and they can return a response object with allowing you to set status codes and headers:
export async function get({ params }) {
  const id = params.id
  const user = await getUserById(id)

  if (!user) {
    return new Response(null, {
      status: 404,
      statusText: 'Not found',
    })
  }

  return new Response(JSON.stringify(user), {
    status: 200,
    headers: {
      'Content-Type': 'application/json',
    },
  })
}
Endpoints can also return other HTTP methods functions for example create, update, del (delete).
Conclusion
If you believe Astro is deserving of its recent surge in popularity and want to give it a try, I would gladly refer you to their website and documentation at https://astro.build/.