System components communication and the chat API
System components communication and the chat API
By Mohamed Elmedany
15 min read
How the components of the chat system communicate, and what are the specifications of the chat API.

- Authors

- Name
- Mohamed Elmedany
Previously, we discussed configuring and using the authorisation server, where we detailed how to manage authentication, authorisation, and registration with the help of the Spring Framework. We will continue building on that setup, adding more components to the system, and extending the authorisation server's functionality to work better.
Let's look again at the desired end architecture:
Messaging Channel
We are using a message channel for communication between system components where we share system events. An event signifies that a specific action has occurred or a state has changed, and the relevant system component(s) listens to that event and reacts accordingly. This practice is called Event Streaming, which allows us to:
- Improve the system's flexibility by decoupling features to different microservices as required.
- Increase the system's durability and reliability by enabling failed components to recover and continue through the continued persistence of events.
- Respond in near real-time, providing a seamless user experience.
For that purpose, we will use Apache Kafka, which is an open-source distributed event streaming platform that allows us to publish, subscribe to, store, and process real-time data streams. It offers key features such as durability, scalability, and fault tolerance, making our systems highly reliable, efficient, and capable of handling large volumes of data in real time.
In addition to that, Spring Framework provides built-in support for Kafka, making it easy to integrate with our system. Once more, Let's break this down into specific functional requirements to understand the functionality and be able to implement and test it.
Functional Requirements
- Ready to use Kafka cluster
- Web interface to manage Kafka cluster
Technologies
- Docker
Implementation
In the project root directory, we will create an empty docker-compose.yml file and add the following:
kafka_ui:
  image: provectuslabs/kafka-ui:latest
  container_name: kafka_ui_app
  ports:
    - '9090:8080'
  environment:
    KAFKA_CLUSTERS_0_NAME: local
    KAFKA_CLUSTERS_0_BOOTSTRAPSERVERS: kafka:9092
  extra_hosts:
    - 'host.docker.internal:host-gateway'
  restart: on-failure
  depends_on:
    kafka:
      condition: service_started

kafka:
  image: bitnami/kafka
  container_name: kafka_server
  ports:
    - '9092:9092'
  environment:
    KAFKA_CFG_NODE_ID: 1
    KAFKA_CFG_PROCESS_ROLES: controller,broker
    KAFKA_CFG_CONTROLLER_LISTENER_NAMES: CONTROLLER
    KAFKA_CFG_LISTENERS: PLAINTEXT://:9092,CONTROLLER://:9093,EXTERNAL://:9094
    KAFKA_CFG_CONTROLLER_QUORUM_VOTERS: 1@kafka:9093
    KAFKA_CFG_ADVERTISED_LISTENERS: PLAINTEXT://kafka:9092,EXTERNAL://localhost:9094
    KAFKA_CFG_LISTENER_SECURITY_PROTOCOL_MAP: CONTROLLER:PLAINTEXT,PLAINTEXT:PLAINTEXT,EXTERNAL:PLAINTEXT
  extra_hosts:
    - 'host.docker.internal:host-gateway'
  restart: on-failure
Let's break down how this configuration is set up:
Kafka UI
We are using the provectuslabs/kafka-ui docker image to manage and monitor Kafka through a user-friendly web interface.
image: Base image.container_name: Container name for easy management.ports: Port mapping inside the container and exposed to the host.environment:KAFKA_CLUSTERS_0_NAME: Name of the Kafka cluster.KAFKA_CLUSTERS_0_BOOTSTRAPSERVERS: Where is the Kafka server.
extra_hosts: Mapping thehost.docker.internaldomain to the internal gateway of the host machine.
Kafka Broker
We are using the bitnami/kafka docker image for its ease of use, up-to-date configurations, and consistency across environments.
image: Base image.container_name: Container name for easy management.ports: Port mapping inside the container and exposed to the host.environment:KAFKA_CFG_NODE_ID: Unique identifier for the Kafka broker node.KAFKA_CFG_PROCESS_ROLES: Comma-separated list of Kafka KRaft roles.KAFKA_CFG_CONTROLLER_LISTENER_NAMES: Comma-separated list of names for the controller's listeners.KAFKA_CFG_LISTENERS: List of Kafka listeners.KAFKA_CFG_CONTROLLER_QUORUM_VOTERS: Node ID and address of the controller servers.KAFKA_CFG_ADVERTISED_LISTENERS: Advertises the Kafka broker atkafka:9092for clients to connect to.KAFKA_CFG_LISTENER_SECURITY_PROTOCOL_MAP: Comma-separated list of security protocol mapping.
extra_hosts: Mapping thehost.docker.internaldomain to the internal gateway of the host machine.
This is the minimum setup required to use a Kafka cluster. The configuration can be further extended as needed to include multiple brokers, manage logs, adjust quotas and limits, or enhance the cluster's security. We can now start running the services by using the docker-compose up command. After that, navigate to http://localhost:9090 to view the Kafka UI dashboard:
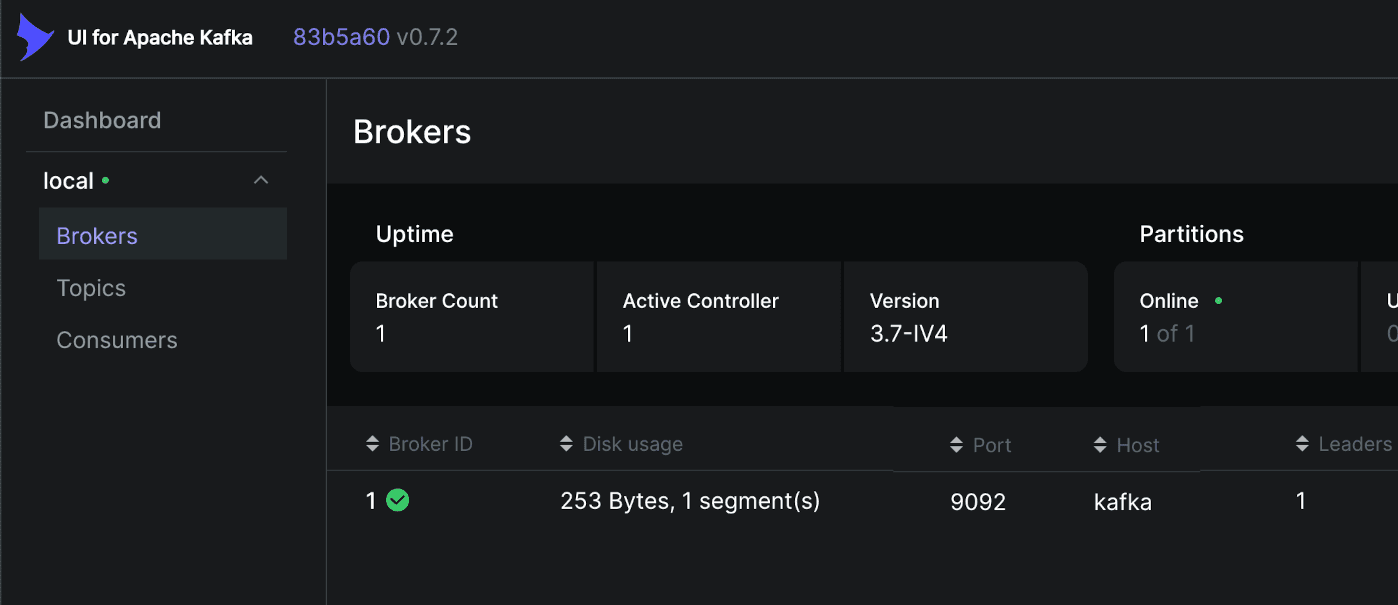
To test this, we need to add new functionality to the authorisation server.
SuccessfulRegistration Event
When a new account is created, the authorisation server will generate an event with the newly created account details, allowing the relevant system components to be informed and perform the required actions. The event should looks as follows:
{
  "userId": "85c01229-20e2-4918-aaa1-1f08ec75d834",
  "username": "mohamed",
  "firstname": "Mohamed",
  "lastname": "Elmedany"
}
So, going back to the authorisation server, there are new requirements, which can be broken down as follows:
Functional Requirements
- Publish an event with account details when a new account is created
Technologies
- Spring Kafka (3.3.2 the current latest release)
Implementation
In the build.gradle file of the authorisation server directory, we will add this extra dependency:
dependencies {
  ...
  implementation("org.springframework.kafka:spring-kafka")
  ...
}
And add the following to application.properties properties file to configure Spring Kafka:
spring.kafka.bootstrap-servers=localhost:9094
spring.kafka.producer.key-serializer=org.apache.kafka.common.serialization.StringSerializer
spring.kafka.producer.value-serializer=org.springframework.kafka.support.serializer.JsonSerializer
spring.kafka.listener.ack-mode=MANUAL


successful-registration.topic=successful-registration
Here, we define the location of the Kafka broker, the serializers for the key and value of the Kafka producer, and the topic name for the event.
Every Kafka Streams application must provide SerDes (Serializer/Deserializer) for the data types of record keys and record values. Since we are only generating events here, we don't need to provide deserializers.
Next, we will add SuccessfulRegistrationDTO.java as account details holder for the event:
@JsonInclude(JsonInclude.Include.NON_NULL)
public class SuccessfulRegistrationDTO {
    private String userId;
    private String username;
    private String firstname;
    private String lastname;
}
Then SuccessfulRegistrationProducer.java, which will be responsible for producing and publishing SuccessfulRegistrationDTO to a Kafka topic.
@Service
public class SuccessfulRegistrationProducer {
    private static final Logger LOGGER = LoggerFactory.getLogger(SuccessfulRegistrationProducer.class);

    protected final String topic;
    protected final KafkaTemplate<String, SuccessfulRegistrationDTO> producer;

    protected SuccessfulRegistrationProducer(@Value("${successful-registration.topic}") String topic,
                                             KafkaTemplate<String, SuccessfulRegistrationDTO> producer) {
        this.topic = topic;
        this.producer = producer;
    }

    public void send(SuccessfulRegistrationDTO message) {
        LOGGER.debug("Sending SuccessfulRegistrationDTO to topic: {} value: {}", topic, JsonUtil.toJson(message));
        ProducerRecord<String, SuccessfulRegistrationDTO> producerRecord = new ProducerRecord<>(topic, message);
        producer.send(producerRecord).whenComplete(this::handleSendResult);
    }

    private void handleSendResult(SendResult<String, SuccessfulRegistrationDTO> result, Throwable throwable) {
        if (throwable == null) {
            LOGGER.debug("SuccessfulRegistrationDTO sent successfully with offset: {}", result.getRecordMetadata().offset());
        } else {
            LOGGER.error("Sending SuccessfulRegistrationDTO to topic: {} resulted to: {}", topic, throwable.getMessage(), throwable);
        }
    }
}
Finally, we need to do small adjustment to RegistrationService.java in order to produce the event once a new account is created:
@Service
public class RegistrationService {
    ...
    private final SuccessfulRegistrationProducer successfulRegistrationProducer;

    public RegistrationService(..., SuccessfulRegistrationProducer successfulRegistrationProducer) {
      ...
      this.successfulRegistrationProducer = successfulRegistrationProducer;
    }

    public void createUser(SignupRequest signupRequest) {
        ...
        if (user.getId() != null) {
          successfulRegistrationProducer.send(userMapper.toSuccessfulRegistrationDTO(user));
        }
    }
}
And that's it. We are ready to test our messaging channel.
Successful SignUp
Now, with every successful signup, we expect a SuccessfulRegistration event to be generated and published to its assigned topic. Let’s see it in action.
Test Case 1: Unsuccessful signup
We can reuse the same call we previously used to create a new account, but this time with the same username. This will allow us to confirm that the request gets rejected, as our system does not allow duplicate usernames.
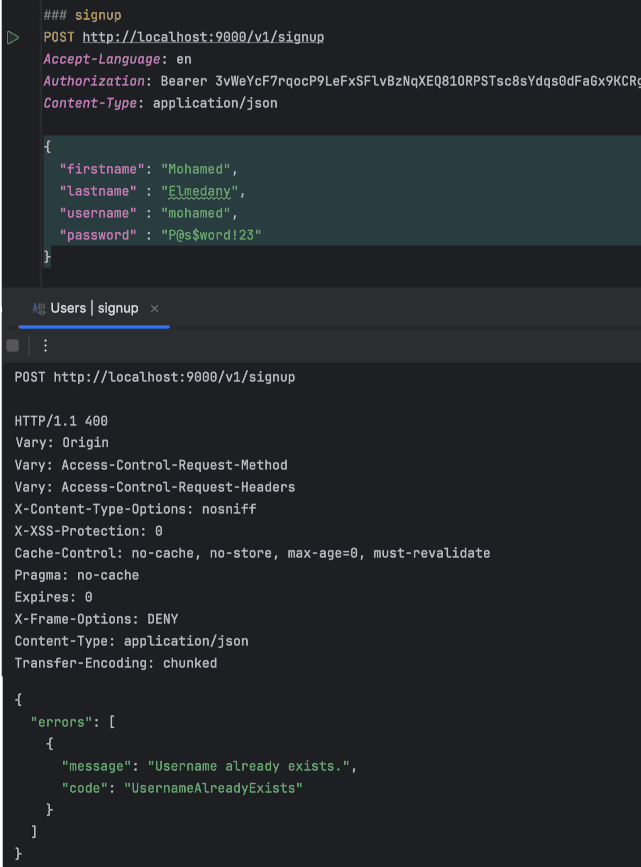
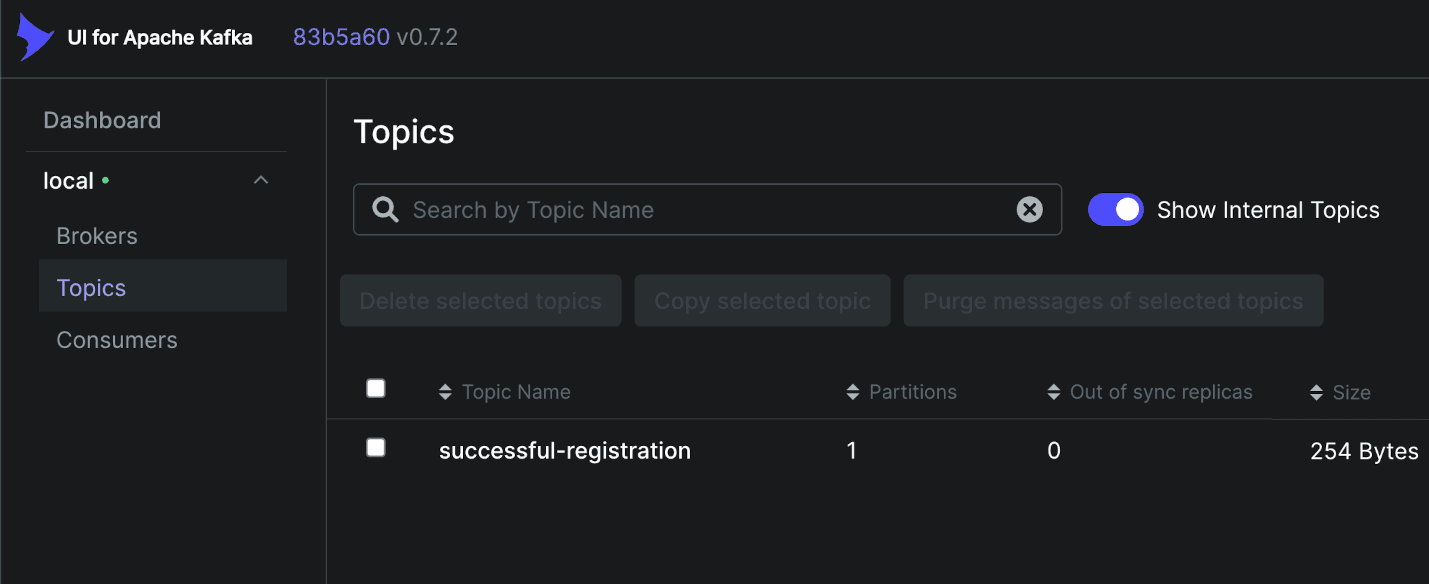
Looking at the Kafka UI dashboard, we can see that the topic has been created, but there shouldn't be any messages yet.
Test Case 2: Successful signup
If we change the username while keeping the rest of the request the same, it will be accepted. We should then see the message with the correct newly created account details appear under the Messages tab.
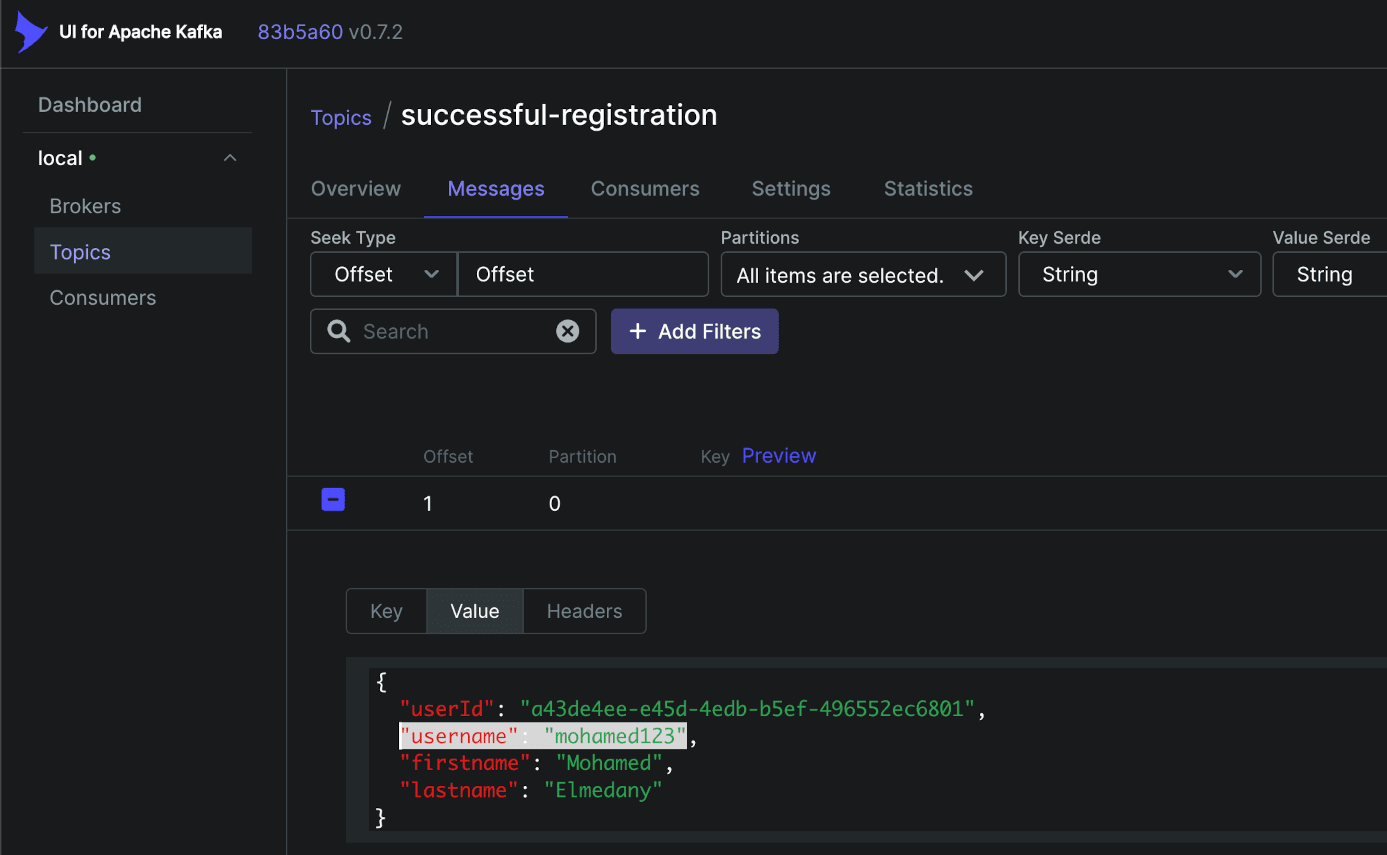
This should cover the desired functionality we have defined so far. Next, we will move on to additional features of the system. The system provides chat functionality, so we will now focus on another key component: The chat API.
Chat API
The chat API is another key component of our system, responsible for providing chat functionality such as searching for or connecting with existing users, starting new conversations, posting or receiving messages, and customising own user profile. It ensures that all chat-related operations are handled efficiently, enabling smooth communication between users. So, how does this work exactly? And what are the specifications of the API? Let’s break that down now.
Functional Requirements
- Listen and process
SuccessfulRegistrationevents - Managing own user profile
- Search for or connect with existing users
- List ongoing conversations or retrieve a specific conversation
- Compose or retrieve conversation messages
Technologies
- Java 21
- Spring Kafka (3.3.2 the current latest release)
- Spring boot, web and data (3.3.2 the current latest release)
- Spring Security with OAuth 2.0 Resource Server (6.3.1 the current latest release)
- Flyway
- Postgres
- Gradle
Implementation
First, just as we did with the authorisation server, we will create a separate directory specifically for the chat API. Inside that directory, we will create a build.gradle file and add the following dependencies:
dependencies {
    implementation("org.springframework.boot:spring-boot-starter-web:+")

    implementation("org.springframework.boot:spring-boot-starter-security:+")
    implementation("org.springframework.boot:spring-boot-starter-oauth2-resource-server:+")

    implementation("org.springframework.boot:spring-boot-starter-data-jpa:+")

    implementation("org.springframework.kafka:spring-kafka:+")

    annotationProcessor("org.springframework.boot:spring-boot-configuration-processor:+")
    annotationProcessor("org.mapstruct:mapstruct-processor:+")

    runtimeOnly("org.postgresql:postgresql:+")
    runtimeOnly("org.flywaydb:flyway-database-postgresql:+")
}
Next, we will add ResourceServerConfiguration.java to define the security configuration:
@Configuration
@EnableWebSecurity
public class ResourceServerConfiguration {
    private final String introspectionUri;
    private final String clientId;
    private final String clientSecret;

    public ResourceServerConfiguration(@Value("${oauth2.token.introspection-uri}") String introspectionUri,
                                       @Value("${oauth2.resources.server.client-id}") String clientId,
                                       @Value("${oauth2.resources.server.client-secret}") String clientSecret) {
        this.introspectionUri = introspectionUri;
        this.clientId = clientId;
        this.clientSecret = clientSecret;
    }

    @Bean
    public SecurityFilterChain securityFilterChain(HttpSecurity http) throws Exception {
        http.cors(withDefaults())
                .csrf(AbstractHttpConfigurer::disable)
                .authorizeHttpRequests(authorizeRequests -> authorizeRequests.anyRequest().authenticated());

        http.oauth2ResourceServer(oauth2ResourceServer ->
                oauth2ResourceServer.opaqueToken(opaqueTokenConfigurer ->
                        opaqueTokenConfigurer.introspectionUri(introspectionUri)
                                .introspectionClientCredentials(clientId, clientSecret)
                                .authenticationConverter(tokenAuthenticationConverter())));

        return http.build();
    }

    @Bean
    public OpaqueTokenAuthenticationConverter tokenAuthenticationConverter() {
        return new TokenAuthenticationConverter();
    }

    @Bean
    public PasswordEncoder passwordEncoder() {
        return PasswordEncoderFactories.createDelegatingPasswordEncoder();
    }
}
Here, we configure securityFilterChain bean with the following:
- Require all requests to be authenticated.
- Configure
oauth2ResourceServerwithintrospectionUri, which is the location of our authorisation server, and provide theclientIdandclientSecretto identify the chat API as a client application. - Define the
tokenAuthenticationConverterbean, which is responsible for converting a successful introspection result into an Authentication token.
Then, we will add application.properties file to define properties:
server.port=8088

spring.datasource.url=jdbc:postgresql://localhost:5432/<database_name>?stringtype=unspecified&serverTimezone=UTC
spring.datasource.hikari.maximum-pool-size=10
spring.datasource.hikari.jdbc-url=${spring.datasource.url}
spring.datasource.hikari.username=postgres

spring.flyway.enabled=true
spring.flyway.user=postgres
spring.flyway.encoding=UTF-8
spring.flyway.locations=classpath:db/migrations
spring.flyway.schemas=public
spring.flyway.table=migrations_log
spring.flyway.baseline-on-migrate=true
spring.flyway.url=${spring.datasource.url}

spring.kafka.bootstrap-servers=localhost:9094

spring.kafka.consumer.auto-offset-reset=earliest
spring.kafka.consumer.key-deserializer=org.apache.kafka.common.serialization.StringDeserializer
spring.kafka.consumer.value-deserializer=org.springframework.kafka.support.serializer.JsonDeserializer
spring.kafka.consumer.properties.enable.auto.commit=false
spring.kafka.listener.ack-mode=MANUAL

oauth2.token.introspection-uri=http://localhost:9000/oauth2/introspect
oauth2.resources.server.client-id=chat-api
oauth2.resources.server.client-secret=chat-api-secret

successful-registration.topic=successful-registration
successful-registration.consumer.group-id=successful-registration-consumer-group
Here, similarly to the authorisation server, we define the server port, configure the Spring datasource, and set up Flyway for database migrations, which can be found here db/migrations. We also specify Kafka topic and consumer properties to enable listening to and processing of the SuccessfulRegistration events.
That’s it for the basic setup. Next, we will move on to the functional requirements and test them one by one.
SuccessfulRegistration Event Processing
To process the event, we need a listener attached to the topic that will consume messages as they arrive, start from the beginning, or continue from where it left off if it's behind. For that purpose, we'll add the SuccessfulRegistrationListener.java class:
@Service
public class SuccessfulRegistrationListener {
    private static final Logger LOGGER = LoggerFactory.getLogger(SuccessfulRegistrationListener.class);

    private final UserProfileService userProfileService;

    public SuccessfulRegistrationListener(UserProfileService userProfileService) {
        this.userProfileService = userProfileService;
    }

    @KafkaListener(topics = {"${successful-registration.topic}"},
            groupId = "${successful-registration.consumer.group-id}")
    public void successfulRegistration(ConsumerRecord<String, SuccessfulRegistrationDTO> message, Acknowledgment acknowledgment) {
        LOGGER.debug("Received message on topic: {} value: {}", message.topic(), JsonUtil.toJson(message.value()));

        try {
            process(message.value());
            acknowledgment.acknowledge();
        } catch (Exception e) {
            LOGGER.error("Error while processing message: {}", JsonUtil.toJson(message.value()), e);
            acknowledgment.nack(Duration.ofMinutes(5));
        }
    }

    protected void process(SuccessfulRegistrationDTO successfulRegistrationDTO) {
        LOGGER.debug("Processing successful registration: {}", JsonUtil.toJson(successfulRegistrationDTO));
        userProfileService.createNewProfile(successfulRegistrationDTO);
    }
}
Then, we will add UserProfileService.java, which will be responsible for creating and managing user profiles. It will map registration data from a SuccessfulRegistrationDTO to a UserProfile entity and sets the necessary fields:
@Service
public class UserProfileService {
    private final UserProfileRepository userProfileRepository;
    private final UserProfileMapper userProfileMapper;

    public UserProfileService(UserProfileRepository userProfileRepository,
                              UserProfileMapper userProfileMapper) {
        this.userProfileRepository = userProfileRepository;
        this.userProfileMapper = userProfileMapper;
    }

    public UserProfile createNewProfile(SuccessfulRegistrationDTO successfulRegistrationDTO) {
        UserProfile userProfile = userProfileMapper.successfulRegistrationToUserProfile(successfulRegistrationDTO);
        userProfile.setActive(true);
        userProfile.setCreated(OffsetDateTime.now());
        userProfile.setUpdated(OffsetDateTime.now());
        return userProfileRepository.save(userProfile);
    }
}
We will also need to add UserProfileRepository.java, which will initially extend the default JPA functionality.
With that done, we are ready to start processing the previously produced SuccessfulRegistration event.
Test Case: New user profile from SuccessfulRegistration event
We just need to start the chat API and proceed from there. By checking the logged lines from the listener, we can confirm that the event has been processed as expected.

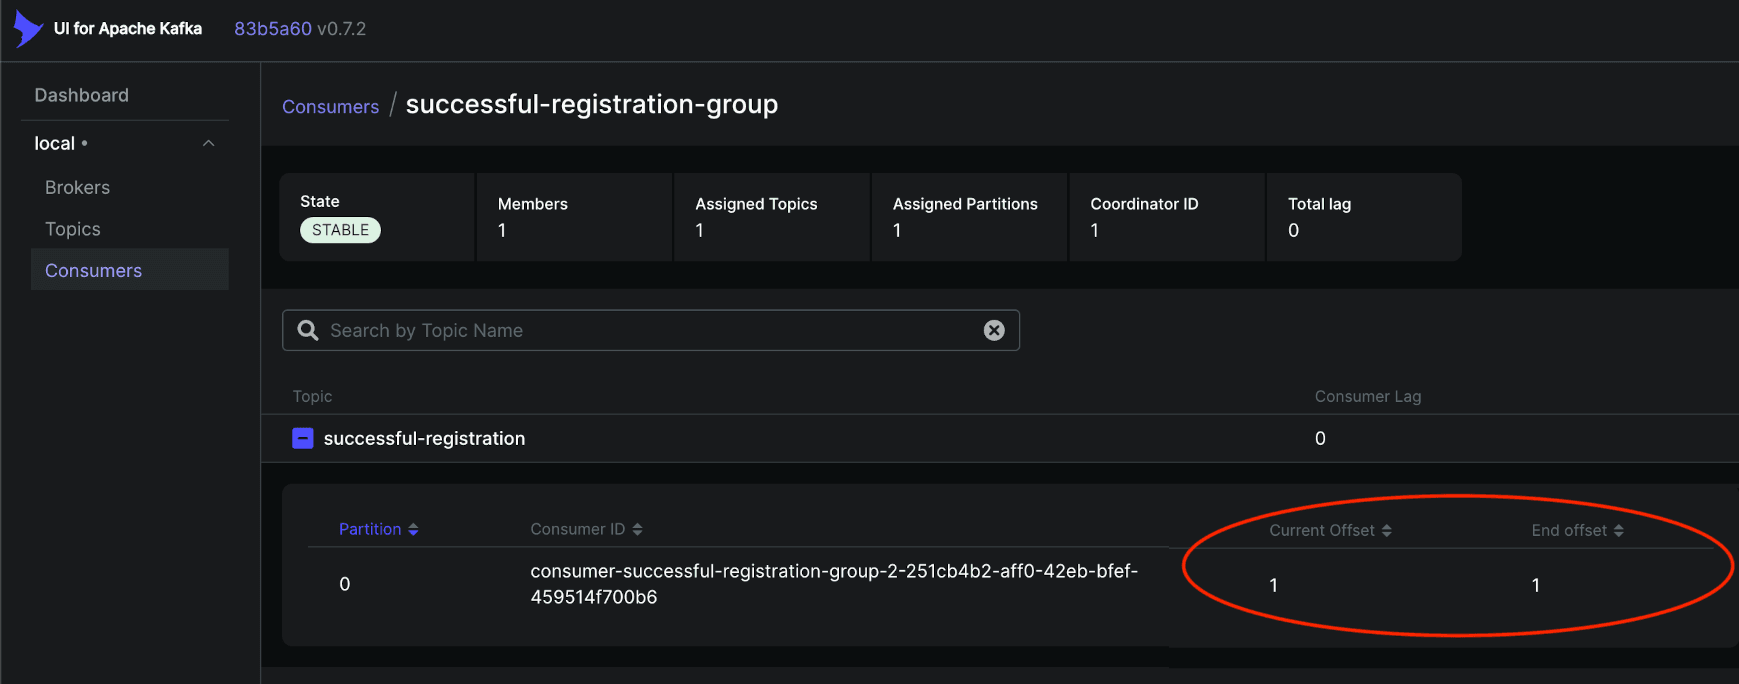
Looking at the Kafka UI dashboard, we can see that the consumer group has been created and the current offset is 1. This indicates that the event message has been processed and acknowledged successfully.
Managing own user profile
Now that we have created a profile for the newly created user account, we need to provide functionality to load the profile when the user logs in, update profile information when needed, or even search for other existing profiles. To achieve this, we will introduce the UserProfile endpoint:
@RestController
@RequestMapping("/v1")
public class UserProfileController {

    private final UserProfileService userProfileService;

    public UserProfileController(UserProfileService userProfileService) {
        this.userProfileService = userProfileService;
    }

    @GetMapping(value = "/users/profiles", produces = MediaType.APPLICATION_JSON_VALUE)
    public ResponseEntity<APIResponse<UserProfileDTO>> get() {
        Authentication authentication = SecurityContextHolder.getContext().getAuthentication();
        String principalName = authentication.getName();

        UserProfileDTO profile = userProfileService.findByUsername(principalName);

        return new ResponseEntity<>(new APIResponse<>(profile, null), HttpStatus.OK);
    }

    @PutMapping(value = "/users/profiles", consumes = MediaType.APPLICATION_JSON_VALUE)
    public ResponseEntity<APIResponse<Void>> update(@RequestBody UserProfileDTO updatedProfile) {
      Authentication authentication = SecurityContextHolder.getContext().getAuthentication();
      String principalName = authentication.getName();

      userProfileService.update(principalName, updatedProfile);

      return new ResponseEntity<>(APIResponse.emptyResponse(), HttpStatus.NO_CONTENT);
    }
}
Next, we will extend UserProfileService.java to include functionality for finding and updating user profiles by username:
@Service
public class UserProfileService {
  ...

  public UserProfileDTO findByUsername(String username) {
    return findByUsernameInternal(username);
  }

  public void updateUserProfile(String username, UserProfileDTO updatedProfileDTO) {
    UserProfile userProfile = findUserProfileByUsernameInternal(username);

    userProfileMapper.update(userProfile, updatedProfileDTO);

    userProfileRepository.save(userProfile);
  }

  private UserProfileDTO findByUsernameInternal(String username) {
    UserProfile userProfile = findUserProfileByUsernameInternal(username);
    return userProfileMapper.toUserProfileDTO(userProfile);
  }

  private UserProfile findUserProfileByUsernameInternal(String username) {
    UserProfile userProfile = userProfileRepository.findByUsername(username).orElse(null);

    if (userProfile == null) {
      throw new UsernameNotFoundException("Username cannot be found.");
    }

    return userProfile;
  }

  ...
}
Finally, we will extend UserProfileRepository.java to support the functionality of finding user profiles by username:
@Repository
public interface UserProfileRepository extends JpaRepository<UserProfile, UUID> {
    Optional<UserProfile> findByUsername(String username);
}
Test Case 1: Load own user profile
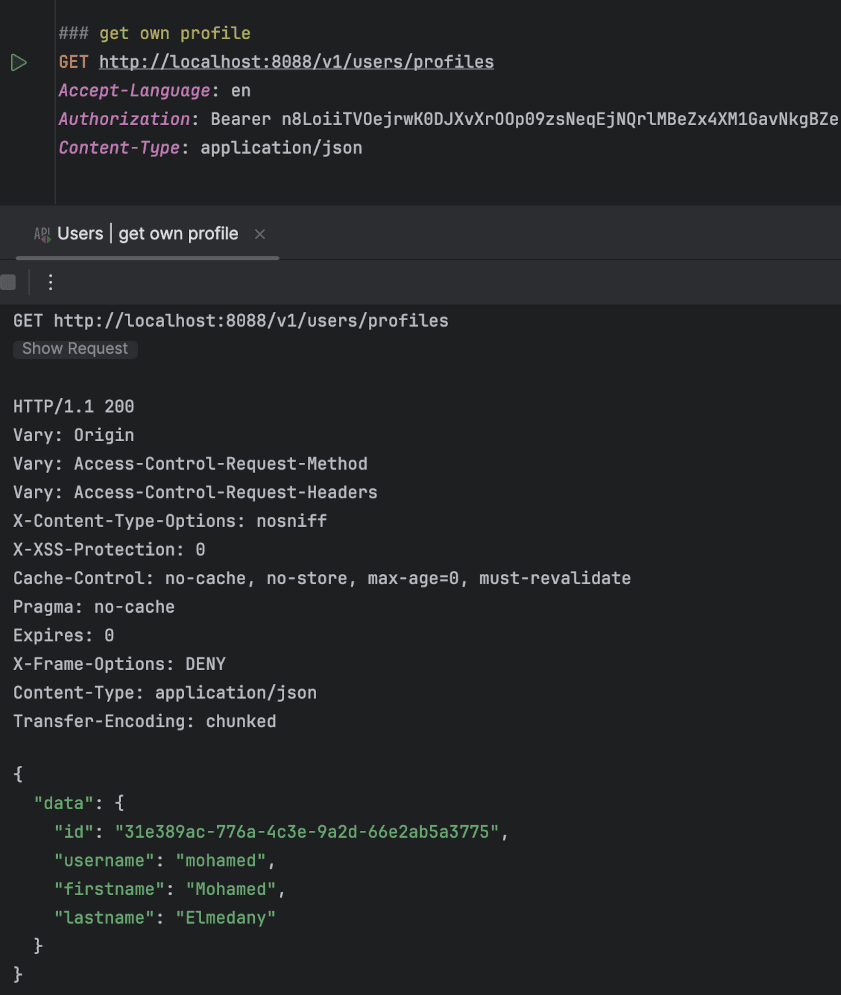
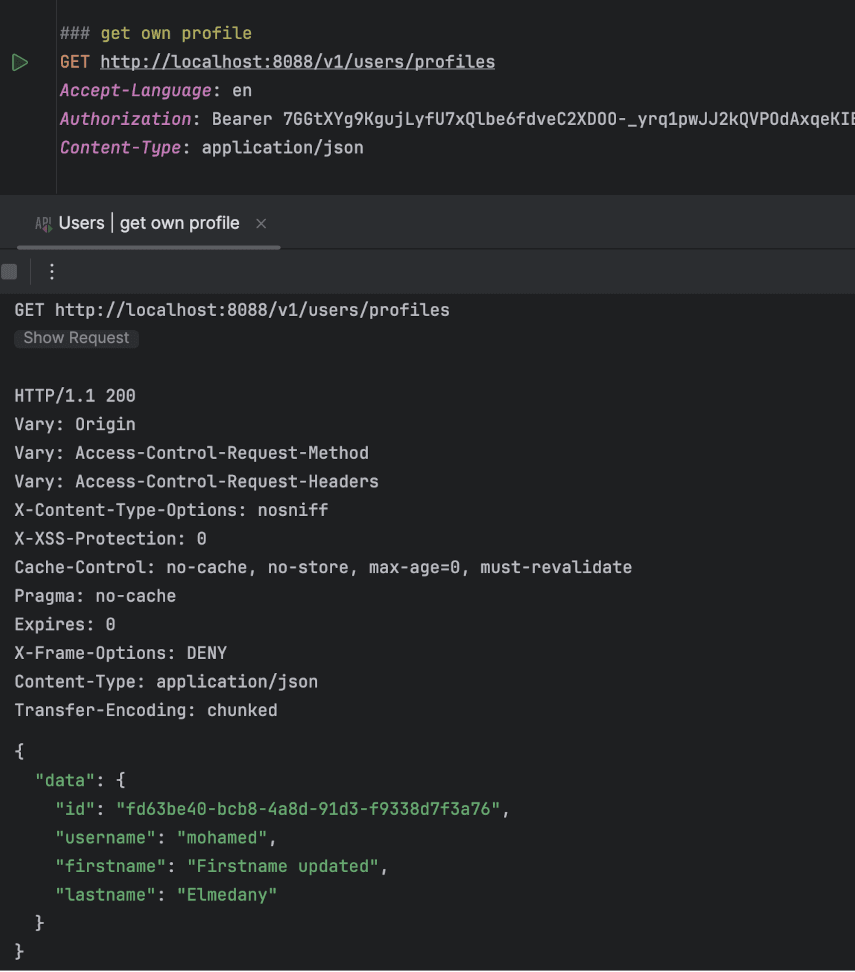
After a successful login, users should be able to view their own profile. Although we don't have a UI yet, we can still verify what the UI would expect from the backend. Calling the /v1/users/profiles endpoint with the correct Authorization header should return the logged-in user's profile details.
Test Case 2: Invalidated or expired token
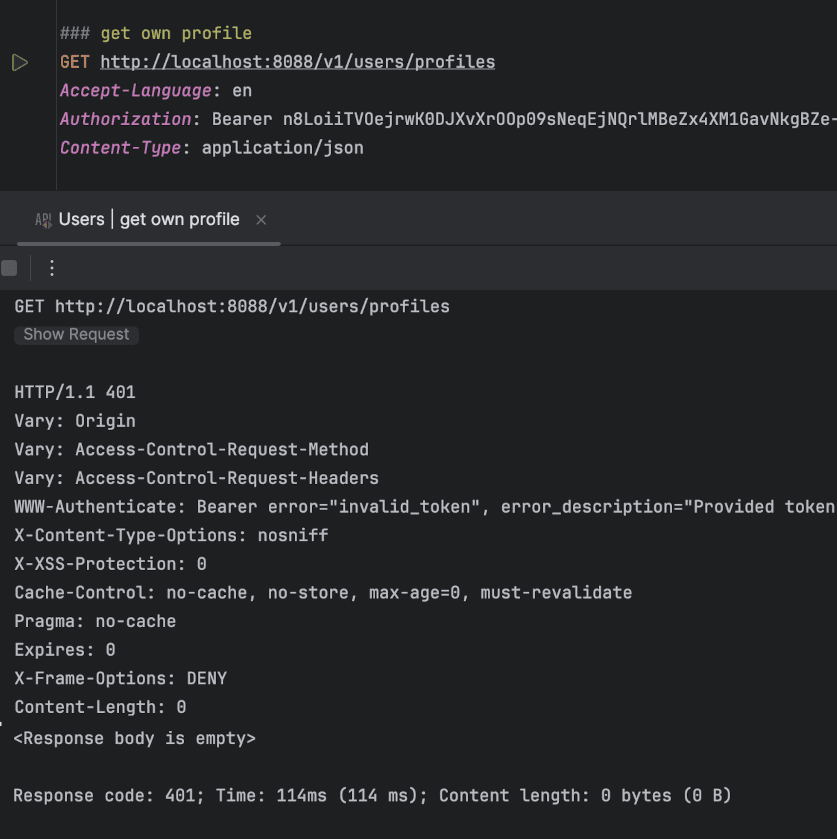
When the token is invalidated or expired, users will no longer be able to call the chat API. This is enforced by the authorisation server to ensure no unauthorised access to the resource server.
How does the chat API know whether the token is valid or not? The sequence diagram below explains the full flow of accessing system resources, in this case, user profiles:
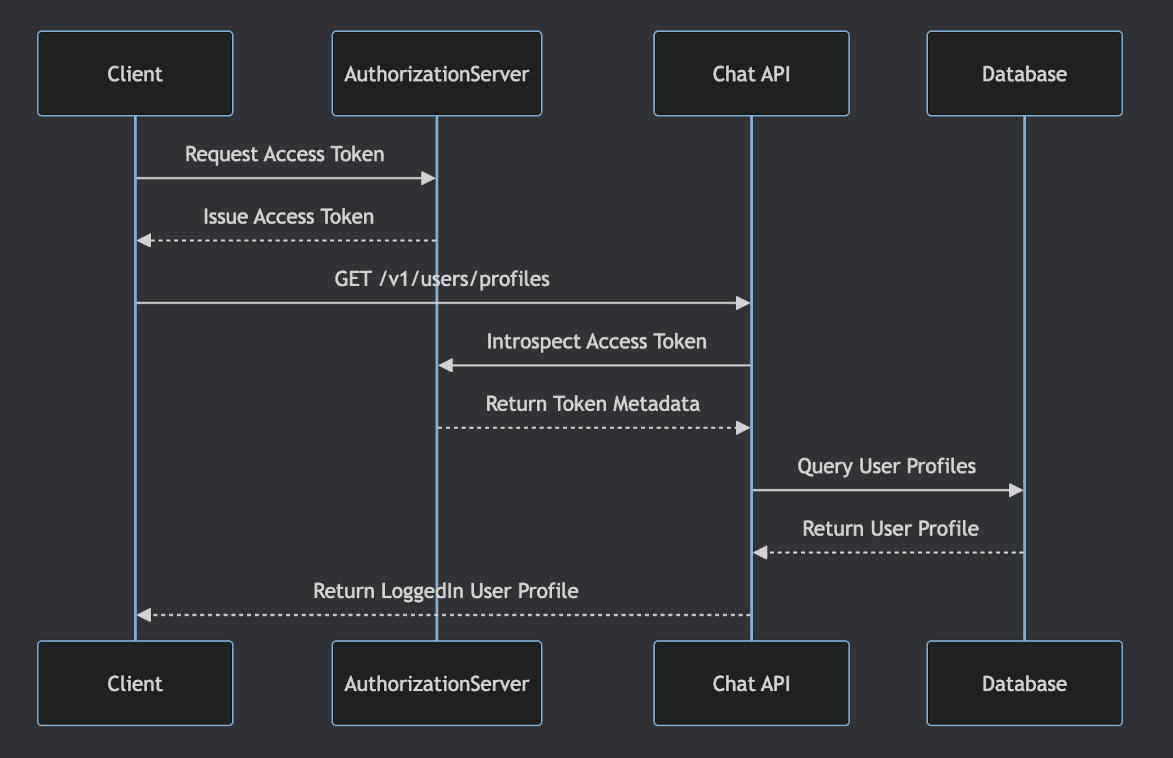
- First, the flow begins by asking the authorisation server for an access token (i.e., login). The obtained access token is added to the
Authorizationheader for any subsequent requests. - When it is required to access a resource, such as by making a GET request to
/v1/users/profiles, the resources server (i.e., the chat API) uses its ownclientIdandclientSecretto send an introspection request to the authorisation server to retrieve the access token's metadata. - The authorisation server validates the caller's client credentials and the access token, then responds with the access token's metadata once all checks pass successfully.
- The resource server receives the access token's metadata and can determine whether the user attempting to access the resource (i.e., the user profile) is authorised.
- Finally, the resource server returns the requested resource to the requester.
Test Case 3: Update user profile
Users should also be able to update their own profiles. By calling the /v1/users/profiles endpoint with the correct Authorization header and including the updated profile details in the request body, the chat API will update those details in the database.
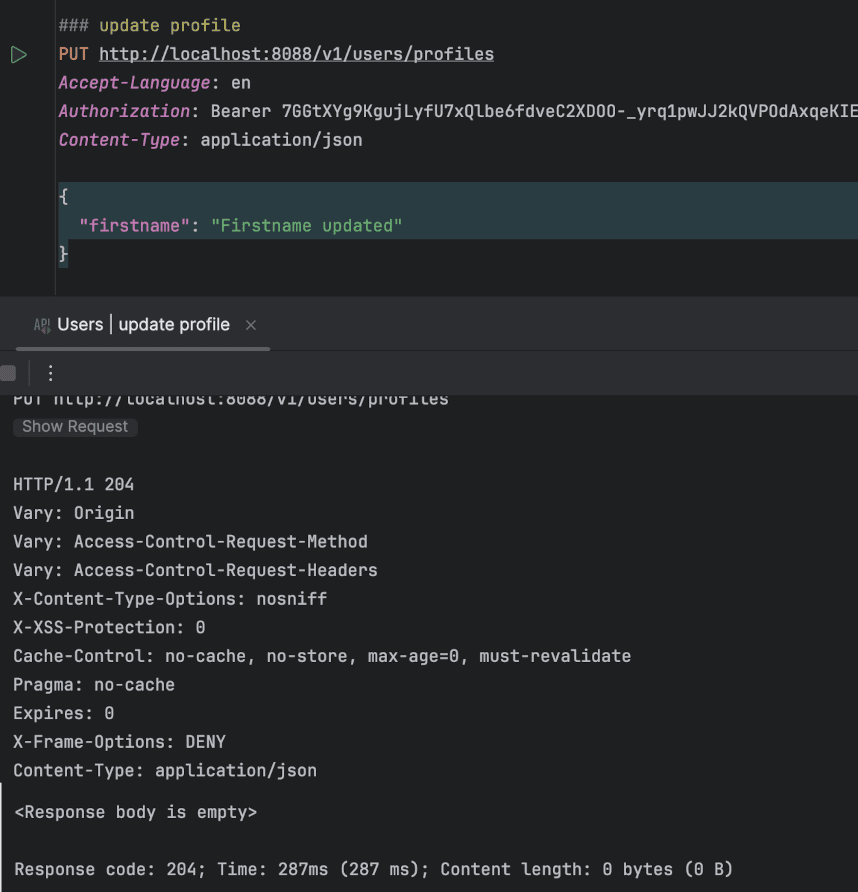
Then when trying to load the user profile again:
Search for or connect with existing users
While it's possible to chat with oneself, it's also enjoyable and will enhance the chatting experience to connect with others and have conversations or share information about common interests. To connect with others, we first need the ability to search for users.
We will extend UserProfileController with endpoints for searching user profiles by a keyword and for adding a connection to another user’s profile:
@RestController
@RequestMapping("/v1")
public class UserProfileController {
  ...

  @GetMapping(value = "/users/profiles/search", produces = MediaType.APPLICATION_JSON_VALUE)
  public ResponseEntity<APIResponse<List<UserProfileDTO>>> search(@RequestParam String keyword) {
    Authentication authentication = SecurityContextHolder.getContext().getAuthentication();
    String principalName = authentication.getName();

    List<UserProfileDTO> profiles = userProfileService.searchUserProfiles(keyword, principalName);

    return new ResponseEntity<>(new APIResponse<>(profiles, null), HttpStatus.OK);
  }

  @PutMapping(value = "/users/profiles/connections/add/{id}", consumes = MediaType.APPLICATION_JSON_VALUE)
  public ResponseEntity<APIResponse<Void>> addConnection(@PathVariable String id) {
    Authentication authentication = SecurityContextHolder.getContext().getAuthentication();
    String principalName = authentication.getName();

    userProfileService.addConnection(principalName, id);

    return new ResponseEntity<>(APIResponse.emptyResponse(), HttpStatus.CREATED);
  }

  ...
}
Next, we can again extend UserProfileService.java with functionality that allows users to search for profiles they are not yet connected to, using a keyword, and to add new connections:
@Service
public class UserProfileService {
  ...

  public List<UserProfileDTO> search(String keyword, String loggedInUsername) {
    return userProfileMapper.toUserProfileDTOList(userProfileRepository.searchNotConnectedProfiles(keyword, loggedInUsername));
  }

  public void addConnection(String username, String idToConnect) {
    UserProfile userProfile = findUserProfileByUsernameInternal(username);

    if (userProfile.getId().toString().equalsIgnoreCase(idToConnect)) {
      throw new IllegalArgumentException("User cannot do self connect.");
    }

    UserProfile connection = findUserProfileByIdInternal(idToConnect);

    boolean connectionExists = userProfile.getConnections().stream()
            .anyMatch(profile -> profile.getId().toString().equalsIgnoreCase(idToConnect));

    if (!connectionExists) {
      userProfile.getConnections().add(connection);
      connection.getConnections().add(userProfile);

      userProfileRepository.save(userProfile);
    }
  }

  ...
}
Finally, we will adjust UserProfileRepository.java to include search query:
@Repository
public interface UserProfileRepository extends JpaRepository<UserProfile, UUID> {
   ...

    @Query("SELECT u " +
            "FROM UserProfile userprofile" +
            "WHERE (LOWER(userprofile.firstname) LIKE LOWER(CONCAT('%', :keyword, '%')) OR LOWER(userprofile.lastname) LIKE LOWER(CONCAT('%', :keyword, '%'))) " +
            "AND LOWER(userprofile.username) <> LOWER(:loggedInUsername) " +
            "AND userprofile.username NOT IN (SELECT connection.username FROM UserProfile currUser JOIN currUser.connections connection WHERE LOWER(currUser.username) = LOWER(:loggedInUsername))")
    List<UserProfile> searchUserProfiles(String keyword, String loggedInUsername);

    ...
}
In the above query, we are selecting user profile(s) from the database based on the following criteria:
- Matches profiles where
firstnameorlastnamecontains the keyword (case-insensitive). - Excludes the logged-in user by checking their
username. - Excludes profiles already connected to the logged-in user.
Test Case 1: Search existing user profile
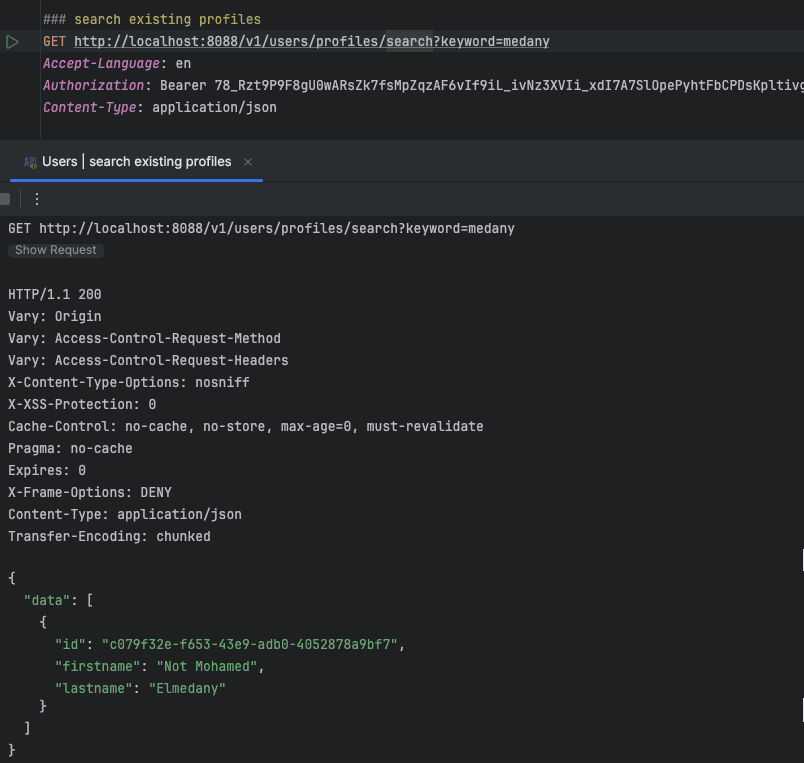
Using a keyword, whether it’s a full first name, last name, or just part of them, users should be able to search for other existing profiles. By calling the /v1/users/profiles/search endpoint with the correct Authorization header and including the keyword as a query parameter, the chat API will return profiles that match the provided keyword. Note that the keyword is case-insensitive.
Test Case 2: Add a new connection
Now that we have found the profile we're searching for, we want to add this profile as a connection so we can start chatting. By calling the /v1/users/profiles/connections/add/{id} endpoint with the correct Authorization header and providing the ID of the desired profile to connect with as a path parameter, the chat API will verify the existence of the provided profile and add the connection if it doesn't already exist.
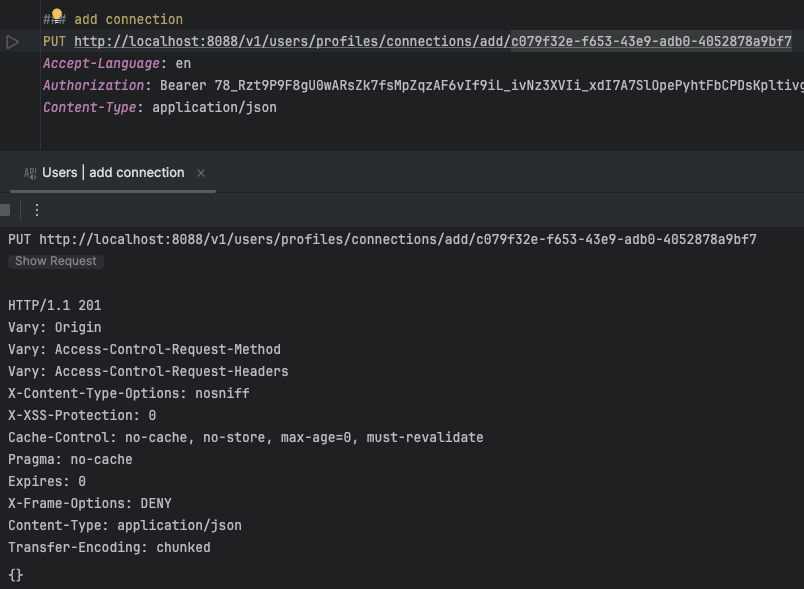
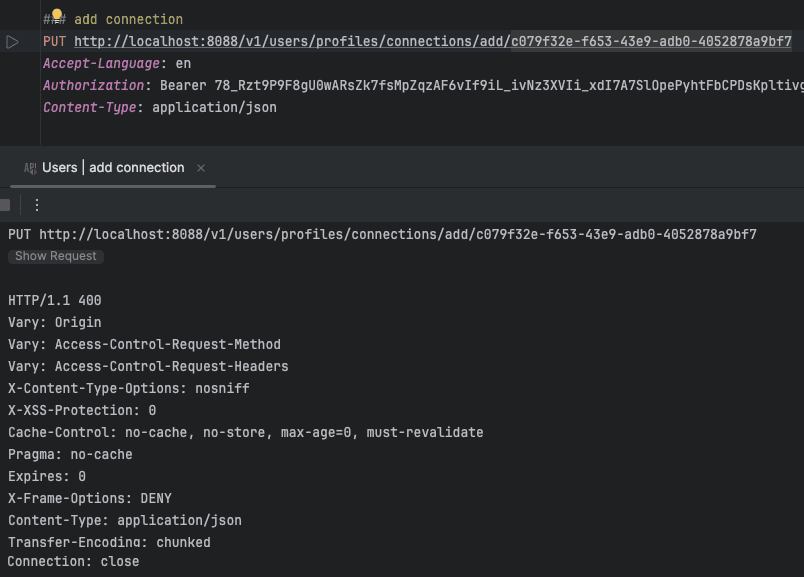
If we try to run the same request again, the call will fail because the connection already exists.
List ongoing conversations or retrieve a specific conversation
We now have a profile and have added connections to it; it's time to start chatting with one of our connections. To do this, we need to start a conversation first. In the previous implementation, we didn't include functionality to start a conversation. When a new connection is added, we will trigger an event to signify the change that occurred, let's call it NewConnection event. The chat API will listen to that event and start a new conversation for the added connection.
First, we will start by adding extra properties:
new-connection.topic=new-connection
new-connection.consumer.group-id=new-connection-group
Next, we will introduce ConversationService.java, which will handle the creation of new conversations:
@Service
public class ConversationService {
    private final ConversationRepository conversationRepository;

    public ConversationService(ConversationRepository conversationRepository) {
        this.conversationRepository = conversationRepository;
    }

    public void createConversation(UserProfile user, UserProfile connection) {
      Conversation newConversation = new Conversation();
      newConversation.setType(ConversationType.direct_message);
      newConversation.setConfiguration( new ConversationConfiguration());

      newConversation.setParticipants(List.of(user, connection));

      conversationRepository.save(newConversation);
    }
}
Then, we will add NewConnectionProducer.java, which will be responsible for creating NewConnection events and sending them to the specified Kafka topic:
@Service
public class NewConnectionProducer {
    private static final Logger LOGGER = LoggerFactory.getLogger(NewConnectionProducer.class);

    protected final String topic;
    protected final KafkaTemplate<String, NewConnectionDTO> producer;

    protected NewConnectionAddedProducer(@Value("${new-connection.topic}") String topic,
                                         KafkaTemplate<String, NewConnectionDTO> producer) {
        this.topic = topic;
        this.producer = producer;
    }

    public void send(NewConnectionDTO message) {
        LOGGER.debug("Sending NewConnectionDTO to topic: {} value: {}", topic, JsonUtil.toJson(message));
        ProducerRecord<String, NewConnectionDTO> producerRecord = new ProducerRecord<>(topic, message);
        producer.send(producerRecord).whenComplete(this::handleSendResult);
    }

    private void handleSendResult(SendResult<String, NewConnectionDTO> result, Throwable throwable) {
        if (throwable == null) {
            LOGGER.debug("NewConnectionDTO sent successfully with offset: {}", result.getRecordMetadata().offset());
        } else {
            LOGGER.error("Sending NewConnectionDTO to topic: {} resulted to: {}", topic, throwable.getMessage(), throwable);
        }
    }
}
And NewConnectionListener.java, which will handle incoming NewConnection events from a Kafka topic. It will process these events by retrieving the relevant user profiles and creating a new conversation between them:
@Service
public class NewConnectionListener {
    private static final Logger LOGGER = LoggerFactory.getLogger(NewConnectionListener.class);

    private final ConversationService conversationService;
    private final UserProfileService userProfileService;

    public NewConnectionListener(ConversationService conversationService, UserProfileService userProfileService) {
        this.conversationService = conversationService;
        this.userProfileService = userProfileService;
    }

    @Transactional
    @KafkaListener(topics = {"${new-connection.topic}"}, groupId = "${new-connection.consumer.group-id}")
    public void newConnection(ConsumerRecord<String, NewConnectionDTO> message, Acknowledgment acknowledgment) {
        LOGGER.debug("Received message on topic: {} value: {}", message.topic(), JsonUtil.toJson(message.value()));

        try {
            process(message.value());
            acknowledgment.acknowledge();
        } catch (Exception e) {
            LOGGER.error("Error while processing message: {}", JsonUtil.toJson(message.value()), e);
            acknowledgment.nack(Duration.ofMinutes(5));
        }
    }

    protected void process(NewConnectionDTO newConnectionDTO) {
        LOGGER.debug("Processing new connection: {}", JsonUtil.toJson(newConnectionDTO));
        UserProfile user = userProfileService.findById(newConnectionDTO.getRequesterId());
        UserProfile connection = userProfileService.findById(newConnectionDTO.getConnectionId());
        conversationService.createConversation(user, connection);
    }
}
Finally, we will make a small adjustment to UserProfileService.java to produce a NewConnection event once the connection has been added:
@Service
public class UserProfileService {
    ...
    private final NewConnectionProducer newConnectionProducer;

    public UserProfileService(..., NewConnectionProducer newConnectionProducer) {
      ...
      this.newConnectionProducer = newConnectionProducer;
    }

  public void addConnection(String username, String idToConnect) {
    ...

    newConnectionProducer.send(userProfileMapper.toNewConnectionDTO(userProfile.getId(), connection.getId()));
  }
}
Test Case 1: Create conversation for added connection
If we run the same test case again but specify a different profile this time, the NewConnection event will be produced after the new connection is made. The event listener will then handle the event, creating a new conversation.

Test Case 2: List ongoing conversations
To further test the created conversation(s), we need to be able to list user's ongoing conversations. The UI also requires this functionality, although we haven't reached that part yet. To make this possible, we need to add the missing functionality.
We start with introducing Conversations endpoint:
@RestController
@RequestMapping("/v1")
public class ConversationController {
    private final ConversationService conversationService;

    public ConversationController(ConversationService conversationService) {
        this.conversationService = conversationService;
    }

    @GetMapping(value = "/conversations", produces = MediaType.APPLICATION_JSON_VALUE)
    public ResponseEntity<APIResponse<List<ConversationDTO>>> getConversations() {
        Authentication authentication = SecurityContextHolder.getContext().getAuthentication();
        String username = authentication.getName();

        List<ConversationDTO> conversations = conversationService.getConversations(username);

        return new ResponseEntity<>(new APIResponse<>(conversations, null), HttpStatus.OK);
    }
}
Then we will extend the functionality of ConversationService.java to allow retrieving conversations for the logged-in user:
@Service
public class ConversationService {
  ...
    public List<ConversationDTO> getConversations(String username) {
      return conversationMapper.toDTOList(conversationRepository.findConversationsForUser(getUserProfileId(username)));
    }
  ...
}
Finally, we will add ConversationRepository.java:
@Repository
public interface ConversationRepository extends JpaRepository<Conversation, UUID> {

  @Query("SELECT c " +
          "FROM Conversation c JOIN c.participants p " +
          "WHERE p.id = :id ORDER BY c.created DESC")
  List<Conversation> findConversationsUser(@Param("id") UUID id);
}
The above query retrieves conversations in which the logged-in user is participating, identified by their ID, and orders the results in descending order based on the creation date.
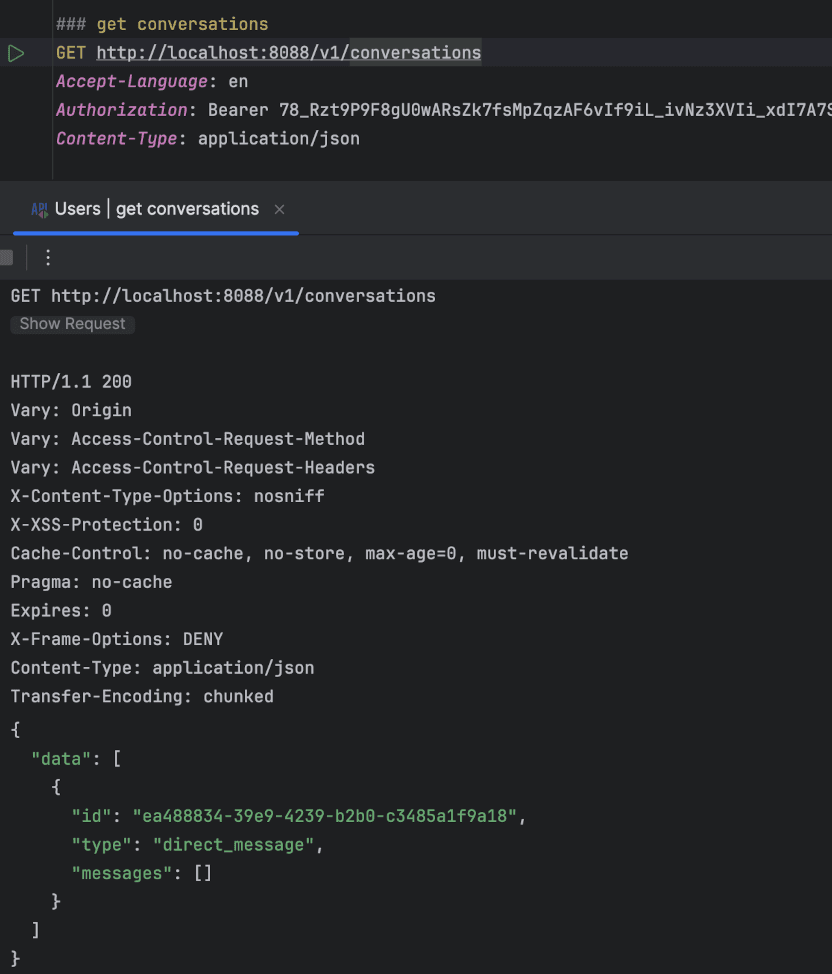
Now, by calling the newly created /v1/conversations endpoint with the correct Authorization header, the chat API will return user's ongoing conversations.
Test Case 3: Retrieve a specific conversation
We will first add a new endpoint to retrieve a specific conversation by its ID:
@RestController
@RequestMapping("/v1")
public class ConversationController {
  ...
    @GetMapping(value = "/conversations/{id}", produces = MediaType.APPLICATION_JSON_VALUE)
    public ResponseEntity<APIResponse<ConversationDTO>> getConversation(String id) {
      Authentication authentication = SecurityContextHolder.getContext().getAuthentication();
      String username = authentication.getName();

      ConversationDTO conversationDTO = conversationService.getConversation(id, username);

      return new ResponseEntity<>(new APIResponse<>(conversationDTO, null), HttpStatus.OK);
    }
  ...
}
Then we will adjust ConversationService.java to allow retrieving a conversation by its ID, if the specified user is a participant in it.
@Service
public class ConversationService {
  ...
  public ConversationDTO getConversation(String id, String username) {
    Conversation conversation = conversationRepository.findById(UUID.fromString(id)).orElse(null);

    if (conversation == null) {
      throw new ConversationNotFoundException(id, "Conversation not found!");
    }

    boolean userInConversationParticipants = conversation.getParticipants().stream()
            .anyMatch(participant -> username.equalsIgnoreCase(participant.getUsername()));

    if (!userInConversationParticipants) {
      throw new ConversationNotFoundException(id, "Conversation not found!");
    }

    return conversationMapper.toDTO(conversation);
  }
  ...
}
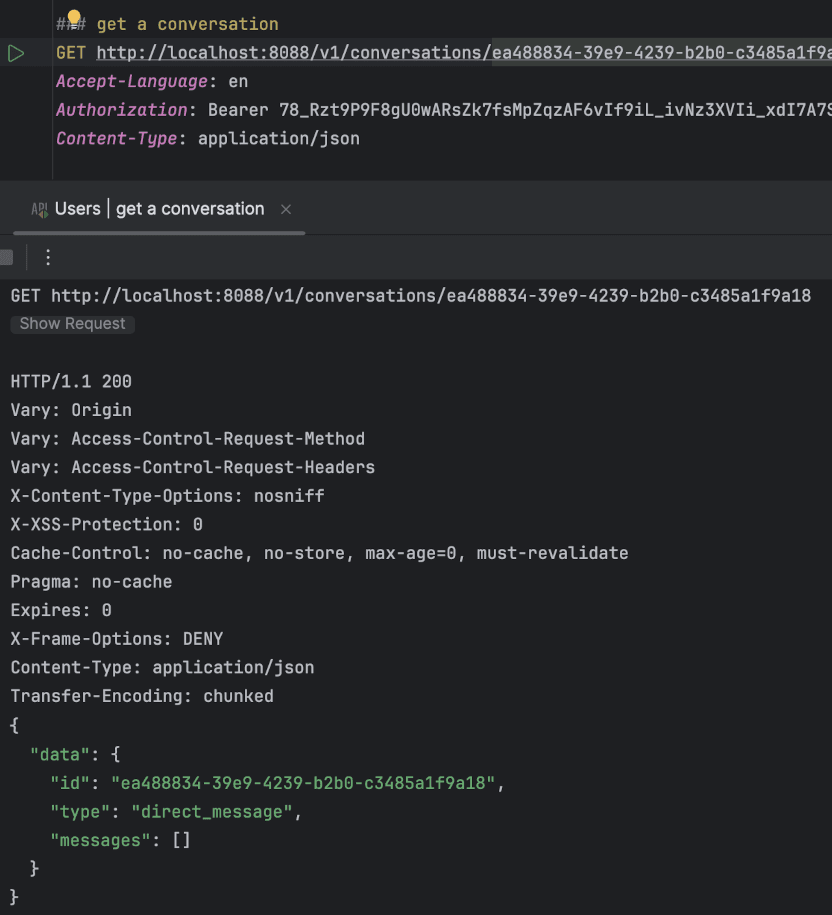
We can verify the implementation by calling the newly created /v1/conversations/{id} endpoint with the correct Authorization header and specifying the required conversation ID as a path parameter. The chat API will return the conversation if it exists and if the requesting user is a participant in it.
Compose or retrieve a conversation messages
Now we need to start using the created conversation(s), right? After all, what's the point of having a conversation if we can't send any messages? Let's first add the missing functionality.
We will define the new endpoint for posting a message:
@RestController
@RequestMapping("/v1")
public class ConversationController {
  ...
  @PostMapping(value = "/conversations/{conversationId}/messages", consumes = MediaType.APPLICATION_JSON_VALUE)
  public ResponseEntity<APIResponse<Void>> postMessage(String conversationId, PostMessageRequest postMessageRequest) {
    Authentication authentication = SecurityContextHolder.getContext().getAuthentication();
    String username = authentication.getName();

    conversationMessageService.postMessage(username, conversationId, postMessageRequest);
    return new ResponseEntity<>(APIResponse.emptyResponse(), HttpStatus.CREATED);
  }
  ...
}
Then, we will add ConversationMessageService.java, which will handle posting messages to a conversation. It ensures the user is a participant, then creates a new ConversationMessage with the provided text and sender information, saving both the message and the updated conversation to the database.
@Service
public class ConversationMessageService {

    private final UserProfileService userProfileService;
    private final ConversationRepository conversationRepository;
    private final ConversationMessageRepository conversationMessageRepository;

    public ConversationMessageService(ConversationRepository conversationRepository,
                                      UserProfileService userProfileService,
                                      ConversationMessageRepository conversationMessageRepository) {
        this.conversationRepository = conversationRepository;
        this.userProfileService = userProfileService;
        this.conversationMessageRepository = conversationMessageRepository;
    }

    public void postMessage(String username, String conversationId, PostMessageRequest postMessage) {
        Conversation conversation = conversationRepository.findById(UUID.fromString(conversationId))
                .orElseThrow(() -> new ConversationNotFoundException("Conversation " + conversationId + " not found."));

        verifyUserInConversation(username, conversation);

        UserProfile sender = userProfileService.findUserProfileByUsername(username);

        ConversationMessage conversationMessage = new ConversationMessage();
        conversationMessage.setType(ConversationMessageType.text);
        conversationMessage.setText(postMessage.getMessage());
        conversationMessage.setSender(sender);

        conversationMessage.setConversation(conversation);

        conversation.getMessages().add(conversationMessage);
        conversationRepository.save(conversation);

        conversationMessageRepository.save(conversationMessage);
    }

    private void verifyUserInConversation(String username, Conversation conversation) {
        boolean userInConversationParticipants =
                conversation.getParticipants().stream().map(UserProfile::getUsername)
                        .anyMatch(participant -> participant.equalsIgnoreCase(username));

        if (!userInConversationParticipants) {
            throw new UserCannotPostMessageException("User " + username + " is not a participant of conversation " + conversation.getId().toString());
        }
    }
}
Test Case 1: Compose a new message
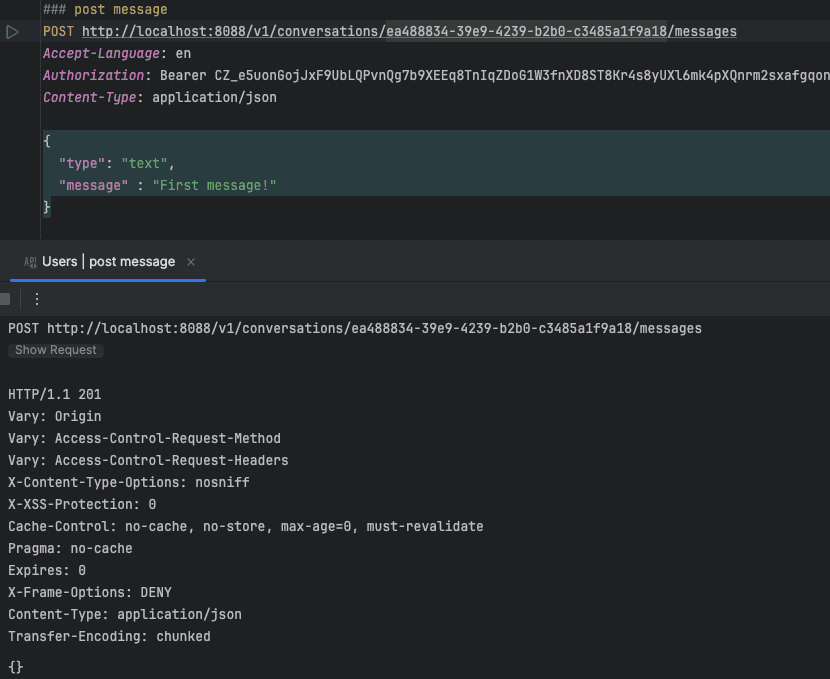
We need to identify which conversation we want to send the message to, which we can retrieve from previous test cases. Then we can post the message body to /v1/conversations/{conversationId}/messages along with the correct Authorization header, as you should already know by now.
Caution: Saving unsanitised text to a database is like leaving your door unlocked; it invites many possible attacks and exposes the system to some serious vulnerabilities. Always sanitise and validate user input to protect the data and ensure better security.
We can verify that everything worked as expected by running the previous test case again, where we retrieved a specific conversation. We should be able to see the message we just posted.

Test Case 2: Receive an incoming message
Receiving an incoming message requires more steps that we haven't covered yet. For now, we can assume there's a UI that receives an update with a message ID to fetch from the chat API. To achieve this, we'll need to create an endpoint to fetch a specific message by its ID. Starting by adding the new endpoint first:
@RestController
@RequestMapping("/v1")
public class ConversationController {
  ...
  @GetMapping(value = "/conversations/{conversationId}/messages/{messageId}", produces = {MediaType.APPLICATION_JSON_VALUE, MediaType.TEXT_PLAIN_VALUE})
  public ResponseEntity<APIResponse<ConversationMessageDTO>> getMessage(String messageId, String conversationId) {
    Authentication authentication = SecurityContextHolder.getContext().getAuthentication();
    String username = authentication.getName();

    ConversationMessageDTO conversationMessageDTO =
            conversationMessageService.getConversationMessage(messageId, conversationId, username);

    return new ResponseEntity<>(new APIResponse<>(conversationMessageDTO, null), HttpStatus.OK);
  }
  ...
}
Next, we will extend ConversationMessageService.java to include functionality for fetching a specific message by its ID:
@Service
public class ConversationMessageService {
  ...
    public ConversationMessageDTO getConversationMessage(String messageId, String conversationId, String username) {
      ConversationMessage conversationMessage = conversationMessageRepository.findByIdAndConversationId(UUID.fromString(messageId),
              UUID.fromString(conversationId)).orElse(null);

      if (conversationMessage == null) {
        throw new ConversationMessageNotFoundException("Conversation message " + messageId + " not found in conversation" + conversationId);
      }

      boolean userInConversationParticipants = conversationMessage.getConversation().getParticipants().stream()
              .anyMatch(participant -> username.equalsIgnoreCase(participant.getUsername()));

      if (!userInConversationParticipants) {
        throw new ConversationNotFoundException("Conversation " + conversationId + " not found.");
      }

      return conversationMessageMapper.toDTO(conversationMessage);
    }
  ...
}
Finally, we will update ConversationMessageRepository.java to support fetching a specific message by its ID:
@Repository
public interface ConversationMessageRepository extends JpaRepository<ConversationMessage, UUID> {
    Optional<ConversationMessage> findByIdAndConversationId(UUID id, UUID conversationId);
}
Now, with the correct conversation ID and message ID, we can call the /v1/conversations/{conversationId}/messages/{messageId} endpoint along with the correct Authorization header to retrieve the desired message.
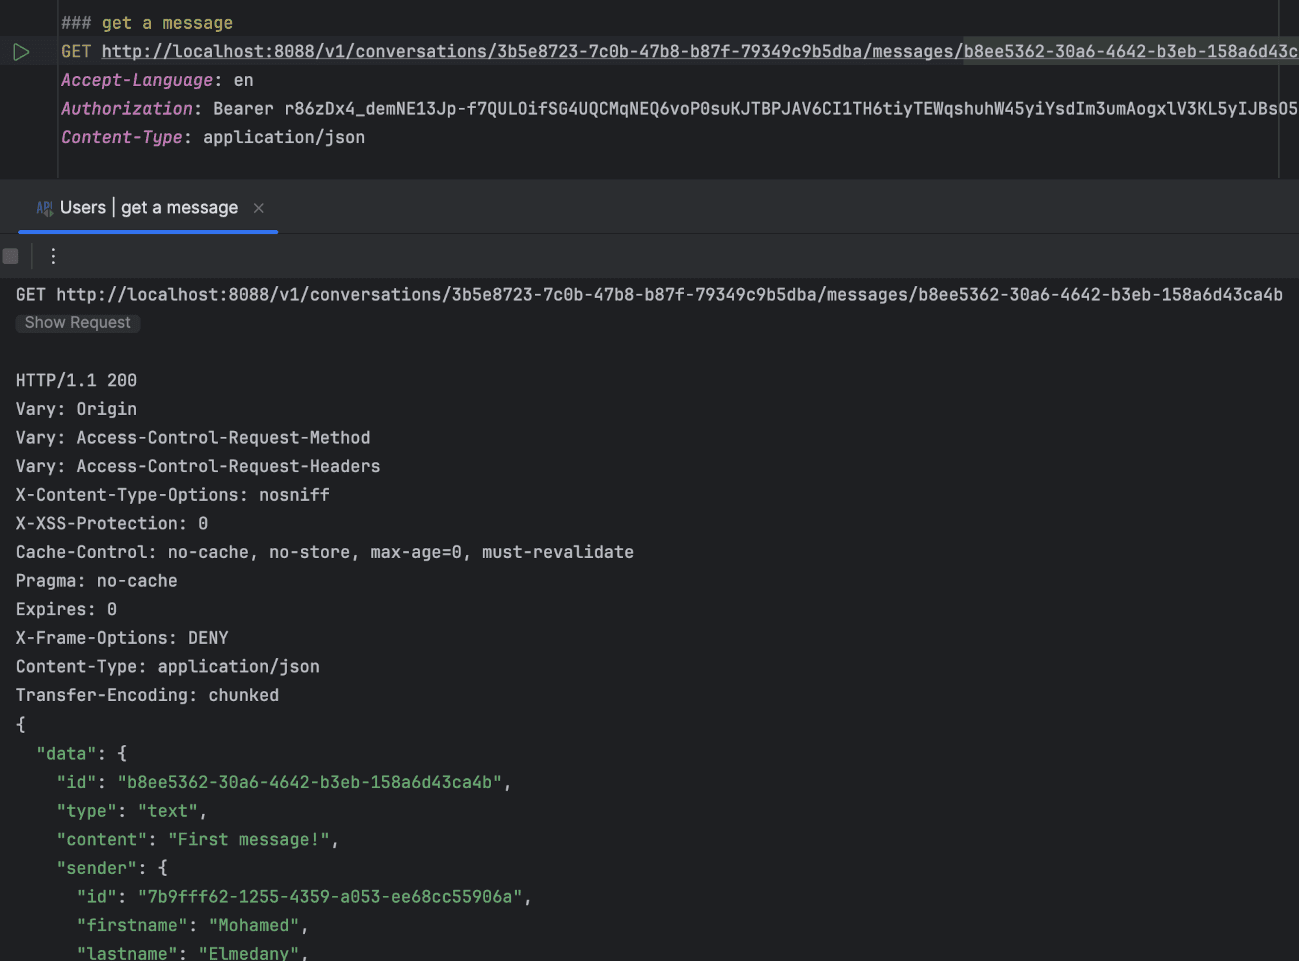
With that complete, we have covered the required functional requirements and tested our implementation to ensure it works as expected.
Source Code & Examples
Some code snippets are intentionally omitted to keep this article concise. Additionally, there are further enhancements and features not covered here. The complete source code and the latest implementation can be found at this GitHub repository.
Conclusion
We have covered two more main components of the system: the Kafka cluster as a messaging channel with a UI to manage it, and the chat API with its basic specifications. We have also tested our implementation to ensure it works as expected. This concludes all the functional requirements for this section.
In the next part, we will dive into creating the interface for the chat system and powering it with real-time updates. Stay tuned!
References
- Spring for Apache Kafka
- Bitnami package for Apache Kafka
- Setting up a Local Kafka Environment in KRaft